The【Schedule】function can be used if users want the HMI to automatically execute specific actions regularly over long periods of time while the HMI is operating; the【Schedule】function can automatically execute the action selected by the user according to the date and time.
This chapter will explain the Schedule related screens and usage methods.
11.1 Schedule List
Click on【Schedule】in the【Project Explorer】of the FvDesigner and the【Schedule List】will appear; current【Schedules】that were already set will be displayed on the list in order according to the【Group ID】set for each schedule.

Figure 169【Schedule】List Screen
To set a new set of schedule, click on the【Add】button on the right and a【Schedule】settings dialog will appear for the user to operate.
To edit a【Schedule】that was already set, double-click on the【Schedule】entry on the list or first select the【Schedule】entry and then click on the【Edit】button on the right; at this time the settings dialog for this【Schedule】entry will appear for the user to modify.
To delete a 【Schedule】 that was already set, select the 【Schedule】entry and click on the【Delete】button on the right to delete this【Schedule】entry.
11.2 Schedule Settings
The setting screen of the【Schedule】function is as shown in the figure below, the meanings of each setting option are listed below:
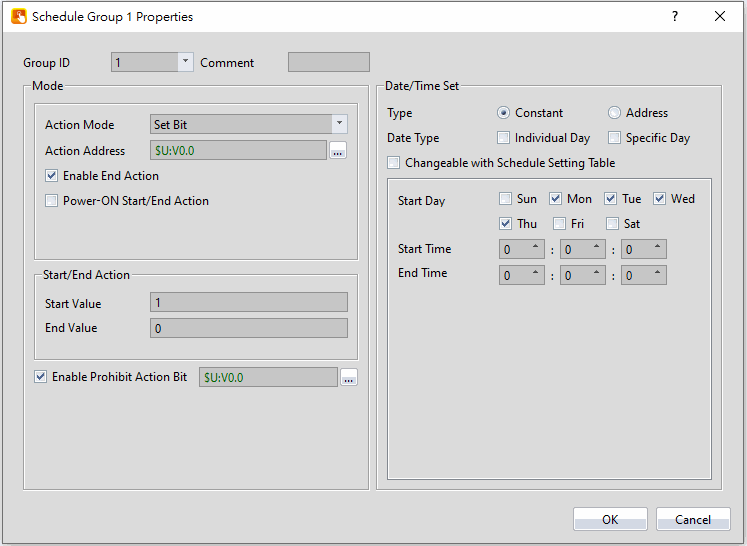
Figure 170【Schedule】Setting Screen
Table 75【Schedule】Setting Properties
|
Property |
Description |
||||||||||||||||||||||
|
【Group ID】 |
Set the Group ID of the【Schedule】. |
||||||||||||||||||||||
|
【Comment】 |
Set the comments of the【Schedule】. |
||||||||||||||||||||||
|
【Mode】 |
Set the execution action behavior of the【Schedule】. 【Action Mode】 The available actions that can be configured include: 【Set Bit】, 【Reset Bit】, 【Write Word】, and 【Run Script】. 【Action Address】 Set the address to be operated when the schedule is executed. This option is not available when the mode is set to 【Run Script】. 【Power-ON Start/End Action】 Set whether to detect the schedule configuration upon startup. This feature can only be enabled after selecting 【Enable End Action】. If the HMI startup time falls within the start and end time, the start action will be executed. 【Start/End Action】 Set the parameters to be configured when the system time reaches the 【Start Time】or【End Time】. 【Enable End Action】 Set to enable end action. The【End Value】,【End Script】and【End Time】of the【Schedule】can be set when this option is enabled; when the system time reaches the set【End Time】, the HMI will automatically execute the end action set. |
||||||||||||||||||||||
|
【Date/Time Set】 |
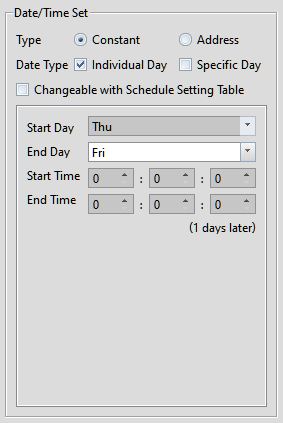
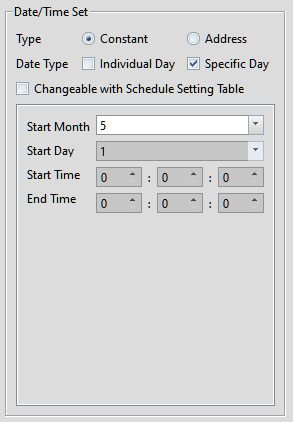
Set the date and time for the【Schedule】to execute the action. 【Type – Constant – Individual Day】
When 【Individual Day】is selected, the schedule will be configured based on the day of the week. 【Type – Constant – Specific Day】
When 【Specific Day】is selected, the schedule can be configured to execute at a specific date and time. 【Type – Address】 When 【Address】is selected, a total of 11 consecutive registers will be used for configuration.
|
11.3 Examples
Example 1: Execute start action at fixed times weekly.
|
Address |
Value |
Function |
|
【Time Setting Address】 |
1 |
Start reading the【Time Setting Address】, and changes the【Schedule】settings according to the value read. |
|
【Time Setting Address】+2 |
Bit 0: 0 |
Do not enable end action. |
|
Bit 1: 0 |
Do not enable【Individual Day】. |
|
|
Bit 2: 0 |
Do not enable【Specific Day】. |
|
|
【Time Setting Address】+3 |
Bit 0: 0 |
Set not to execute【Schedule】on Monday. |
|
Bit 1: 1 |
Set to execute【Schedule】on Tuesday. |
|
|
Bit 2: 0 |
Set not to execute【Schedule】on Wednesday. |
|
|
Bit 3: 1 |
Set to execute【Schedule】on Thursday. |
|
|
Bit 4: 1 |
Set to execute【Schedule】on Friday. |
|
|
Bit 5: 0 |
Set not to execute【Schedule】on Saturday. |
|
|
Bit 6: 0 |
Set not to execute【Schedule】on Sunday. |
|
|
【Time Setting Address】+4 |
8 |
Set the hour of the Start Time for the【Schedule】to start execution as 8 A.M. |
|
【Time Setting Address】+5 |
30 |
Set the minute of the Start Time for the【Schedule】to start execution as 30 minutes. |
|
【Time Setting Address】+6 |
0 |
Set the second of the Start Time for the【Schedule】to start execution as 0 seconds. |
Example 2: Individually setting the date and time to execute start action and end action weekly.
|
Address |
Value |
Function |
|
【Time Setting Address】 |
1 |
Start reading the【Time Setting Address】, and changes the【Schedule】settings according to the value read. |
|
【Time Setting Address】+2 |
Bit 0: 1 |
Enable End Action. |
|
Bit 1: 1 |
Enable【Individual Day】; The end day and start day can be set individually. |
|
|
Bit 2: 0 |
Do not enable【Specific Day】. |
|
|
【Time Setting Address】+3 |
1 |
Set the start day for the【Schedule】to start execution as Monday. |
|
【Time Setting Address】+4 |
8 |
Set the hour of the Start Time for the 【Schedule】to start execution as 8 A.M. |
|
【Time Setting Address】+5 |
30 |
Set the minute of the Start Time for the 【Schedule】to start execution as 30 minutes. |
|
【Time Setting Address】+6 |
0 |
Set the second of the Start Time for the 【Schedule】to start execution as 0 seconds. |
|
【Time Setting Address】+7 |
7 |
Set the end day for the 【Schedule】to end execution as Sunday. |
|
【Time Setting Address】+8 |
17 |
Set the hour of the End Time for the【Schedule】to end execution as 5 P.M. |
|
【Time Setting Address】+9 |
0 |
Set the minute of the End Time for the【Schedule】to end execution as 0 minutes. |
|
【Time Setting Address】+10 |
30 |
Set the second of the End Time for the【Schedule】to end execution as 30 seconds. |
Example 3: Execute start action on specific day and time.
|
Address |
Value |
Function |
|
【Time Setting Address】 |
1 |
Start reading the【Time Setting Address】, and changes the【Schedule】settings according to the value read. |
|
【Time Setting Address】+2 |
Bit 0: 0 |
Do not enable end action. |
|
Bit 1: 0 |
Do not enable【Individual Day】. |
|
|
Bit 2: 1 |
Enable【Specific Day】. 【Time Setting Address】+3 and【Time Setting Address】+7 will save the start month and start day settings respectively. |
|
|
【Time Setting Address】+3 |
6 |
Set the start month as June. |
|
【Time Setting Address】+4 |
0 |
Set the hour of the Start Time for the【Schedule】to start execution as 0 A.M. |
|
【Time Setting Address】+5 |
30 |
Set the minute of the Start Time for the【Schedule】to start execution as 30 minutes. |
|
【Time Setting Address】+6 |
0 |
Set the second of the Start Time for the【Schedule】to start execution as 0 seconds. |
|
【Time Setting Address】+7 |
30 |
Set the start day as the 30th. |
Tip: press ← → to switch chapters, Ctrl+K to search