It can be used to connect to the database server and upload data to the database or download data from the database to the HMI. The database function can be added and activated in the function【Function】of【Project Explorer】. (※Note: This item can only be seen when the model is PC.)
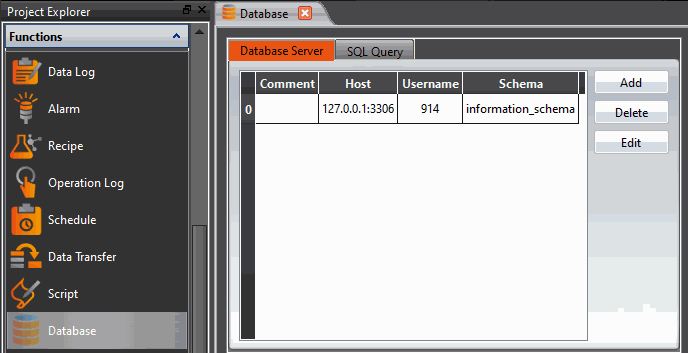
Figure 187 Database
15.1 【Database Server】
15.1.1 【General】
After clicking Add or Edit, the【Database Server Properties】window will pop up. The following describes each setting:
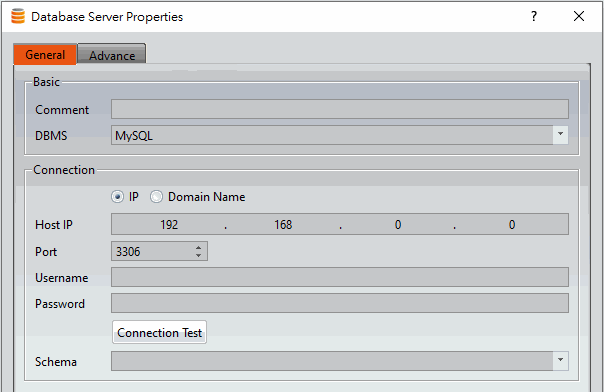
Figure 188【Database Server Properties】【General】setting page
Table 95【Database Server Properties】【General】properties setting page
|
Property |
Description |
|
【Basic】 |
【Comment】 Comment for this connection 【DBMS】 Database server system, currently only supports MySQL and Microsoft SQL Server. |
|
【Connection】 |
【IP】 Set the address of the connected server, then you can enter【Host IP】below. 【Domain Name】 Set the address of the connected server, then you can enter the【Host Name】below 【Port】 Set the communication port connected to the database server, the default is 3306 【Username】 Set the user name to connect to the database server 【Password】 Set the password to connect to the database server 【Connection Test】 Test the above information can successfully connect to the server or not, if test success, then can select the【Schema】. 【Schema】 if test success, then can select the database. |
15.1.2 【Advanced】
The connection status and parameters of the database can be viewed or controlled by setting the address.
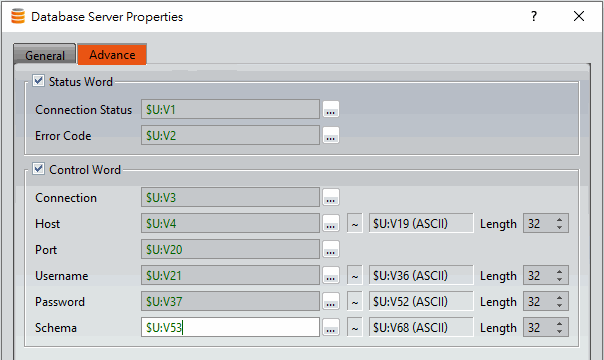
Figure 189【Database Server Properties】【Advanced】setting page
Table 96【Database Server Properties】【Advanced】properties setting page
|
Property |
Description |
|||||||||||||||||||||
|
【Status Word】 |
【Connection Status】 Display the connection status.
【Error Code】 Database server system, currently only supports MySQL
|
|||||||||||||||||||||
|
【Control Word】 |
【Connection】 Control the connection status
【Host】 Set the connected host, for example: If the connection setting selects【IP】, enter: 192.168.0.100 If the connection setting selects【Domain Name】, enter: DESKTOP-NLURQM5 【Port】 Set the port to connect to the database server 【Username】 Set the username to connect to the database server 【Password】 Set the password to connect to the database server 【Schema】 Set the connected database name |
15.2 【SQL Query】
Provides data exchange function for HMI and database, and can set the format of the data field for SQL query.
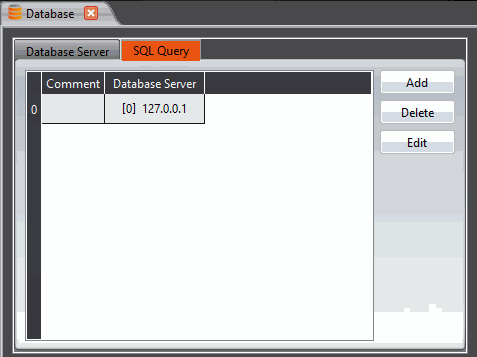
Figure 190【SQL Query】page
15.2.1 【General】
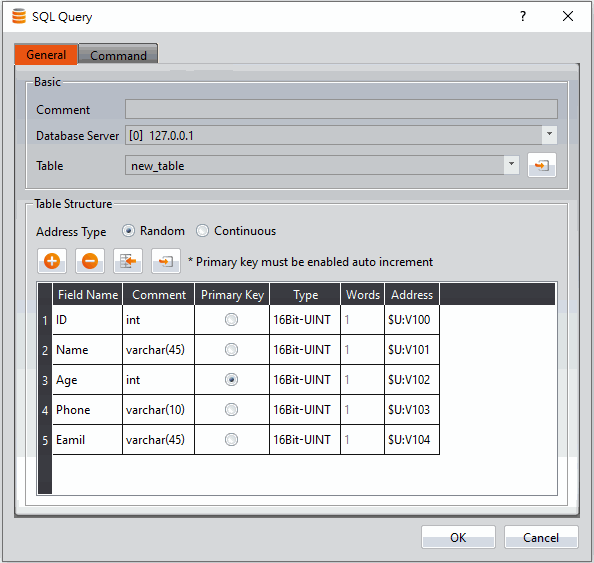
Figure 191【SQL Query】【General】setting page
Table 97【SQL Query】【General】properties setting page
|
Property |
Description |
|
【Basic】 |
【Comment】 Comment of this SQL Query 【Database Server】 Choose a database as the data source 【Table】 Import the form from the database |
|
【Table Structure】 |
【Address Type】 Here you can select the address where the data will be placed after reading the column below
【Add】 Add a new column 【Delete】 Delete the selected column 【Insert】 Insert a column below the selected column 【Import Files From Database】 Import field data from the selected database |
|
【Table Column】 |
【Field Name】 The field name must same as the database table field setting 【Comment】 Comment for this column 【Primary Key】 Set the primary key 【Type】 Set the data type 【Words】 Set the needed words 【Address】 Set the address where the data is placed after reading |

15.2.2 【Command】
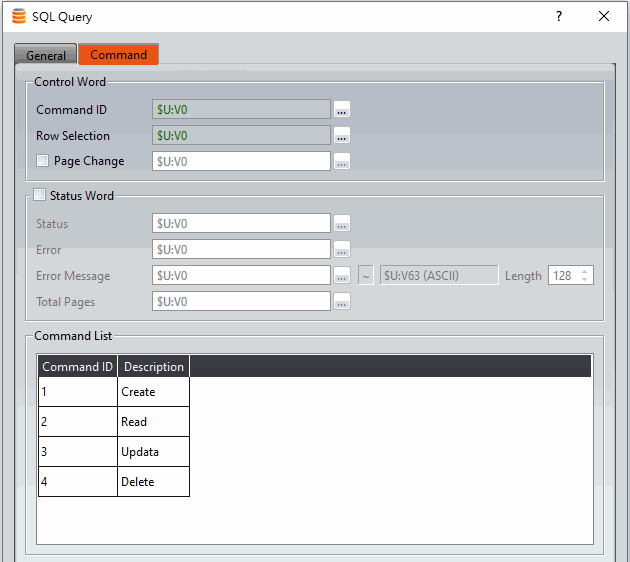
Figure 192【SQL Query】【Command】setting page
Table 98【SQL Query】【Command】properties setting page
|
Property |
Description |
||||||||||||||||||||||||||||||||||||||||||||||||
|
【Control Word】 |
Use the control address to control the command of【SQL Query】. 【Command ID】 Choose the command from【Command List】to command
【Row Selection】 Select which row of data to read to the target address 【Page Change】 Choose which page to read. One page for every 1000 data, if the database has more than 1000 data, you need to enable this function |
||||||||||||||||||||||||||||||||||||||||||||||||
|
【Status Word】 |
Use the status word group to monitor the processing status of【SQL Query】. 【Status】
【Error】
【Error Message】 Error message returned by the database server 【Total Pages】 Display the total number of pages |
15.3 Database Related Object
【SQL Query Table】can be selected in the【Toolbox】, use【SQL Query Table】to display the execution results of【SQL Query】commands.
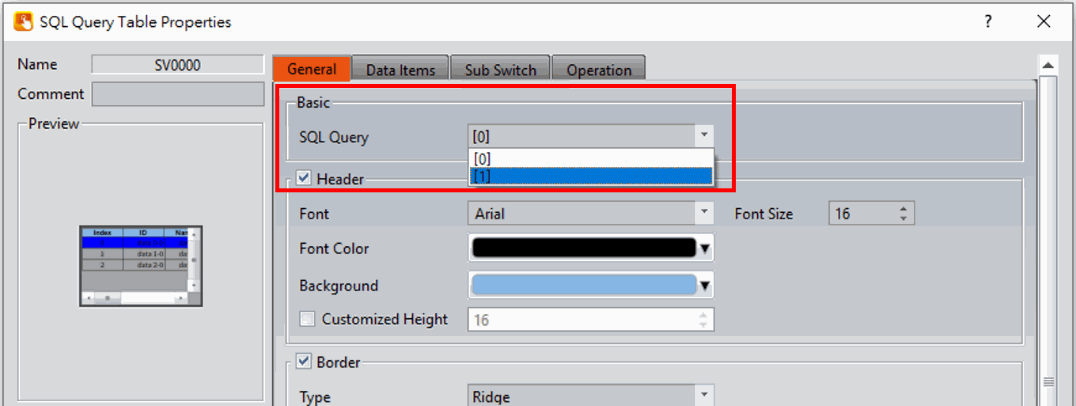
Figure 193【SQL Query Table】setting
Tip: press ← → to switch chapters, Ctrl+K to search