The【Data Transfer】function can be used if the user wants the HMI to execute data transfer actions under specific conditions while the HMI is operating; the【Data Transfer】function will execute a data transfer according to the conditions set by the user. There a two modes of data transfer:【Data to Data】and【CSV File to Data】.
This chapter will explain【Data Transfer】related pages and settings.
12.1 Data Transfer List (Data to Data Mode)
Click on【Data Transfer】in【Project Explorer】of the FvDesigner and the【Data Transfer List】will appear;【Data Transfer】that are currently set will be displayed on the list in the order of the【Group ID】set for them.

Figure 171【Data Transfer】List Screen
To set a new Data Transfer, click on the【Add】button on the right, and the【Data Transfer】setting dialog will appear for the user to operate.
To edit a【Data Transfer】that was already set, double-click on the【Data Transfer】entry or first select the【Data Transfer】entry and then click on the【Edit】button on the right. The settings dialog of this【Data Transfer】entry will appear for the user to modify.
To delete an existing【Data Transfer】, select the【Data Transfer】entry and then click on the【Delete】button on the right to delete this【Data Transfer】entry.
If you need to set a new data transfer, similar to the original, you can select the original【Data Transfer】and click the【Copy】button on the right side of the window.
12.2 Data Transfer Settings (Data to Data Mode)
The settings screen of the【Data Transfer】is as shown in the figure below and the meanings of each setting are listed below:
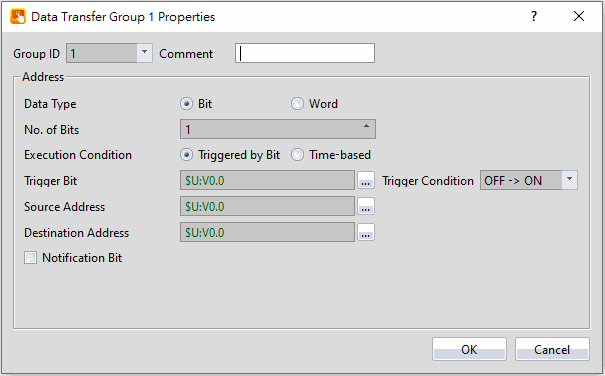
Figure 172 Setting Dialog of【Data Transfer】
Table 76 Setting Properties of【Data Transfer】
|
Property |
Description |
|
【Group ID】 |
Set the group ID of the【Data Transfer】. |
|
【Comment】 |
Set the comment of the【Data Transfer】. |
|
【Address】 |
Set the behavior of the【Data Transfer】. 【Data Type】 Set the data type of the【Data Transfer】. 【No. of Bits】 Set the number of bits per transfer; it can be set between1~65535 bits. The more number of bits per transfer, the longer it will take for the transfer to be completed. Therefore, make sure that there is sufficient time for the data transfer to be completed every time it is executed. 【No. of Words】 Set the number of words per transfer; it can be set between 1~65535 words. The more number of words per transfer, the longer it will take for the transfer to be completed. Therefore, make sure there is sufficient time for data transfer to be completed every time it is executed. 【Execution Condition】 Set the condition to execute【Data Transfer】. The【Trigger Bit】and【Trigger Condition】can be set below if the execution condition is set as【Triggered by Bit】; The data transfer will be executed when the status changes satisfy the conditions set. The【Time Interval】can be set below if the execution condition is set as【Time-based】; The HMI will execute the data transfer according to the set time interval. 【Source Address】 Set the source address for executing the【Data Transfer】; The HMI will read the No. of Bits or No. of Words set from the source address and write them into the【Destination Address】when the data transfer is executed. 【Destination Address】 Set the destination address for executing the【Data Transfer】; The HMI will read the No. of Bits or No. of Words set from the source address and write them into the【Destination Address】when the data transfer is executed. 【Notification Bit】 Specify a bit to set or reset upon the completion of the data transfer. This bit can be used to trigger other functions to run on the transferred data. |
12.3 Data Transfer List (CSV to Data Mode)
Click on 【Data Transfer】in【Project Explorer】 and the【Data Transfer List】 will appear. Switch to the 【CSV File to Data】 tab. 【Data Transfer】that are currently set will be displayed on the list in the order of the【Group ID】set for them.

Figure 173 CSV Data Transfer List Screen
To set a new Data Transfer, click on the【Add】button on the right, and the【Data Transfer】setting dialog will appear for the user to operate.
To edit a【Data Transfer】that was already set, double-click on the【Data Transfer】entry or first select the【Data Transfer】entry and then click on the【Edit】button on the right. The settings dialog of this【Data Transfer】entry will appear for the user to modify.
To delete an existing 【Data Transfer】, select the【Data Transfer】entry and then click on the【Delete】button on the right to delete this【Data Transfer】entry.
If you need to create a new【Data Transfer】and set it similar to the original, select the original【Data Transfer】and click the【Copy】button on the right side of the window.
12.4 Data Transfer Settings (CSV to Data Mode)
The【CSV to Data Transfer Mode】settings are below. The meanings of each setting are listed below.
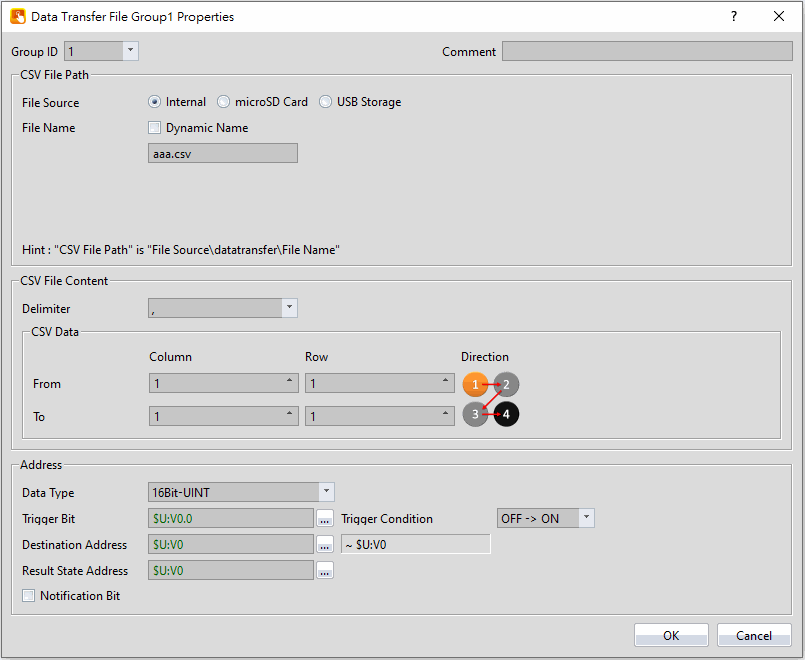
Figure 174【CSV to Data Transfer Mode】Settings Screen
Table 77【CSV to Data Transfer Mode】Setting Properties
|
Property |
Description |
||||||||||
|
【Group ID】 |
Set the group ID of the【Data Transfer】. |
||||||||||
|
【Comment】 |
Set the comment of the【Data Transfer】. |
||||||||||
|
【CSV File Path】 |
Set the source of the【Data Transfer】. 【File Source】 Set the location of the CSV file source:【internal】,【microSD Card】, or【USB Storage】. 【File Name】 Enter the file name of the CSV file. If【Dynamic Name】is selected, the name of the file can be saved to a specified location. This allows the program to change CSV files by saving a new name into the specified location. The register address and length can be set. |
||||||||||
|
【CSV File Content】 |
【Delimiter】 Set the delimiter between entries. 【CSV Data】 Set the start and end positions in the CSV file. Enter a【From】column and row and an【To】column row. The direction the data is read can be changed by clicking the【Direction】icon. |
||||||||||
|
【Address】 |
【Data Type】 Select the data type of the【CSV to Data File Transfer】. 【Trigger Bit】 Set the address of the bit that triggers the【CSV to Data File Transfer】. 【Trigger Condition】 Select the type of bit change that provides the trigger: OFF to ON, ON to OFF, or both directions. 【Destination Address】 Set the target address of the【CSV to Data File Transfer】. 【Result State Address】 The【CSV to Data File Transfer】result status is stored in this location.
【Notification Bit】 Notify a bit upon the completion of the【Data Transfer】. Level: Set the bit as 0 or 1. Pulse: Set the bit to 1 and automatically restore to 0 after continuing the time set by【Width】. |
Tip: press ← → to switch chapters, Ctrl+K to search