Script provides a simple language to allow users to write their own programs. Available statements include logical judgments, numerical computations, loop executions etc. Users can flexibly use the statements provided by the system to complete a complex task that cannot easily be accomplished with general objects. Existing scripts previously created could also be reused in different projects to save development time.
13.1 Using Scripts
In this section, we will introduce how to create and edit the scripts and its related attributes.
13.1.1 Script List
Click on【Script】in【Functions】of the【Project Explorer】, which is located to the left side of the FvDesigner, to enter the【Script List】.
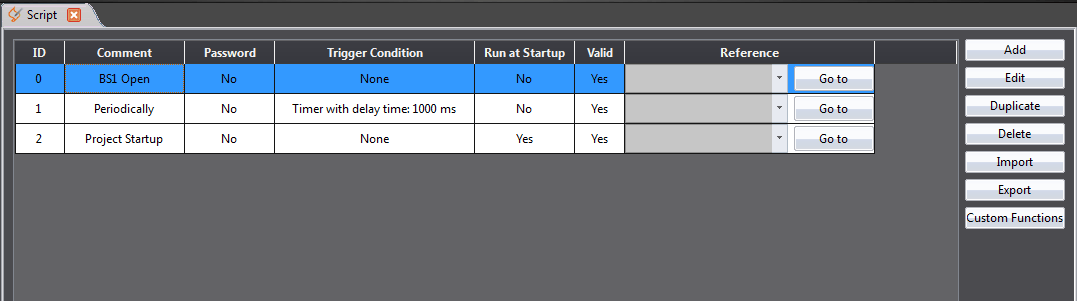
Figure 175【Script List】
The following are the description of each column in the script list:
Table 78【Script List】- Descriptions
|
Field |
Description |
|
【ID】 |
Every script must have a unique ID; the range of the ID is from 0 to 65534. |
|
【Comment】 |
Descriptions that help understand the contents or usage of a script. |
|
【Password】 |
Whether this script is protected by password or not. |
|
【Trigger Condition】 |
Set the conditions that the script will be triggered in the background. |
|
【Run at Startup】 |
Set to execute the script when the project starts. |
|
【Valid】 |
Valid means that no errors were found when the script was compiled. |
|
【Reference】 |
When a script is used in an object or function, pressing【Go to】can jump to the location where this script is used immediately. |
The following are the descriptions of the buttons on the right side of the script list:
Table 79 Script List–Descriptions of the buttons on the right side
|
Button |
Description |
|
【Add】 |
Opens the【Script Editor】and a new empty script to edit. |
|
【Edit】 |
Opens the【Script Editor】and allows the script currently selected in the Script List to be edited; double-clicking on the script of a Script List has the same effect as selecting the script first and then pressing【Edit】. |
|
【Duplicate】 |
Makes a duplicate of the currently selected script. |
|
【Delete】 |
Deletes the currently selected script. |
|
【Import】 |
Imports scripts. |
|
【Export】 |
Exports the currently selected script. |
|
【Custom Functions】 |
Opens the【Script Editor】and displays the【Custom Functions】for editing. |
13.1.2 Script Editor
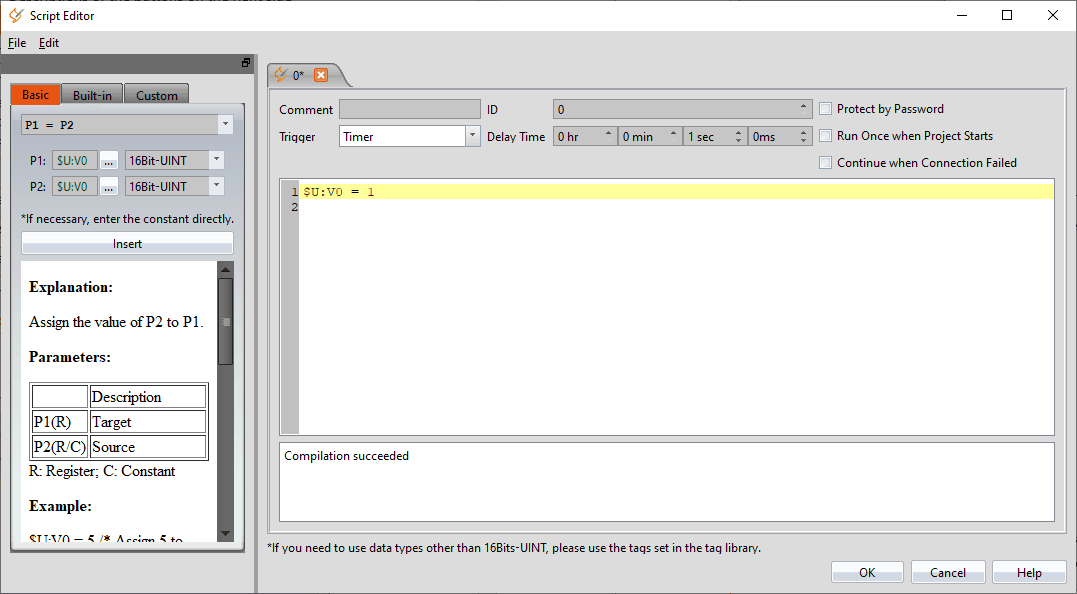
Figure 176 Script Editor Screen
The【Function】block to the left has three tab pages available for selection; Their descriptions are as follows:
Table 80 Script Editor–Function Block Description
|
Tab Page |
Description |
|
【Basic Functions】 |
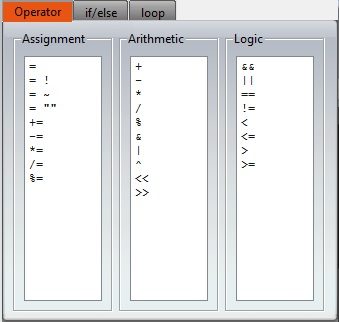
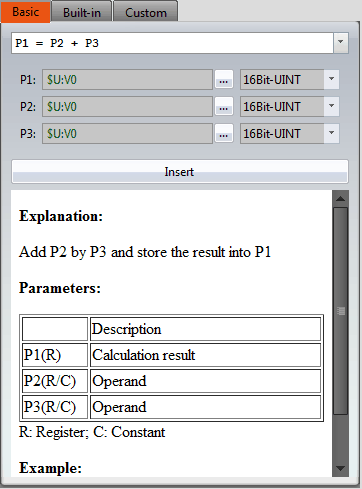
Provides a convenient interface for inputting various operators, logical statements and iterative statements; the following menu will appear when users click on the pull-down menu button:
Users can select the item to use and the contents of the【Basic Function】tab page will be updated according to the selected item.
Users can quickly input or select the register and data type to use as parameters. Once selected, press【Insert】to add the entire statement into the location where the cursor is located in the editor to the right. The usage description and examples of this statement can be checked below the【Insert】button. |
|
【Built-in Function】 |
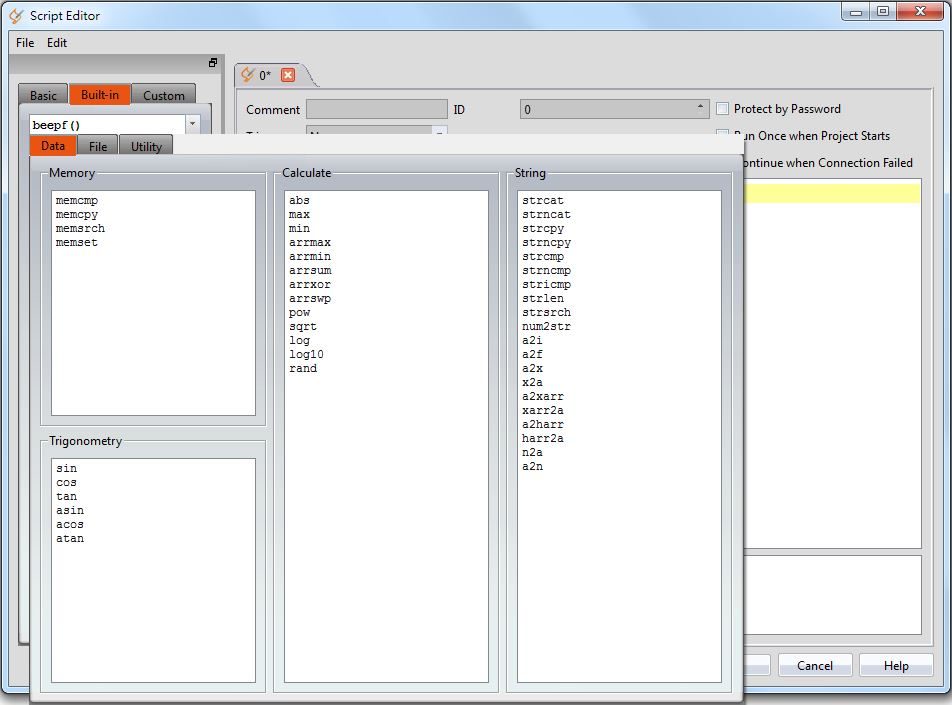
Provides a convenient interface to input the system’s built-in functions. Its usage is similar to that of【Basic Functions】, the following menu will appear after the user clicks on the pull-down menu button:
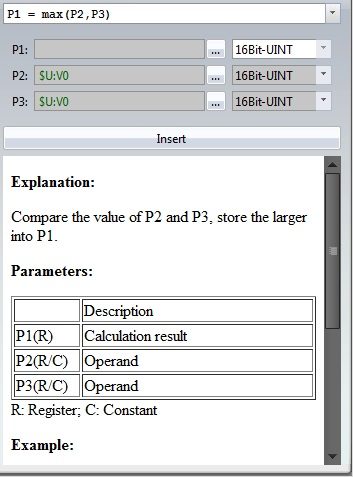
Users can select the item to use from the menu and then the contents of the【Built-in Function】tab page will be updated according to the selected item.
Users can quickly input or select the registers and its data type to use as parameters. Once selected, press【Insert】to add the entire statement into the location where the cursor is located in the editor to the right. The usage description and examples of this built-in function can be checked below the【Insert】button. |
|
【Custom Functions】 |
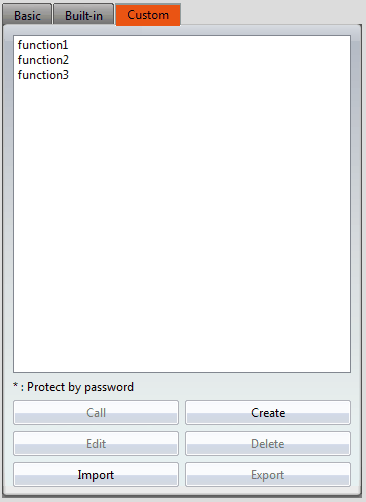
Provides users with list of custom functions.
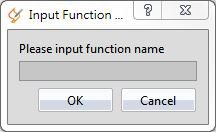
【Call】 Inserts and calls the statement of the currently selected custom function at the location where the cursor is located in the editing section to the right. 【Create】 Creates a new custom functions; the following window will appear once this button is pressed, asking for the name of the custom function.
A new editor tab page will appear in the【Editor】section to the right for editing the contents of the custom function after entering a legal function name and pressing OK. 【Edit】 Opens a new editor tab page for editing the currently selected custom function. It has the same effect as double-clicking on the function name on the list. 【Delete】 Deletes the currently selected custom function. 【Import】 Import custom function. If it is protected by password, you have to input password before import. 【Export】 Export the selected function. |
Descriptions of the top section of the【Editor】to the right are as follows:
Table 81 Script Editor–Script Properties Descriptions
|
Field |
Description |
|
【Comment】 |
Used to input a comment for the script. |
|
【ID】 |
Used to set the ID of the script. |
|
【Protect by Password】 |
To decide whether this script is protected by password or not. |
|
【Trigger】 |
Selects when to trigger this script: 【None】 Do not select any triggering condition (but the script may still be executed when the project starts or triggered by other objects or functions). 【Timer】 Script will be triggered continuously but there will be a fixed delay time between the end of the first execution and the start of the next execution. 【When Bit Becomes 1】 Executes the script once when the【Bit】changed from 0 to 1. 【While Bit is 1】 Executes the script continuously once the【Bit】is 1. 【When Bit Becomes 0】 Executes the script once when the【Bit】changed from 1 to 0. 【While Bit is 0】 Executes the script continuously once the【Bit】is 0. 【When Bit is Changed】 Executes the script once when the【Bit】changed from 0 to 1 or 1 to 0. |
|
【Run Once when Project Starts】 |
Set to execute the script once when the project first starts. |
|
【Name】 |
The other fields above will disappear when editing a custom function except【Protect by password】, only the name of the custom function can be set. |
|
【Continue when Connection Failed】 |
When there are using external registers in the script, it will stop executing when the connection failed. This function will ignore the connection failed part and execute other parts of the script. |
The mid-bottom section of the【Editor】is divided into the statement editing section and compilation message display section; Every time a change is made in the statement editing section it will make the script compile again immediately, and the compilation results will be displayed below. The user can fix statement errors according to the message content and line number displayed until it displays【Compilation succeeded】.
13.2 When to execute scripts
Scripts can be set to be triggered and executed at the following different times:
- Global
- Project startup: Execute when the project starts.
- Timer: After the script has finished executing, wait a fixed period of time and then execute again.
- Trigger by Bit: Execute the script when the status or changes of a specific bit meet the conditions (Please refer to Table 81 Script Editor–Script Properties Descriptions on the explanations for【Trigger】).
- Screen
- Screen open: Execute the script when a specific screen is opened.
- Screen close: Execute the script when a specific screen is closed.
- Screen cycle: Execute the script periodically when a specific screen is displayed in the foreground.
- Object
- Bit Switch: Execute scripts when the actions meets the conditions.
- Function Switch: Execute scripts when a switch is pressed.
- Schedule
- Execute scripts at the beginning or ending of a scheduled time.
13.3 Script Syntax
13.3.1 Basic
※Notice : If you need to use data types other than 16Bits-UINT, you must use the taqs set in the 【Tag Library】, and it could be recognize when you use it in Script, unused tags will use 16Bit-UINT operations.
13.3.1.1 Assignment
Assignment operators can be used to save constants into registers or save the contents of the source register into the target register.
Table 82 Script–Assignment
|
Type |
Description |
|
Assignment = |
Saves constants into registers, for example $U:V1 = 1234 // Saves integer 1234 into $U:V1 $T:FLOAT = 345.67 // Saves the float integer345.67 into $T:FLOAT(1) $T:STRING = "FATEK" // Saves the ASCII string into $T:STRING(2) Saves the contents of the source register into the target register, for example: $U:V0 = $U:V3 // Saves the contents of register$U:V3 into$U:V0 When the data type of the target register is different from the source register, the value read from the source register will first be converted and then saved into the target register. Rounding of decimal places and overflow may occur according to the different data types, for example: $U:V0 = 0xFFFFFFF // Only saves 0xFFFF into $U:V0(16Bit-UINT) $T:INT32 = 345.67 // Only saves 345 into $T:INT32(32Bit-INT) $T:BCD16 = 1234 /* Converted 1234 into BCD format and then save, therefore the actual value saved into $T:BCD16 is 0x1234 */ |
|
Negative Sign = ! |
Changes operand to positive or negative. If the operand is a positive value, it will return a negative value; if the operand is a negative value, it will return a positive value. For example: $T:INT16 = 123 $T:INT16 = -$T:INT16 // The value of $T:INT16 changed to -123 |
|
Complement = ~ |
Returns 1’s complement of the operand, for example: $U:V0 = 0x5a5a $U:V0 = ~$U:V0 // The value of $U:V0 changed to 0xa5a5 |
|
Assignment = “ “ |
After establishing an ASCII label in the label library, you can write the ASCII string into the depositor through the script. For example: $T:Ascii = "ABCD" Put a Text Input/Display on screen, choose Ascii String for Text Type in setting, choose $T:Ascii for Monitor Address in setting, then the content will present ABCD. |
|
Assignment = L“ “ |
After establishing an Unicode label in the label library, you can write the Unicode string into the depositor through the script. For example: $T:Unicode = "ABCD" Put a Text Input/Display on screen, choose Unicode for Text Type in setting, choose $T: Unicode for Monitor Address in setting, then the content will present ABCD. |
Note that every character in an ASCII string will take up a byte, and a 0 will be added at the end as the end of a string (which is called a null-terminating character); therefore when “FATEK” is written, the content of the 3 words starting from $T:STRING will be 0x4146(‘F’,’A’), 0x4554(‘T’,’E’), and 0x004B(‘K’, 0) respectively.
Table 83 Script–Arithmetic
|
Type |
Example |
|
Addition + |
$U:V0 = 3 + 1 // Result is 4 |
|
Subtraction – |
$U:V0 = 6 – 2 // Result is 4 |
|
Multiplication * |
$U:V0 = 2 * 2 // Result is 4 |
|
Division / |
$U:V0 = 8 / 2 // Result is 4 |
|
Modulus % |
$U:V0 = 9 % 5 // Result is 4 |
|
Bitwise-and & |
$U:V0 = 12 & 4 // Result is 4 |
|
Bitwise-or | |
$U:V0 = 0 | 4 // Result is 4 |
|
Bitwise-xor ^ |
$U:V0 = 65531 ^ 65535 // Result is 4 |
|
Left shift << |
$U:V0 = 1 << 2 // Result is 4 |
|
Right shift >> |
$U:V0 = 8 >> 1 // Result is 4 |
Table 84 Script–Logical
|
Type |
Example |
|
Logical and && |
$U:V0.0 = 1 && 1 // Result is 1 |
|
Logical or || |
$U:V0.0 = 0 || 1 // Result is 1 |
|
Equal == |
$U:V0.0 = 2 == 2 // Result is 1 |
|
Not equal != |
$U:V0.0 = 1 != 2 // Result is 1 |
|
Less than < |
$U:V0.0 = 1 < 2 // Result is 1 |
|
Less than or equal <= |
$U:V0.0 = 2 <= 2 // Result is 1 |
|
Greater than > |
$U:V0.0 = 2 > 1 // Result is 1 |
|
Greater than or equal >= |
$U:V0.0 = 2 >= 2 // Result is 1 |
When there are multiple operators for a statement, their precedence are as shown in the table below:
Table 85 Script–Operator precedence
|
0(Highest) |
( ) |
Parenthesis |
|
1 |
! – ~ |
Reverse logic, negative sign, 1’s complement |
|
2 |
* / % |
Multiplication, division, modulus |
|
3 |
+ − |
Addition, subtraction |
|
4 |
<< >> |
Left shift, right shift |
|
5 |
< <= |
Less than, less than or equal |
|
> >= |
Greater than, greater than or equal |
|
|
6 |
== != |
Equal, not equal |
|
7 |
& |
Bitwise-and |
|
8 |
^ |
Bitwise-xor |
|
9 |
| |
Bitwise-or |
|
10 |
&& |
Logical-and |
|
11 |
|| |
Logical-or |
|
12(Lowest) |
= |
Assignment operator |
13.3.1.2 Logical Judgement
Logical Statement can execute different statement blocks according to different conditions, allowing scripts to flexibly execute corresponding operations for different situations.
Table 86 Logical Statement Syntaxes
|
Type |
Description |
|
if <condition> … End if |
Executes the statement in the if block when if <condition> is true, for example: $U:V0 = 1 if $U:V0.0 $U:V3 = 2 // Will be executed endif if $U:V0 > 2 $U:V3 = 3 // Will not be executed Endif |
|
if <condition> … else … End if |
Execute the statement in the if block when the if <condition> is true, or else execute the statement in the else block if the if <condition> is false; for example: $U:V0 = 1 if $U:V0 > 2 $U:V3 = 2 // Will not be executed else $U:V3 = 3 // Will be executed Endif |
|
if <condition> … Else if <condition1> … Else if <condition2> … End if |
When the if <condition> is true, execute the statement in the if block. Otherwise, determine the first else if <condition>; if the first else if <condition> is true, execute the statement in the else if block. If the first else if <condition> is still false, try the next else if <condition>, and so on. 0 or multiple else if blocks can exist, for example: $U:V0 = 1 if $U:V0 == 4 $U:V3 = 4 // Will not be executed Else if $U:V0 == 3 $U:V3 = 3 // Will not be executed Else if $U:V0 == 2 $U:V3 = 2 // Will not be executed Else if $U:V0 == 1 $U:V3 = 1 // Will be executed End if |
|
if <condition> … elseif <condition> … elseif <condition> … else … Endif |
When the if <condition> is true, execute the statement in the if block. Otherwise, determine the first else if <condition>; if the first else if <condition> is true, execute the statement in its else if block. If the first else if <condition> is still false, try the next else if <condition>, and so on. 0 or multiple else if blocks can exist. If the if <condition> and all of the else if <condition> are false, the statement in the else block will be executed. For example: $U:V0 = 1 if $U:V0 == 4 $U:V3 = 4 // Will not be executed Else if $U:V0 == 3 $U:V3 = 3 // Will not be executed Else if $U:V0 == 2 $U:V3 = 2 // Will not be executed else $U:V3 = 3 // Will be executed End if |
13.3.1.3 Iterative
Iterative Statements can execute statement blocks repeatedly according to different conditions, allowing some repetitive tasks to be completed using fewer statements.
Table 87 Iterative Statement Syntax
|
Type |
Description |
|
loop <count> … Endloop |
Repeatedly execute the statements in the loop block <count> times , <count> can be a register or a positive integer constant. For example: /*Calculate the sum of 1 to 10 and save it into $U:V0 */ $U:V0 = 0 // sum $U:V1 = 0 loop 10 $U:V1 = $U:V1 + 1 $U:V0 = $U:V0 + $U:V1 Endloop |
|
for <reg> = <start> to <end> step <n> … Endfor |
If <start> is less than <end>, <reg> will be set to <start>, and the for block will be executed once. Then the value of <reg> will be added by <n> and execute for block again, until <reg> plus <n> is greater than <end>. If <start> is greater than <end>, <reg> will be subtracted by <n> instead, for block will be executed every time until <reg> minus <n> is less than <end>. Note:
For example: /* Calculate the sum of $U:V0 to $U:V10 and save it into$U:V11 */ $U:V11 = 0 for $S:I0 = 0 to 10 $U:V11 = $U:V11 + $U:V0[$I0] Endfor |
|
while<condition> … Endwhile |
Execute the statement in the while block when the while <condition> is true, and then check whether the while <condition> is true or false again to determine whether to execute again or exit the loop. If the while <condition> is false, then the program exits the loop. The while <condition> can be a register or an expression combined by multiple registers and operators. For example: /* Calculate the sum of 1 to 10 and save it into$U:V0 */ $U:V0 = 0 // sum $U:V1 = 0 while $U:V1 <= 10 $U:V1 = $U:V1 + 1 $U:V0 = $U:V0 + $U:V1 Endwhile |
|
Break |
break statement can be used in loop, for, or while loops. When a break statement is executed, the program will exit the current loop and continue execution. break statement is usually used with an if statement so that it will exit the loop when specific conditions are met; for example: /* Search for the first non-zero word between $U:V0 to $U:V10; if the value of $U:V11 is 3 when the loop ends, then $U:V3 is the first non-zero word; if no non-zero word can be found, the value of $U:V11 will remain as 11 when the loop is finally existed*/ $U:V11 = 11 for $S:I0 = 0 to 10 if $U:V0[$S:I0] != 0 $U:V11 = $S:I0 break end if endfor |
|
Continue |
continue statement can be used in loop, for, and while loops. When the continue statement is executed, the statements in the loops afterwards will be omitted and it will jump directly to the next iteration of the loop for execution, for example: $U:V0 = 0 $U:V1 = 0 loop 10 $U:V0 = $U:V0 + 1 /* Will be executed 10 times */ if $U:V1 >= 5 continue end if $U:V1 = $U:V1 + 1 /* Will only be executed the first 5 times*/ Endloop |
13.3.2 Built-in Functions
The script statement collection provides many built-in functions; users can use these functions to execute numerical computations, string processing, file accessing and other more complicated operations.
Table 88 Script Built–in Functions
|
Type |
Function |
Description |
|
Memory Operation |
memcmp |
Memory block comparison |
|
memcpy |
Copy memory block |
|
|
memsrch |
Search memory block |
|
|
memset |
Memory block value |
|
|
reverse |
Reverse Word Order |
|
|
Trigonometry |
sin |
Sine |
|
cos |
Cosine |
|
|
tan |
Tangent |
|
|
asin |
Arcsine |
|
|
acos |
Arccosine |
|
|
atan |
Arctangent |
|
|
Numeric Computation |
abs |
Absolute value |
|
max |
Maximum value |
|
|
min |
Minimum value |
|
|
arrmax |
Maximum value for array |
|
|
arrmin |
Minimum value for array |
|
|
arrsum |
Sum or array |
|
|
arrxor |
And-Or array |
|
|
arrswp |
Swap high and low byte of array |
|
|
pow |
Power |
|
|
sqrt |
Square root |
|
|
log |
Natural logarithm |
|
|
log10 |
Common logarithm |
|
|
Rand |
Generate random number |
|
|
String Operations |
strcat |
Concatenate string |
|
Strncat |
Concatenate string (restrict length) |
|
|
strcpy |
Copy string |
|
|
strncpy |
Copy string (restrict length) |
|
|
strcmp |
String comparison |
|
|
strncmp |
String comparison (restrict length) |
|
|
stricmp |
String comparison(case-insensitive) |
|
|
strlen |
String length |
|
|
strsrch |
Search string |
|
|
substr |
String extraction |
|
|
num2str |
Numeric value to string |
|
|
a2i |
String to integer |
|
|
a2f |
String to floating point number |
|
|
a2x |
String (hexadecimal) to integer |
|
|
x2a |
Integer (hexadecimal) to string (ASCII) |
|
|
a2xarr |
Convert string to consecutive integers separated by whitespace |
|
|
xarr2a |
Convert words with the hexadecimal representation to an ASCII string. |
|
|
a2harr |
Convert the unicode of the string into consecutive integers |
|
|
harr2a |
Convert the array of the hexadecimal numbers to an ASCII string. |
|
|
n2a |
Convert multiple consecutive integers to a string |
|
|
a2n |
Convert continuous multiple strings to integers |
|
|
unicode2ascii |
Convert the UNICODE string into an ASCII string. |
|
|
unicode2gb |
Convert the UNICODE string into a GB18030 string. |
|
|
unicode2big |
Convert the UNICODE string into a BIG5 string. |
|
|
ascii2unicode |
Convert the ASCII string into an UNICODE string. |
|
|
gb2unicode |
Convert the GB18030 string into an UNICODE string. |
|
|
big2unicode |
Convert the BIG5 string into an UNICODE string. |
|
|
File Operations |
file_open |
Open file (Internal Storage) |
|
file_read |
Read file (Internal Storage) |
|
|
file_write |
Write file (Internal Storage) |
|
|
file_close |
Close file (Internal Storage) |
|
|
file_delete |
Delete file (Internal Storage) |
|
|
file_ rename |
Rename file (Internal Storage) |
|
|
file_ copy |
Copy file (Internal Storage) |
|
|
mkdir |
Create Directory (Internal Storage) |
|
|
screen_capture |
Saves current screen into internal storage |
|
|
SD File Operations |
sd_file_open |
Open file (SD Card) |
|
sd_file_read |
Read file (SD Card) |
|
|
sd_file_write |
Write file (SD Card) |
|
|
sd_file_close |
Close file (SD Card) |
|
|
sd_file_delete |
Delete file (SD Card) |
|
|
sd_file_ rename |
Rename file (SD Card) |
|
|
sd_ file_ copy |
Copy file (SD Card) |
|
|
sd_mkdir |
Create Directory (SD Card) |
|
|
sd_screen_capture |
Saves current screen into SD storage |
|
|
USB File Operations |
usb_file_open |
Open file (USB Storage) |
|
usb_file_read |
Read file (USB Storage) |
|
|
usb_file_write |
Write file (USB Storage) |
|
|
usb_file_close |
Close file (USB Storage) |
|
|
usb_file_delete |
Delete file (USB Storage) |
|
|
usb _file_ rename |
Rename file (USB Storage) |
|
|
usb _ file_ copy |
Copy file (USB Storage) |
|
|
usb_mkdir |
Create Directory (USB Storage) |
|
|
usb_screen_capture |
Saves current screen into USB storage |
|
|
Timer |
Sleep |
Pause the execution of script in seconds |
|
Msleep |
Pause the execution of script in milliseconds |
|
|
Date/Time Operation |
get_datetime |
Read date/time |
|
set_datetime |
Set date/time |
|
|
|
print_screen |
Prints current screen |
|
Communication |
io write and read |
Write continuous data to the specified device and read continuous data to the specified address |
|
io write |
Writing the lower bytes of consecutive words to device. |
|
|
io read1 |
Read the needed data length from the target device and display the result. |
|
|
io read2 |
Read the data from the target device and display the result. |
|
|
io read3 |
Read the data from device until the end code is received. |
|
|
init crc |
Initialize the CRC checksum. |
|
|
checksum |
Calculate the sum of the codes for consecutive addresses |
|
|
get_link_param_eth |
Read the connection parameters of the Ethernet device to the specified address. |
|
|
set_link_param_eth |
Set the connection parameters of the Ethernet device to the specified address. |
|
|
Sound |
play_sound |
Play sound |
|
play_sound 2 |
Play a sound file from an external storage device (microSD card or USB drive). |
|
|
stop_sound |
Stop playing sound |
|
|
Beep |
Trigger the buzzer once |
|
|
Beepf |
Force trigger the buzzer once. |
|
|
Draw |
change_bs |
Change the foreground screen (base screen) |
|
popup_windows |
Pop-up the window screen |
|
|
close_all_windows |
Close all the window screens |
|
|
System |
get_id |
Read the specified ID and store it to the start address. |
|
reboot_hmi |
Reboot HMI |
Note: Built-in functions may be added, removed or modified during software updates; please refer to the built-in functions and related documentation listed in FvDesigner if the functions listed in FvDesigner are different from the ones listed in this document.
13.3.3 Custom Functions
Users can combine the frequently used statements into custom functions. Call the created custom function if these statements need to be used in different scripts. The use of custom functions allows the scripts to be simpler and saves the time to repeatedly write the same statement combinations.
Table 89 Script–Custom function-related statements
|
Related Statement |
Description |
|
call <function> |
Calls the custom function named <function>, and will start executing from the first statement in the custom function; it will exit the custom function and return to the script to continue executing the next statement after the call statement once it has finished executing the last statement in the custom function. The example below is used to determine whether it is working hours now, and will save the result into $U:V100; users can make it into a custom function called IsWorkHour if $S:TIME_LOCAL_HOUR >= 8 && $S:TIME_LOCAL_HOUR <= 17 $U:V100 = 1 else $U:V100 = 0 endif Just call IsWorkHour and then check $U:V100 when used in a script; for example: /* Determines whether it is working hour to set the brightness level for the backlight of the HMI */ call IsWorkHour if $U:V100 $S:OP_BACKLIGHT_LEVEL = 80 else $S:OP_BACKLIGHT_LEVEL = 30 Endif |
|
Ret |
ret statements can be used in custom functions so that it will exit the custom function and return to the script to continue executing the next statement after the call statement once it executes up to the ret statement; for example: /* If $U:V0.0 is 0, then this custom function will exit and return to the script to the line after the call statement; the if $U:V0.1 statement behind will not be executed */ if $U:V0.0 @PLC0:Y0 = 1 else ret endif if $U:V0.1 @PLC:Y1 = 1 Endif |
13.3.4 Comments
Comments can be used as program code explanations in the script to increase the readability of the program. Comments are omitted during script compilation. Therefore they will not affect the execution results of script. Program code that will not be used immediately can also be added into comments and moved out of the comment block for use when needed.
Table 90 Script–Comments
|
Type |
Description |
|
Single-Line Comment |
Texts between the // symbol up to the end of the line will be treated as comments For example: // This is a single line comment |
|
Multi-Line Comment |
Texts between the /* symbol and */ symbol will be treated as comments For example: /* This is a multi-line comment */ |
13.4 Examples – Scrolling Lamp
The goal of this example is to create a scrolling lamp where the lamps will move back and forth. As shown in the figure below, there are 15 lamps on the screen and three of the lamps are lit. We wish to have a visual effect where these three lamps keep moving to the left and then move back to the right once it reaches the end and continues cycling in this manner.
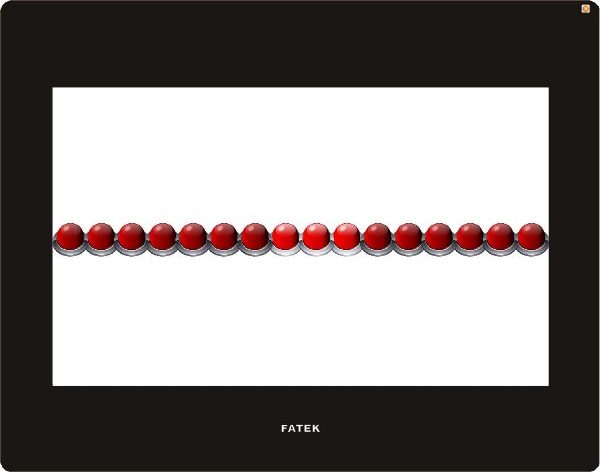
Figure 177 Scrolling Lamp Example
Idea
In order to achieve the effect of the lamps moving towards the left, we can match the 16 lamps on the screen to the 0 to 15th bit of a register word and then use scripts to execute left shift computing to this register. When the 15th bit of the register is 1, it means that the lamp has already moved to the left-most part; next the script should right shift the register until the 0th bit of the register is 1 and then switch to left shift again.
Now that we have an idea what needs to be accomplished, we can start implementing this example.
- First we will place 16 lamps on the screen, and set the monitor address of the right-most lamp to $U:V0.0 and the second one to $U:V0.1, and so on and so forth, until the address of all 16 lamps have been set.
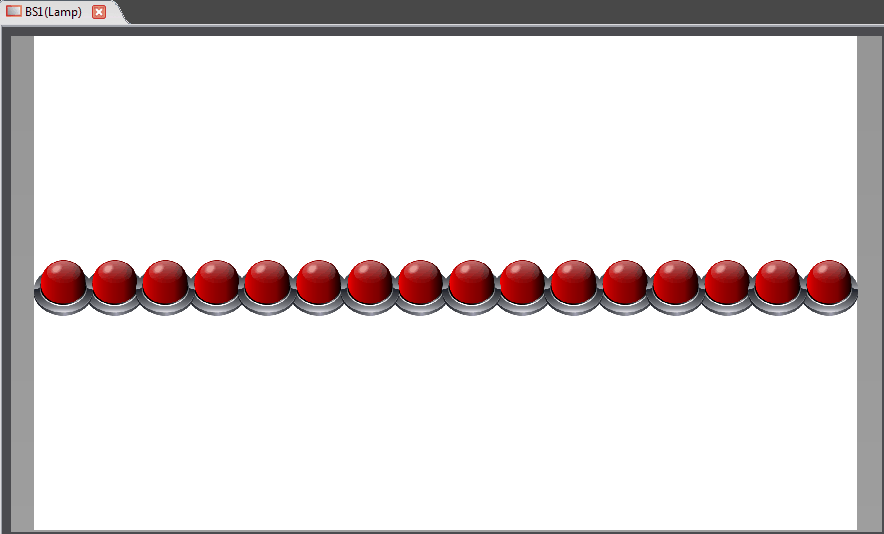
Figure 178 Scrolling Lamp Example Screen Setting
- Next we will add a script to control the movement of the lamps; first enter the【Script List】and press【Add】, input Move Lamp for the comment and then input the following script contents and save:
/* When $U:V1 = 0, move left
When $U:V1 = 1, move right */
if !$U:V1
if !$U:V0.15 // Lamp not yet reached to the left-most position
$U:V0 = $U:V0 << 1 // Left shift the lamp
else
$U:V1 = 1 // Change the lamp movement to right shift
endif
else
if !$U:V0.0 // Lamp not yet reached the right-most position
$U:V0 = $U:V0 >> 1 // Right shift the lamp
else
$U:V1 = 0 // Change the lamp movement to left shift
endif
endif
- Next is to add another script to initialize the value of the register; input Init Lamp as the comment. the content is shown below:
$U:V0 = 7 // Light up the three right-most lamps initially
$U:V1 = 0 // Start moving the lamp to the left
- Finally right click the mouse at an empty space on the screen and select【Properties】to enter the【Screen Properties】to set the two scripts to execute when the screen opens and cycles respectively:
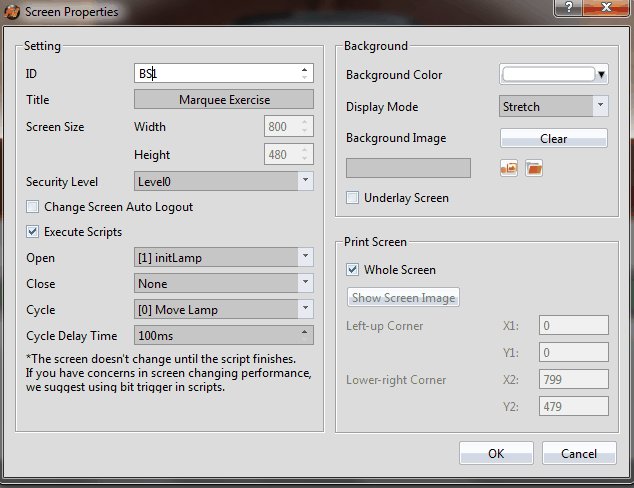
Figure 179 Using Script Setting for the Screen
Return to the【Script List】screen when the setting is complete and the following results can be seen:

Figure 180 Script Setting Result
- Finally, click on【Simulate】which is located in the functions tab page of 【Project】located in the toolbar on the top of the main screen and we will be able to see on the simulation screen that the lamps are moving the way we expected.
Tip: press ← → to switch chapters, Ctrl+K to search