18.1 【Image Library】
The【Image Library】function can be used when designing projects with the FvDesigner to create images that need to be used in the【Image Library】files (*.fil) in advance so that they can be conveniently used when editing objects. In addition, the generated【Image Library】files (*.fil) can also be exported when several people are developing a project together, so that other developers can import and use the files.
18.1.1 Image Library Settings
Click on【Image Library】in【Project Explorer】of the FvDesigner and the【Image Library】Edit Window (as shown in the figure below) will appear, where the usage methods of each setting is as shown in the table below:
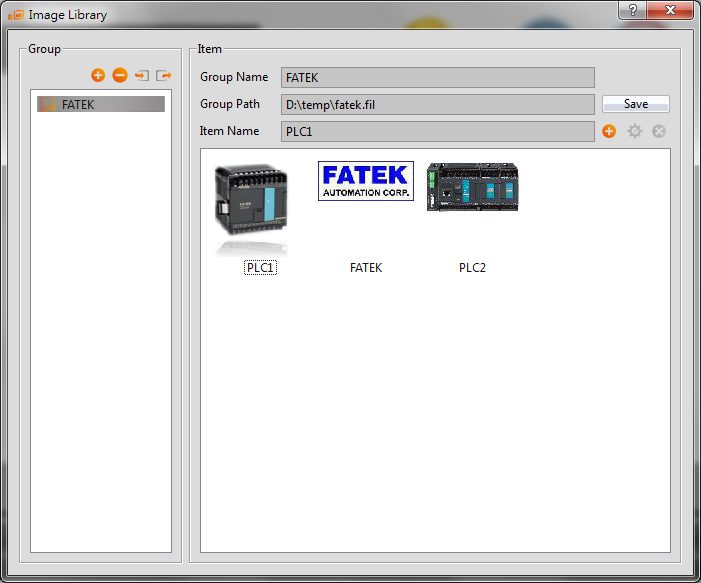
Figure 218 Image Library Editing Window
Table 107 Edit Window Setting Properties of the Image Library
|
Property |
Description |
|
【Add】 |
|
|
【Remove】 |
|
|
【Import】 |
|
|
【Export】 |
|
|
【Group List】 |
Display the【Image Library】groups currently included in the computer. When the mouse is clicked on a specific【Image Library】group, the item list on the right will display all image contents included in that【Image Library】group. |
|
【Group Name】 |
Set the name for the currently selected【Image Library】group. Note: This name is only the displayed name of the【Image Library】group; it is not the file name of the【Image Library】file. |
|
【Group Path】 |
Display the file path of the currently selected【Image Library】group. |
|
【Item Name】 |
Edit the item name of the currently selected image. |
|
【Save】 |
Save the contents of the edited【Image Library】group into the corresponding【Image Library】file. |
|
【Add Item】 |
|
|
【Edit Item】 |
|
|
【Delete Item】 |
|
|
【Item List】 |
Display all the image contents included in the currently selected【Image Library】; the【Add Item】,【Edit Item】and【Delete Item】buttons on the top-right can be used to edit the selected【Image Library】group. |
 Add an【Image Library】group; the system will generate a new【Image Library】file (*.fil) when this button is pressed.
 Remove an【Image Library】group; this【Image Library】will be removed from the image library when this button is pressed, but the【Image Library】file (*.fil) will not be deleted.
 Import a new【Image Library】file and generates a corresponding【Image Library】group.
 Save the current【Image Library】group into the specified path as a new file.
 Add an image into the active【Image Library】group.
 Change the saved image of the currently selected item.
 Delete the currently selected image.
18.1.2 Image Library Usage Method
The【Image Selector】must be used if the users want to use the image library they created or the default image libraries provided by the FvDesigner. This chapter will introduce the【Image Selector】usage and how to select images saved in the【Image Library】.
18.1.2.1 Image Selector
The【Image Selector】is as shown in the figure ( ); it allows users to select images. When the images saved in the【Image Library】need to be used, click on the “
 ”button to the left to select the image needed from the【Image Library】. If the image needed is saved on the user’s computer, the “
 ” button to the right can be pressed to select the image needed from the user’s computer.
18.1.2.2 Image Library Selection Window
The image selection window of the【Image Library】is as shown in the figure below. Use the pull-down menu to select the【Image Library】group where the image that the user wants to use is located, and then select the image needed from the【Item List】below. The【Item List】will synchronize and update the display of images included in the【Image Library】group when switched to another【Image Library】group.
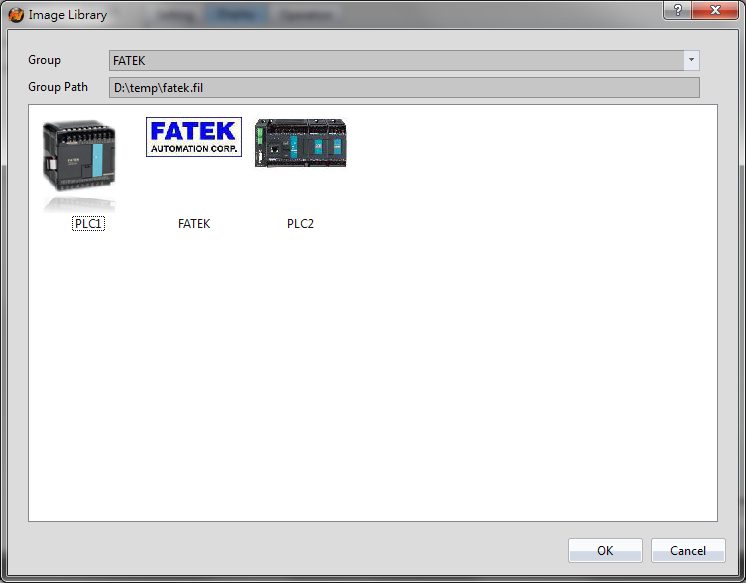
Figure 219 Image Selection Window of Image Library
18.2 【Audio Library】
The【Audio Library】function can be used while designing projects with the FvDesigner to create the audio files that need to be used into the【Audio Library】files (*.fal) in advance so that they can be conveniently used when editing objects. In addition, the generated 【Audio Library】files (*.fal) can also be exported when several people are developing a project together, so that other developers can import and use the files, too.
18.2.1 Audio Library Settings
Click on【Audio Library】in【Project Explorer】of the FvDesigner and the【Audio Library】Edit Window (as shown in the figure below) will appear where the usage of each setting is as shown in the table below:
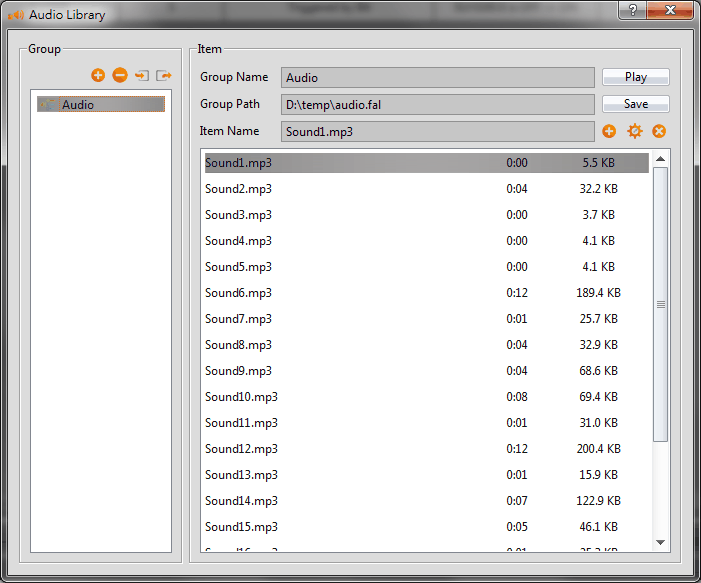
Figure 220 Audio Library Edit Window
Table 108 Edit Window Setting Properties of Audio Library
|
Property |
Description |
|
【Add】 |
|
|
【Remove】 |
|
|
【Import】 |
|
|
【Export】 |
|
|
【Group List】 |
Display the【Audio Library】groups currently included on the computer. When a specific【Audio Library】group is clicked, the item list on the right will display all audio contents included in that【Audio Library】group. |
|
【Group Name】 |
Set the name for the currently selected【Audio Library】group. Note: This name is only the displayed name of the【Audio Library】group; it is not the file name of the【Audio Library】file. |
|
【Group Path】 |
Display the file path of the currently selected【Audio Library】group. |
|
【Item Name】 |
Edit the item name of the currently selected audio file. |
|
【Play】 |
Play the currently selected audio file. This button will change to the【Stop】function when the audio file starts to play; It can stop playing the audio file that is currently playing. |
|
【Save】 |
Save the contents of the edited【Audio Library】group into the corresponding【Audio Library】file. |
|
【Add Item】 |
|
|
【Edit Item】 |
|
|
【Delete Item】 |
|
|
【Item List】 |
Display all the audio contents included in the currently selected【Audio Library】; the【Add Item】,【Edit Item】and【Delete Item】buttons on the top-right can be used to edit the selected【Audio Library】group. |
 Add an【Audio Library】group; the system will generate a new【Audio Library】file (*.fal) when this button is pressed.
 Remove an【Audio Library】group; this 【Audio Library】will be removed from the audio library when this button is pressed, but the【Audio Library】file (*.fal) will not be deleted.
 Import a new【Audio Library】file and generates a corresponding【Audio Library】group.
 Save the current【Audio Library】 group into the specified path as a new file.
 Add an audio file into the active【Audio Library】group.
 Change the currently selected audio.
 Delete the audio file of the currently selected item.
18.2.2 Audio Library Usage Method
The【Audio Selector】must be used if the users want to use the audio files saved in the【Audio Library】. This chapter will introduce the usage of the【Audio Selector】and how to select audio saved in the【Audio Library】.
18.2.2.1 Audio Selector
The【Audio Selector】is as shown in the figure ( ); It allows users to select the audio files to be used. When an audio file saved in the【Audio Library】needs to be used, the “
 ” button on the right can be pressed to select the audio file from the【Audio Library】. The “
 ” button to the left can be pressed to play the selected audio file if the users want to listen to it.
18.2.2.2 Audio Library Selection Window
The audio file selection window of the【Audio Library】is as shown in the figure below. Use the pull-down menu to select the【Audio Library】group where the audio file that the user wants to use is located, and then select the audio file needed from the【Item List】below. Click on the【Play】button located at the top-right to play the selected audio file. The 【Item List】will synchronize and update the display of audio files included in the【Audio Library】group when switched to another【Audio Library】group.
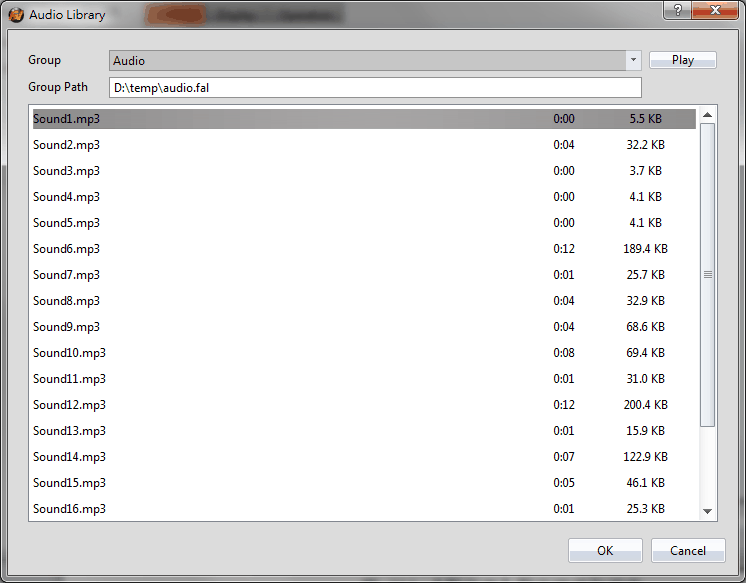
Figure 221 Audio File Selection Window of Audio Library
18.3 【Tag Library】
The【Tag Library】can be used to define the frequently used registered addresses to increase readability during the system design.
18.3.1 Tag Library Settings
Click on【Tag Library】in【Project Explorer】of the FvDesigner and the【Tag Library】Edit Window (as shown in the figure below) will appear where the usage of each setting is as shown in the table below:
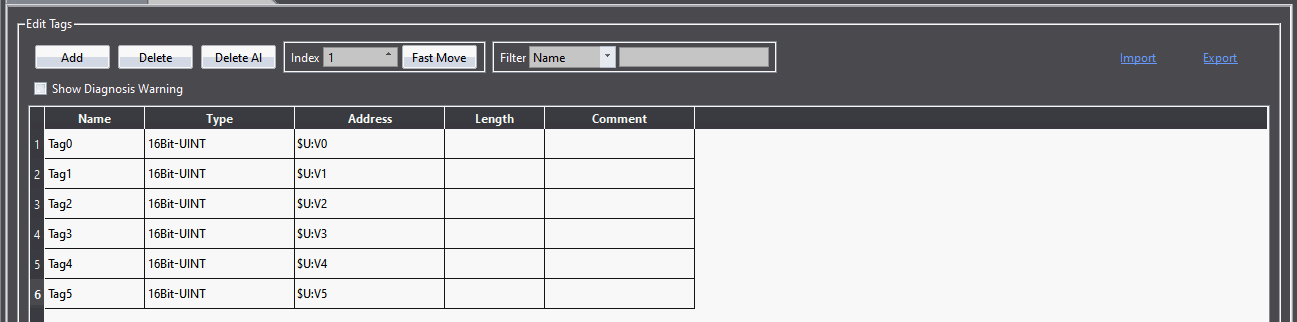
Figure 222 Tag Library Edit Window
Table 109 Edit Window Setting Properties of Tag Library
|
Property |
Description |
|
【Add】 |
Add a tag. |
|
【Delete】 |
Delete the selected tag. 【Delete Al】 Delete all unused tags in the table. |
|
【Index】 |
You can jump to the specified row and column quickly. It is more convenient to use this function to debug when there are too many labels. |
|
【Filter】 |
Filter the name of tag. Allows designer to find tag quickly. Filters includes Name, Type, Address, Length, Comment and All.
|
|
【Show Diagnosis】 |
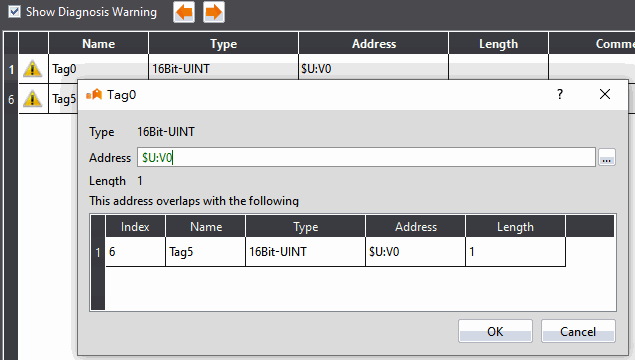
Diagnosis the tag address is overlapped with the other or invalid.
Double click the warning sign to see more detail.
|
|
【Tags List Table】 |
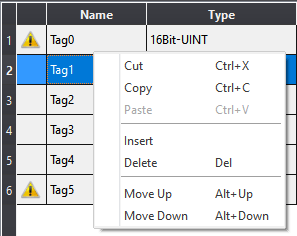
The tag settings can be edited directly from the table. The settings include: 【Name】Tag name of the address. 【Type】Data type of the address. 【Address】Address of the register 【Length】The amount of data for this data type. 【Comment】Comment explanation of this tag. Right-click in the【Tags List Table】, the edit menu can be opened as shown below.
The description of the item in the edit menu. 【Cut】Cut the selected tag. The shortcut key is Ctrl+X. 【Copy】Copy the selected tag. The shortcut key is Ctrl+C. 【Paste】Paste the copied tag. The shortcut key is Ctrl+X. 【Insert】Insert a row in the table. 【Delete】Delete a row in the table. The shortcut key is Del. 【Move Up】Move the selected row to up in the table. The shortcut key is Alt+Up. 【Move Down】 Move the selected row to down in the table. The shortcut key is Alt+Down. |
|
【Import】 |
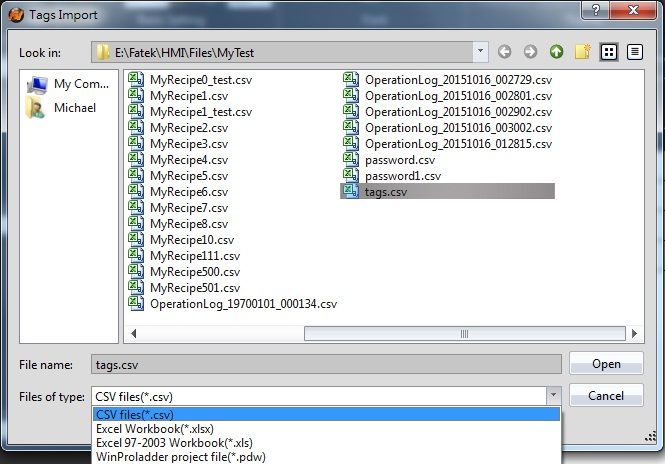
Import a file and fills in the settings included in this file into the【Tag Library】of the currently editing project. Four formats can be imported as CSV file (* .CSV), Excel file (* .xlsx, or * .xls), WinProladder file (* .pdw), as shown below. The WinProladder file is a Fatek PLC program, which supports importing the file directly without any conversion.
|
|
【Export】 |
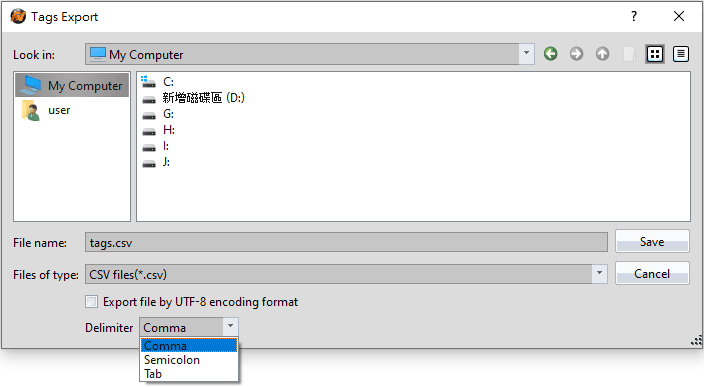
Export the【Tag Library】settings of the currently editing project into a CSV file. Three formats can be exported as CSV file (* .CSV), Excel file (* .xlsx, or * .xls). Three delimiter can choose: Comma, Semicolon, Tab.
|
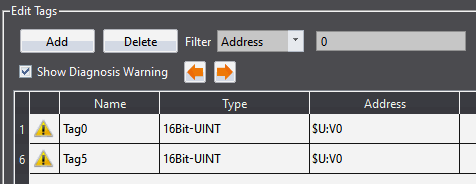
 Diagnosis warning sign: Warns when different tags have used the same address.
 /
 : Switch to the previous or next warning tag.
18.3.2 Introduction of Tag Library Import Mode
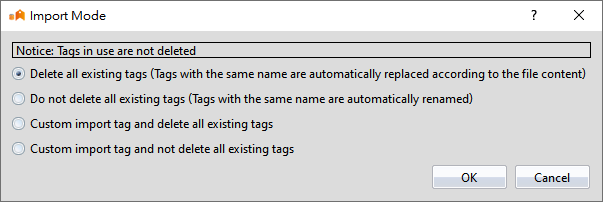
Figure 223【Tag library import mode】dialog
18.3.2.1 Delete all existing tags
The action of this option is to delete unused tags and add all tags in the file when importing,
Example 1. None of the tags in the tag library are in use
Today’s tag library contains: Tag0($U:V0), Tag1($U:V1), Tag2($U:V2)
Imported file content: Tag5($U:V5), Tag6($U:V6), Tag7($U:V7)
Then the final tag library is: Tag5($U:V5), Tag6($U:V6), Tag7($U:V7)
Example 2. There are tags in use in the tag library, but the imported tags do not have this name (red means in use)
Today’s tag library contains: Tag0($U:V0), Tag1($U:V1), Tag2($U:V2)
Imported file content: Tag5($U:V5), Tag6($U:V6), Tag7($U:V7)
Then the final tag library is: Tag0($U:V0), Tag5($U:V5), Tag6($U:V6), Tag7($U:V7)
Example 3, if there is a tag in use in the tag library, and the imported file has the same name, the address will be modified
Today’s tag library contains: Tag0($U:V0), Tag1($U:V1), Tag2($U:V2)
Imported file content: Tag0($U:V5), Tag6($U:V6), Tag7($U:V7)
Then the final tag library is: Tag0($U:V5), Tag6($U:V6), Tag7($U:V7)
18.3.2.2 Not delete all existing tags
The action of this option is to keep the original tag when importing. If the name is the same, the suffix _0 will be added automatically.
Example 1, general import
Today’s tag library contains: Tag0($U:V0), Tag1($U:V1), Tag2($U:V2)
Imported file content: Tag5($U:V5), Tag6($U:V6), Tag7($U:V7)
Then the final tag library is: Tag0($U:V0), Tag1($U:V1), Tag2($U:V2), Tag5($U:V5), Tag6($U:V6), Tag7($U :V7)
Example 2. There is a tag with the same name in the imported file
Today’s tag library contains: Tag0($U:V0), Tag1($U:V1), Tag2($U:V2)
Imported file content: Tag2($U:V2)
Then the final tag library is: Tag0($U:V0), Tag1($U:V1), Tag2($U:V2), Tag2_0($U:V2)
18.3.2.3 Custom Import Tags and Delete All Existing Tags
The action of this option is to delete unused tags when importing. If they have the same name, you can manually modify the name, or choose to automatically add the suffix _0.
Example 1, general import
Today’s tag library contains: Tag0($U:V0), Tag1($U:V1), Tag2($U:V2)
Imported file content: Tag5($U:V5), Tag6($U:V6), Tag7($U:V7)
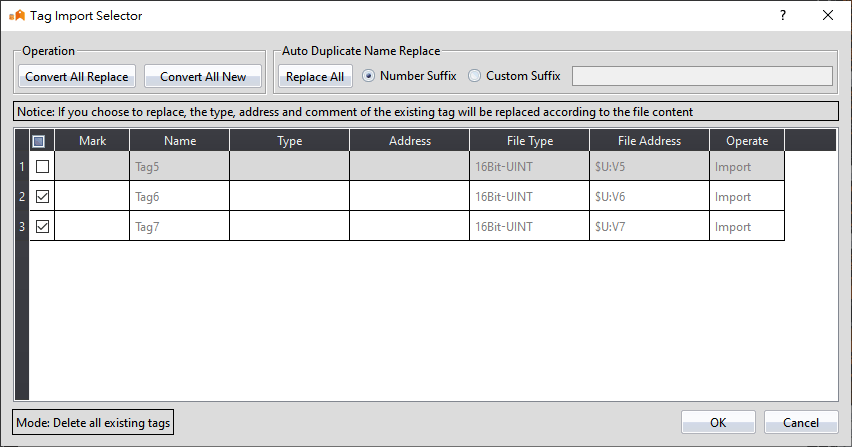
Figure 224【Custom import example 1-1】edit window
If set according to the above figure, the final tag library content is: Tag6($U:V6), Tag7($U:V7)
Example 2. If there are tags in use in the tag library, they will be reserved
Today’s tag library contains: Tag0($U:V0), Tag1($U:V1), Tag2($U:V2)
Imported file content: Tag5($U:V5), Tag6($U:V6), Tag7($U:V7)
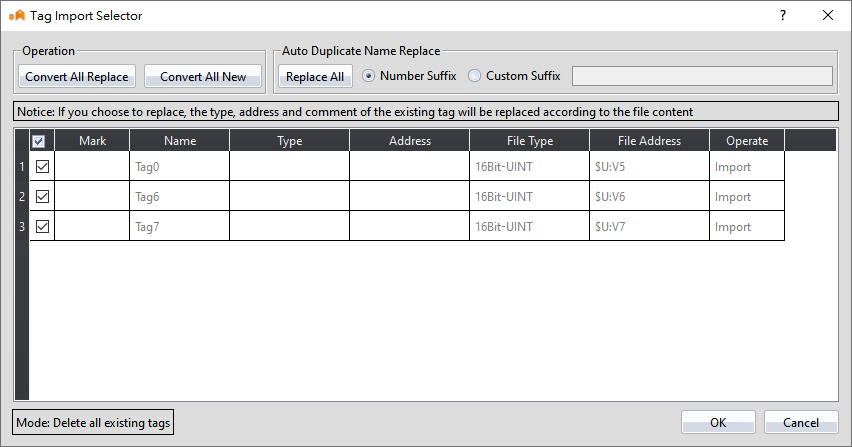
Figure 225【Custom import example 1-2】edit window
As shown in the above figure, the final tag library content is: Tag0($U:V0), Tag5($U:V5), Tag6($U:V6), Tag7($U:V7)
Example 3. If there is a tag in use in the tag library, and the imported file has the same name, it will ask to overwrite or add
Today’s tag library contains: Tag0($U:V0), Tag1($U:V1), Tag2($U:V2)
Imported file content: Tag0($U:V5), Tag6($U:V6), Tag7($U:V7)
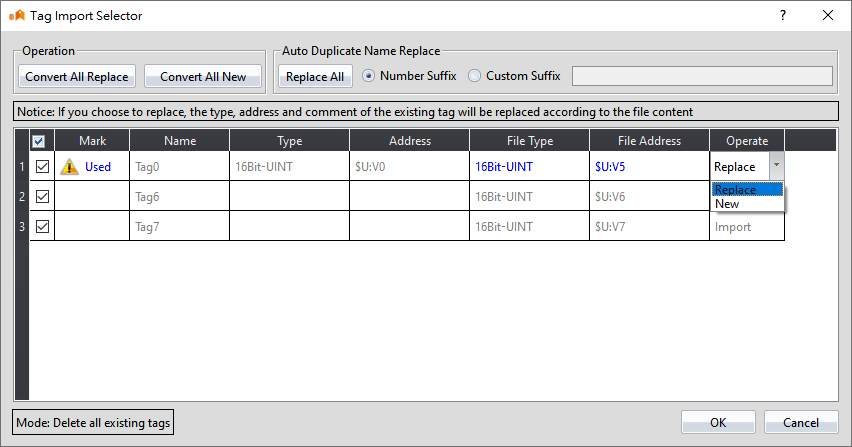
Figure 226【Custom import example 1-3】edit window
If you choose to replace, the final tag library content is: Tag0($U:V5), Tag6($U:V6), Tag7($U:V7)
If you choose to add, the final tag library content is: Tag0($U:V0), Tag0_0($U:V5), Tag6($U:V6), Tag7($U:V7)
18.3.2.4 Import custom tags and not delete all existing tags
The action of this option is to keep the original tag when importing. If the name is the same, you can manually modify the name, or choose to automatically add the suffix _0.
Example 1, general import
Today’s tag library contains: Tag0($U:V0), Tag1($U:V1)
Imported file content: Tag5($U:V5), Tag6($U:V6)
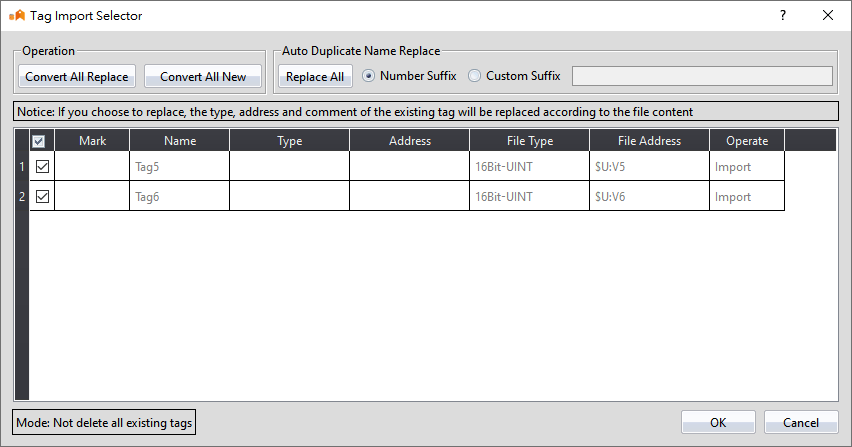
Figure 227【Custom import example 2-1】edit window
As shown in the above figure, the final tag library content is: Tag0($U:V0), Tag1($U:V1), Tag5($U:V5), Tag6($U:V6)
Example 2. If there is a tag with the same name in the imported file, it will ask to overwrite or add
Today’s tag library contains: Tag0($U:V0), Tag1($U:V1)
Imported file content: Tag0($U:V5), Tag6($U:V6), Tag7($U:V7)
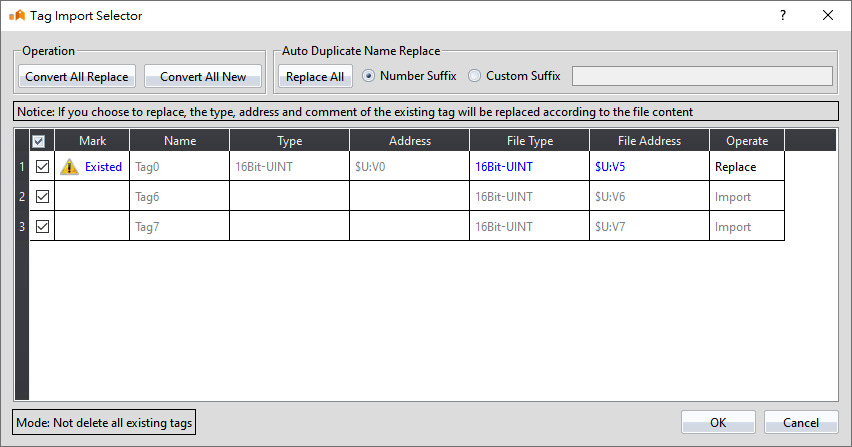
Figure 228【Custom import example 2-2】edit window
If you choose to replace, the final tag library content is: Tag0($U:V5), Tag1($U:V1), Tag6($U:V6), Tag7($U:V7)
If you choose to add, the final tag library content is: Tag0($U:V0), Tag0_0($U:V5), Tag1($U:V1), Tag6($U:V6), Tag7($U:V7 )
18.3.3 Tag Library Usage
The【Address Selector】must be used to select the tag in order to use the【Tag Library】. The 【Address Selector】is as shown in the figure below; the address tag can be entered directly in the edit field of the【Address Selector】, or press the button to the right of the selector to open the【Address Selector】dialog to select a tag.
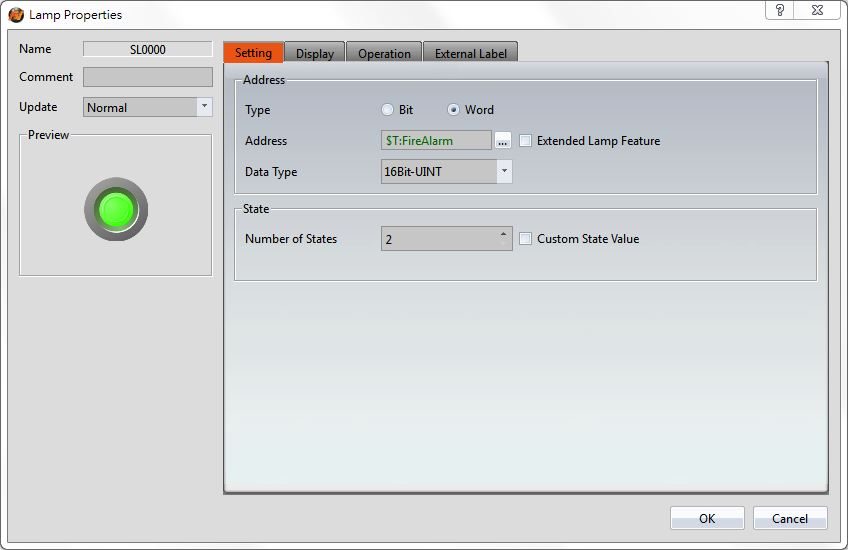
Figure 229 Inputting Address Tag in【Address Selector】Edit Field
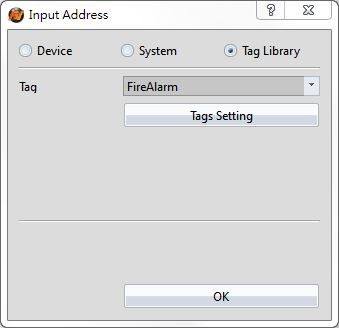
Figure 230 Selecting Address Tag in【Address Selector】Dialog
18.4 【Text Library】
If there is the need to switch displayed texts in real-time in order to achieve multi-language functionality while designing a project using the FvDesigner, the【Text Library】can be used to edit the text to display for different needs by creating a table. This allows the project to switch between text groups currently displayed through the【Control Address】while the HMI is operating.
18.4.1 Text Library Settings
Click on the【Text Library】in【Project Explorer】of the FvDesigner and the【Text Library】Edit Window (as shown in the figure below) will appear where the usage of each setting is as shown in the table below:
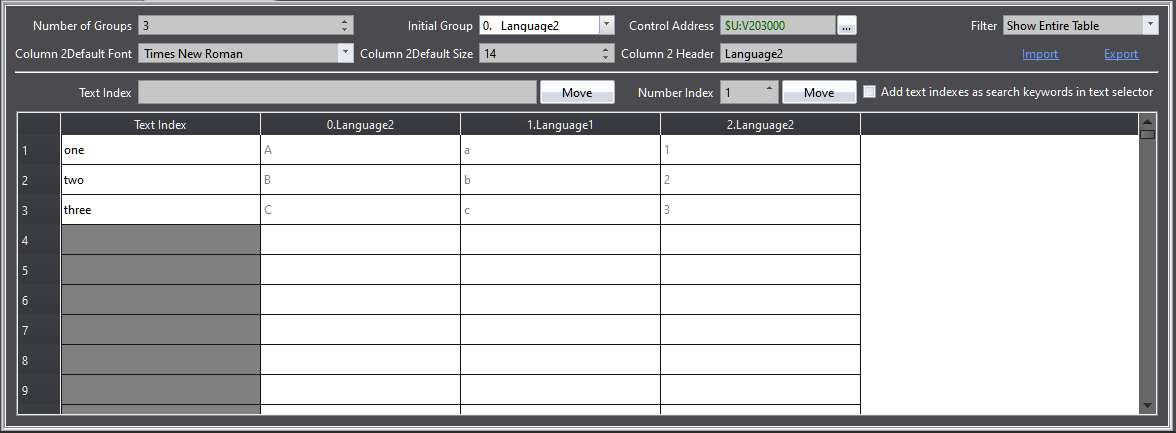
Figure 231 Text Library Edit Window
Table 110 Edit Window Setting Properties of Text Library
|
Property |
Description |
|
【Number of Groups】 |
Set the number of groups for the【Text Library】. |
|
【Initial Group】 |
Set the text group to display when the HMI starts operating. |
|
【Control Address】 |
Set the control address of the【Text Library】. This address is used to control the text group currently displayed by the【Text Library】; the data type used is fixed as【16Bit-UINT】. For example, when the value of the【Control Address】is 0, the【Text Library】will display the text in group 0. |
|
【Filter】 |
Can select【Show Entire Table】and【Show All Text Items】,【Show Entire Table】includes all contents, 【Show All Text Items】only shows text part. |
|
【Default Font】 |
Set the default font of the currently selected group. |
|
【Default Size】 |
Set the default size of the currently selected group. |
|
【Header】 |
Set the header of the currently selected group. |
|
【Import】 |
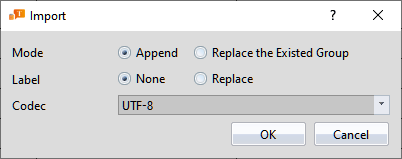
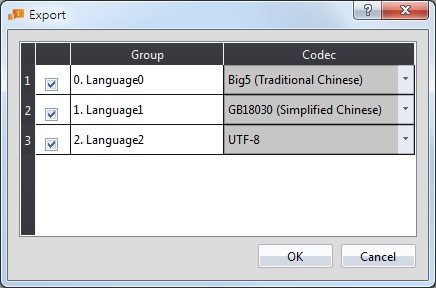
【Append】 Import a【Text Library】CSV file and fills in all the contents included in the file into a new text group. 【Replace the Existed Group】 Import a【Text Library】CSV file and fills in all the contents included in the file into the selected text group. 【Label】 Select whether to overwrite or append the text index. 【Codec】 Set the text encoding format. The available codecs are Big5 (Traditional Chinese), GB18030 (Simplified Chinese), and UTF-8. |
|
【Export】 |
Select the【Text Library】group and encoding format that you want to export, and export the selected【Text Library】group as a CSV file to the specified folder.
|
|
【Text Table】 |
【Text Index】 The text field next to 【Text Index】becomes available after entering content. This feature is used to quickly search for desired labels by recording them in text form. 【Text Library】 The text editing table for each group included in the【Text Library】. If the color of the text is black, means the object is used, if the color of the text is gray, means the object is not used, the designers can distinguish what objects are being used. |
18.4.2 Text Library Usage Method
The【Text Selector】must be used if the users want to use the text contents saved in the【Text Library】. The【Text Selector】is as shown in the figure below; it includes two text selection modes: entering the text directly or selecting text from the【Text Library】. Users can switch between the two modes by using the button to the right.
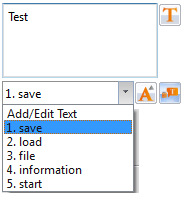
Figure 232 Text Selector
The default setting for the【Text Selector】is the direct text input mode; the users can enter the text that they want to display in the editing section to the left of the【Text Selector】directly. To select texts saved in the【Text Library】, the button to the right must first be pressed to switch modes. At this time the left of the【Text Selector】will change into a pull-down menu and this menu includes all text contents saved in the【Text Library】for the users to choose from. If the contents currently included in the menu is inadequate for use, the user can also select the first option【Add/Edit Text】in the menu and edit the contents of the【Text Library】in the window as shown in the figure below.
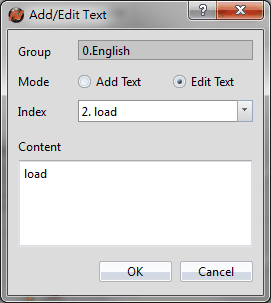
Figure 233 Add/Edit Text Window
If the displayed text is selected from【Text Library】, the dialog of setting the text font and size for different languages will appear after pressing the  button. The user can set the font and size of the text displayed in each language. If【Default Font】or【Default Size】is selected, the font or size of the displayed text will be the font or size set in the【Text Library】.
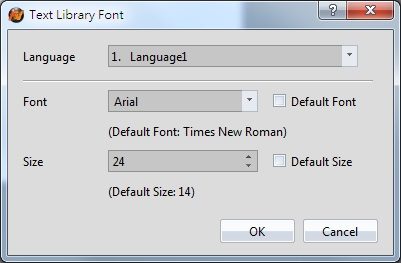
Figure 234 Text Library Font Window
18.5 【Font Library】
When using FvDesigner to design a project, you can use the【Font Library】function to pre-set the required fonts and common texts and download them to the HMI for use, so as to prevent the future HMI from displaying correctly.
18.5.1 Font Library Settings
Click【Font Library】in the【Project Explorer】to get to the window as seen below:

Figure 235【Font Library】
Table 111【Font Library】Edit Properties
|
Field |
Description |
|
【Add】 |
Add languages such as Chinese (Traditional), Chinese (Simplified), or other languages. The font can also be changed. |
|
【Delete】 |
Remove the selected font. |
|
【Edit】 |
Change the font used in the currently selected language. |
|
【Font library list】 |
The font library list contains fields such as language, font, and common words. 【Language】can display Chinese (Traditional), Chinese (Simplified) or other languages. 【Name】The name of the selected language 【Font】Displays the font used for the selected language 【Common Words】can display commonly and uncommonly used words. 【User Defined Text】Allows the user to input specific words for the chosen language |
|
【Font Library Properties】 |
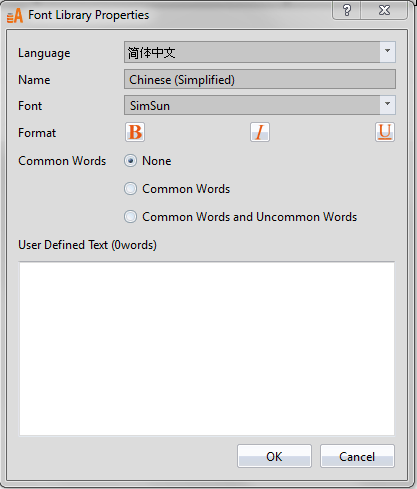
To get to the【Font Library Properties】, double-click the item in the font library list or press edit when the item is selected. The window for【Font Library Properties】will pop up, as show in the figure below.
【Language】You can choose Chinese (Traditional), Chinese (Simplified), or other languages. 【Name】The name of the specific text setting. 【Font】The font used for the text setting. 【Common Words】You can choose between 3 options, none, common words, and common words and uncommon words. Common words consists of about 4800 commonly used words and common words and uncommon words consists of about 11000 words. 【User Defined Text】The user can input custom words for the specified language |
Tip: press ← → to switch chapters, Ctrl+K to search