REST API is a widely used interface architecture in network communication technology. It can be used to exchange data with third-party services. Its advantages are simple and convenient design and practicality, and it follows safe, reliable and efficient communication standards.
The web application can use the REST API to send a request to the server, and then the server will send back a response to meet the needs of information exchange. The entire communication process is based on the standard rules designed and defined by the REST architecture, using standard HTTP methods, including GET, PUT, and POST.
HMI can send a request to an external network server through the REST API, and send the data of the devices’ (HMI, PLC) register address to the server’s database through POST/PUT, or gets data from the server through GET command and writes it into the register address.
This chapter will explain the relevant pages and setting methods of the REST API.
※This function only supports P5 series and FvRT.

Figure 210 REST APIApplication architecture diagram
17.1 REST API Client
Within 【Enable REST API】checked, you can add a new REST request in【Request List】. You can add a new request by click【Add】, click【Delete】to delete the request that you choose, click【Edit】or click the requst twiceto edit it.
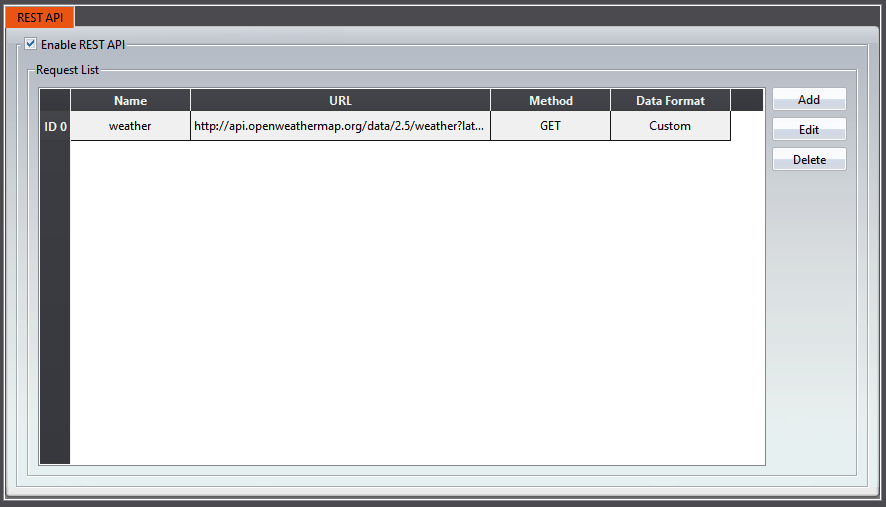
Figure 211 【REST API Client】setting page
17.1.1 REST API Client Setting
Following introduction is for setting interface
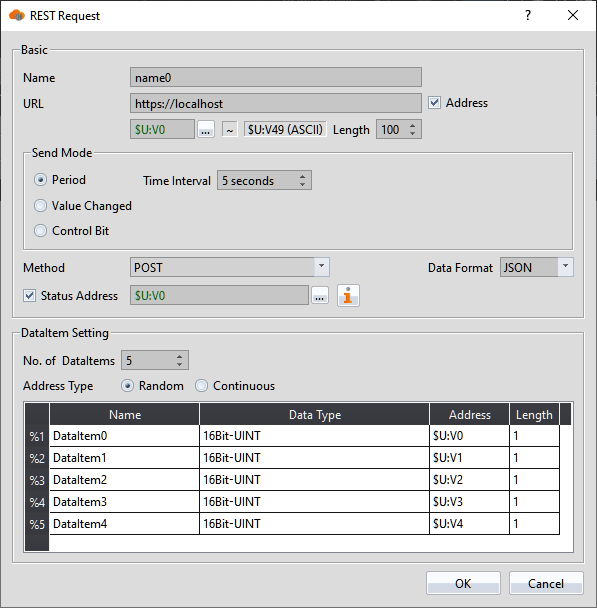
Figure 212 【REST Request】Editing Window
Table 104 Edit Window Setting Properties of the 【REST Request】
|
Property |
Description |
||||||||||||||
|
【Name】 |
Set the name of request, which can be used as a description. |
||||||||||||||
|
【URL】 |
URL for sending request to get data from server. 【Address】 When selected, you can dynamically adjust the theme. |
||||||||||||||
|
【Send Mode】 |
【Period】 You can set Time Interval to send request 【Triggered】 The request only will be sent when the value of the DataItem (Notice:The content of the message will only display items with value changes) 【Control Bit】 Set a bit as the trigger condition. |
||||||||||||||
|
【Method】 |
Common data transfer method, following description:
|
||||||||||||||
|
【Data Format】 |
【JSON】:Commonly used standard formats, example: { "id": 111, "name": "fatek", "url": "https://www.fatek.com/", "status": 100 } (Notice:This is only for the DataItem in first hierarchy of JSONformat, Besides, please choose【Custom】) 【Custom】:Format that you can have your own definition, You need to know that custom is using【Text】 for type format. |
||||||||||||||
|
【Status Address】 |
The execution result can be displayed in the register here:
|
||||||||||||||
|
【DataItem Setting】 |
【No. of DataItems】 Sets the number of data items for this request. 【Address Type】
Only the first item can set the address, the other item address will automatically generate, user cannot modify.
The user can manually set the address for each data item. 【Address Type】
The name of the item cannot be blank and must be unique.
Depending on the data type, the user can set the address for each data item.
If the data type is 16-bit, it will occupy one word. A 32-bit data type will occupy two words. For ASCII-String types, the user can define how many words each item should use. Each word can store 2 characters. |
17.1.2 REST API Example
Here is a demonstration project for retrieving the current temperature in Taipei. Please note that this is a sample based on the API from openweathermap.org, and it does not guarantee real-time data retrieval at all times.
Step1.
In the 【URL】field, enter:
http://api.openweathermap.org/data/2.5/weather?lat=25.0481&lon=121.5170&appid=3ec3e04b911a8e4da5c834f60b00e580&units=metric
In the 【Length】field, select 【12】.
In the 【Method】field, select 【GET】.
In the 【Data Format】field, select 【Custom】.
Step2.
Set up the data items:
Set 【No. of DataItems】to 3.
%1 → select 32-bit float
%2 and %3 → select ASCII
Use the default values for lengths. Be sure the addresses do not overlap.
Step3.
In the Custom Data Format field, enter:
|
%2,"main":{"temp":%1,%3 |
For details on the parameters, please refer to:
https://openweathermap.org/api/one-call-3
Step4.
Place a numeric input object on the screen corresponding to the address linked with %1.
Compile the project and run it in online simulation or download it to the HMI to view the data.
17.2 REST API Server
By enabling【REST API Server】, you can configure the server properties and resources.
A resource refers to data or services within the server that can be uniquely identified and accessed (read or modified). Each resource corresponds to a specific URL..
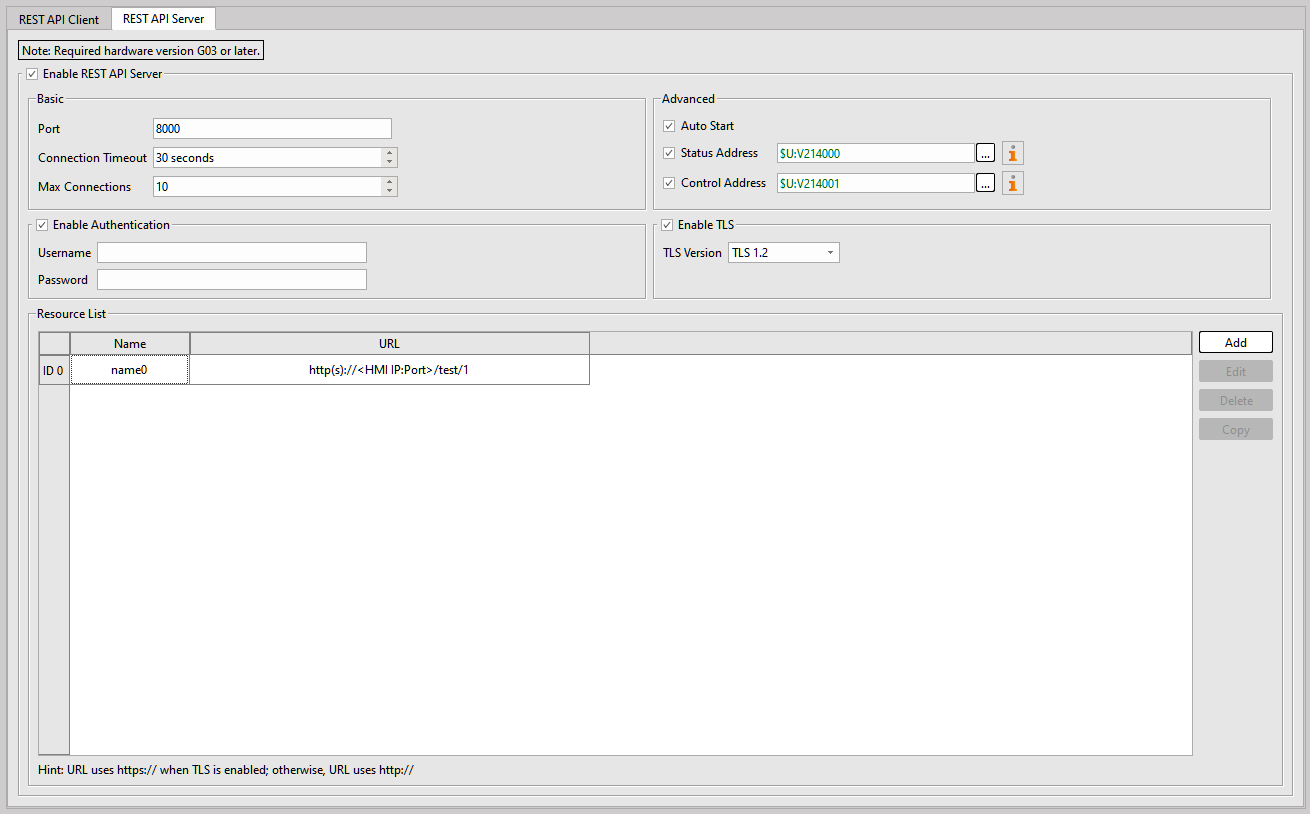
Figure 213 【REST API Server】setting page
Table 105【REST API Server】Edit Properties
|
Property |
Description |
|||||||||||||||||||||||||||
|
【Enable RESR API Server】 |
Enable or disable the 【Enable RESR API Server】. |
|||||||||||||||||||||||||||
|
【Basic】 |
【Port】 Set the server port, Default: 80 【Connection Timeout】 After the server establishes a connection with a client, if no complete request data is received or no further interaction occurs within the specified time, the connection will automatically be terminated. This prevents idle or abnormal connections from occupying system resources. Unit: seconds, Maximum: 300 seconds. 【Max Connections】 Defines the maximum number of client connections that the server can process simultaneously. |
|||||||||||||||||||||||||||
|
【Advanced】 |
【Auto Start】 When enabled, the server will start automatically when the system boots. 【Status Address】 The server’s running status can be monitored using status addresses. The following is the status definition table, which can also be viewed directly by clicking
【Control Address】 The server’s running status can be controled using status addresses. The following is the status definition table, which can also be viewed directly by clicking
|
|||||||||||||||||||||||||||
|
【Enable Authentication】 |
Enable server authentication and configure the following settings: 【Username】Login username 【Password】The password will be stored in encrypted form. |
|||||||||||||||||||||||||||
|
【Enable TLS】 |
Enable TLS to encrypt communication between the client and server. 【TLS Version】Currently, the server uses the HMI built-in self-signed certificate by default. (Support for importing external certificate/private key files will be available in future versions.) |
 :
 :
17.2.1 Adding Resource Entries
Configure the resource URL, data items, supported methods, and response details that the server can handle.
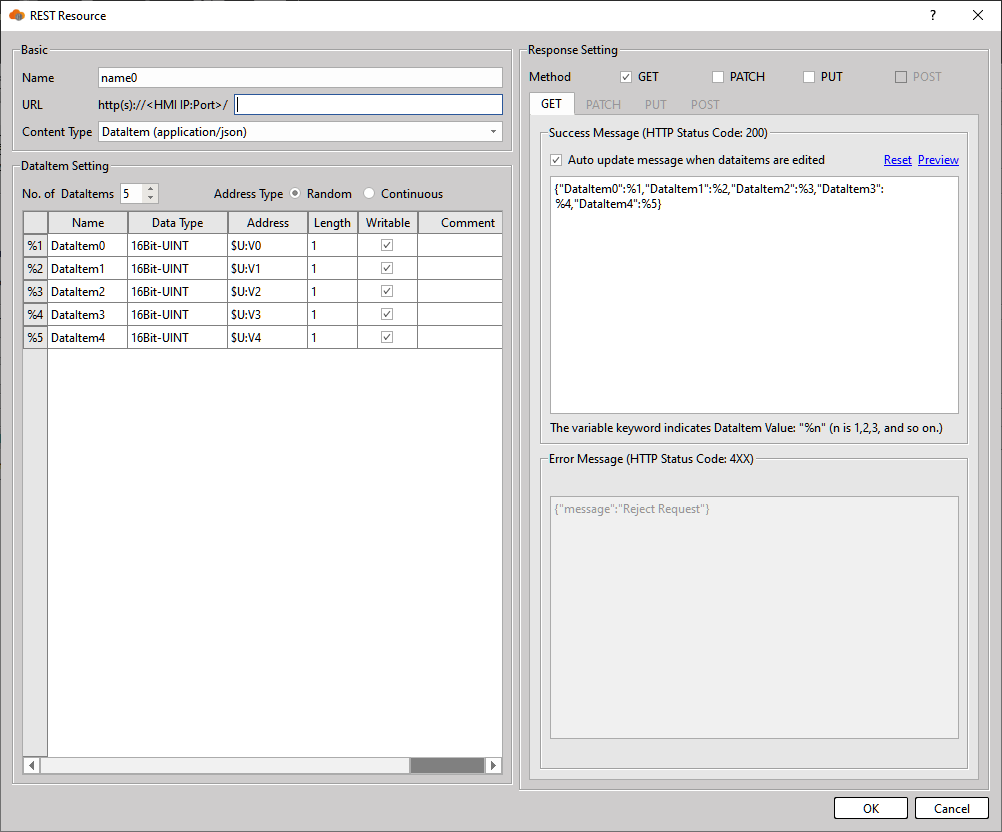
Figure 214 【REST Resource】【Dataitem】Editing Window
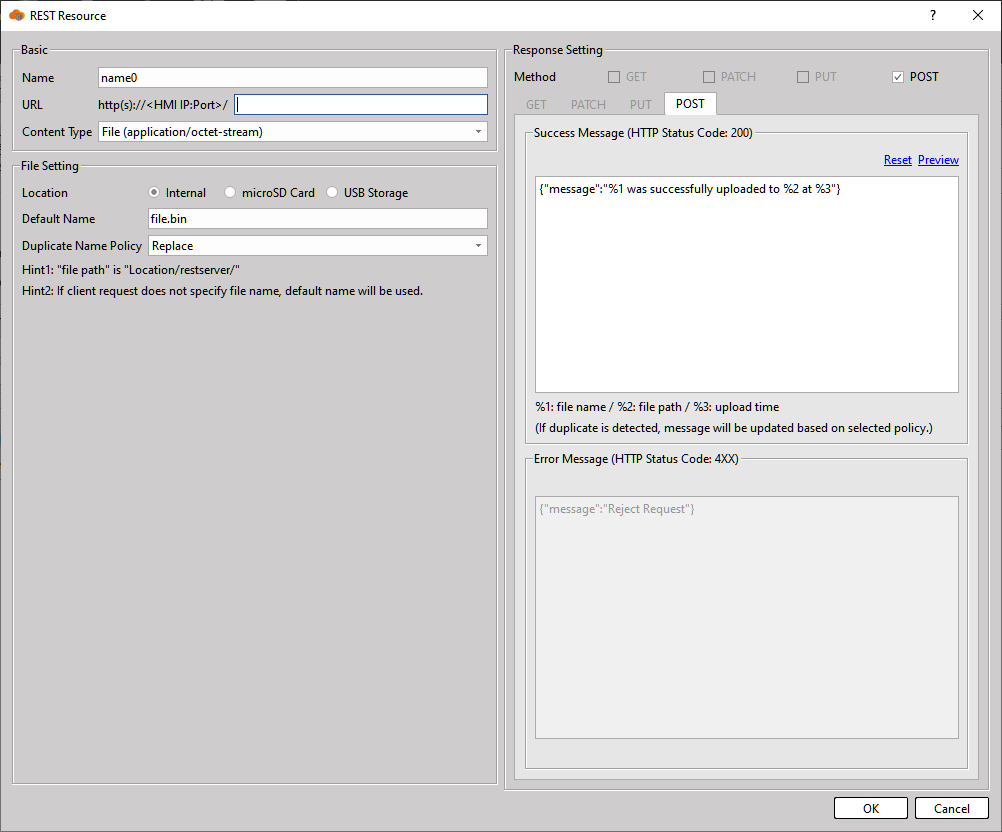
Figure 215 【REST Resource】【File】Editing Window
Table 106【REST Resource】Edit Properties
|
Property |
Description |
|||||||||||||||||||||||||||||||||||||||||||||||||||||||||||||||||
|
【Basic】 |
【Name】 Set the resource name for description purposes. 【URL】 Define the resource path, for example : redfish/v1/Systems External clients can send requests using this URL. *Notice that the URL always starts with“http(s)://HMI IP:Port/"
【Content Type】 When clicked, a menu will appear to configure the data format used when receiving requests. 【Dataitem (application/json)】 Allows reading and writing data items using JSON format. 【File (application/octet-stream)】 Allows file uploads. |
|||||||||||||||||||||||||||||||||||||||||||||||||||||||||||||||||
|
【DataItem Setting】 |
Only visible when【Content Type】is【Dataitem (application/json)】. 【No. of DataItems】 Defines the number of dataitems in the resource. 【Address Type】 【Continuous】 Only the first item address needs to be defined.Other item addresses are automatically generated and cannot be modified. 【Random】 Each data item address can be manually configured. The following are the instructions for setting up data items: 【Name】The name must not be empty and must be unique. 【Data Type】Select the data type. 【Address】Configure the register address. 【Length】Number of word units used (1 word = 2 characters). 【Writable】Enable to allow modification; disabled = read-only. 【Comment】Optional description. |
|||||||||||||||||||||||||||||||||||||||||||||||||||||||||||||||||
|
【File Setting】 |
Only visible when【Content Type】is【File (application/octet-stream)】. 【Location】 Defines where uploaded files are stored, including Internal, microSD Card, USB Storage. 【Default Name】 If the client does not specify a filename, this default filename will be used. Examples : file.bin, test.txt, img.jpg. The filename can be modified but cannot be empty. 【Duplicate Name Policy】 Defines how to handle files with the same name : 【Replace】 Overwrite the existing file. 【Skip】 Skip this step and do not upload new files. 【Rename with timestamp】 Rename the original file by adding a timestamp, then upload it as a new file. For example, the original file "file.bin"becomes"file_2025-12-19T16-18-48.093.bin" |
|||||||||||||||||||||||||||||||||||||||||||||||||||||||||||||||||
|
【Response Setting】 |
【Method】 Supported request methods for this resource URL:
Multiple methods can be selected, but at least one method must be chosen. Selecting a method will enable a configuration page for editing the response message : 【GET】
【PATCH】
【PUT】
【POST】
|
|||||||||||||||||||||||||||||||||||||||||||||||||||||||||||||||||
17.2.2 Common Test Tools
-curl Command
curl is a built-in command-line network tool used to send REST requests to the server.
Basic Syntax
curl -X [METHOD] [URL]
Common Test Examples
- GET (Read Data)
curl -X GET http://192.168.0.100:8000/data
Used to confirm that the server responds correctly.
- PATCH (Update Partial Data)
curl -X PATCH http://192.168.0.100:8000/data \
-H "Content-Type: application/json" \
-d "{\"status\":\"on\"}"
You can use the -d option to send JSON data to the server to test the write function.
- PUT (Update All Data)
curl -X PUT http://192.168.0.100:8000/data \
-H "Content-Type: application/json" \
-d "{\"status\":\"on\" ,\"level\":3,\"enabled\":true}"
You can use the -d option to send JSON formatted data to the server to test the ability to write everything at once.
- POST (Upload File)
curl -X POST http://192.168.0.100:8000/file \
-H "Content-Type: application/octet-stream" \
–data-binary "@C:\test.bin" \
-H "X-Filename: test_upload.bin"
You can use –data-binary to specify the file to upload, and you can use -H "X-Filename" to specify the file name.
- Basic Authentication
curl -u username:password -X GET http://192.168.0.100:8000/data
If the server has enabled account and password verification, you can use -u to pass in login information.
- HTTPS (TLS)
curl -k -X GET https://192.168.0.100:8000/data
The -k parameter is used to trust the server’s self-signed credentials, which is convenient for use during the testing phase.
-Postman
Postman is a commonly used API testing tool for sending REST requests and viewing server responses.
- Enter the request URL. Example: https://192.168.0.100:8000/test
- Select the request method (Example : GET or PATCH).
- If authentication is required. Go to Authorization page, Select Basic Auth, and enter Username and Password
- If TLS is enabled using the HMI self-signed certificate. Go to Settings page, turn OFF “Enable SSL certificate verification” .
- If sending data (Example : PATCH request). Go to Body page, select Raw and JSON as data type, enter JSON content
- If uploading files ((Example : POST request). Go to Body page, select Binary and upload the file, Go to Headers page, and set “Key/Value” as below.
|
Key |
Value |
|
Content-Type |
application/octet-stream |
|
X-Filename |
指定檔名(例如:file.bin, test.txt, img.jpg) |
(If Content-Type is not specified, Postman may automatically convert it and cause errors.)
- Click Send to view the server response and status code.
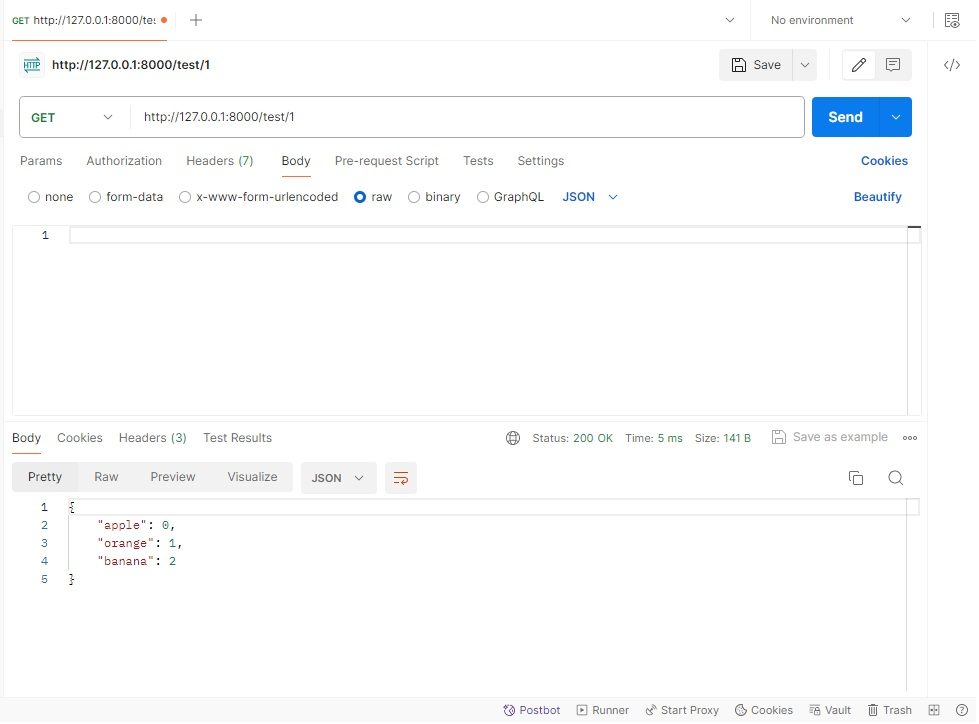
Figure 216 【REST Resource】【Dataitem】Editing Window
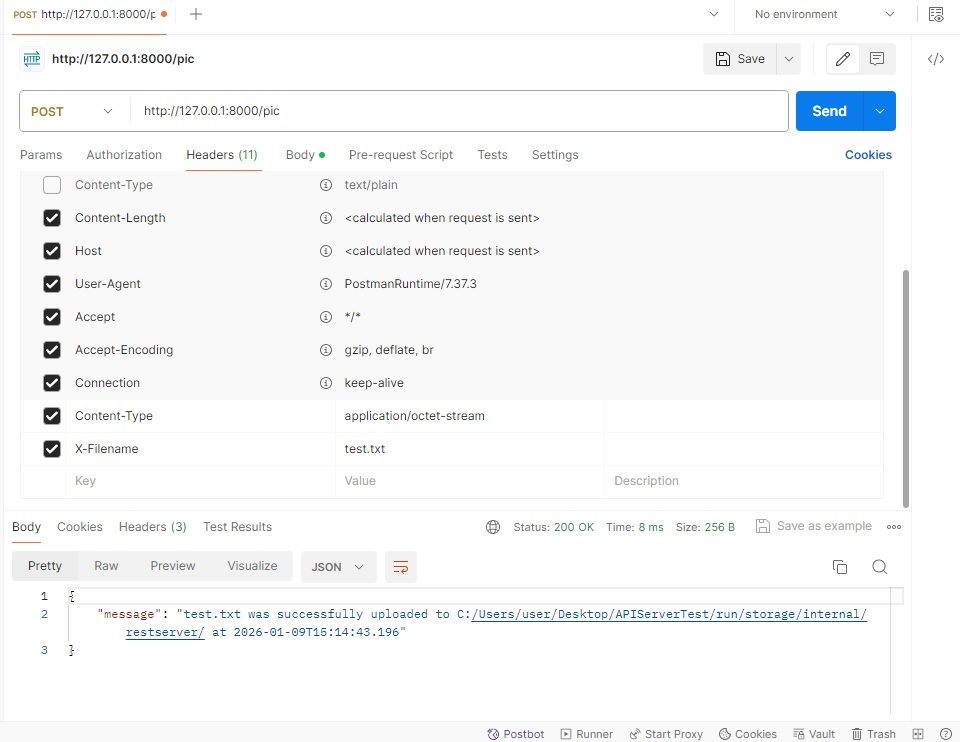 Figure 217 【REST Resource】【Dataitem】Editing Window
Tip: press ← → to switch chapters, Ctrl+K to search