Different operating levels can be set for different objects during HMI operations so that different objects can be used or seen when different users log into the HMI. This prevents operating errors or ensures the security of the data.
5.1 【Security】Settings
5.1.1 【Security】Basic Settings
【Security】can be clicked on the【System】window in the【Project Explorer】to the left of the FvDesigner to enter its setting screen as shown below:
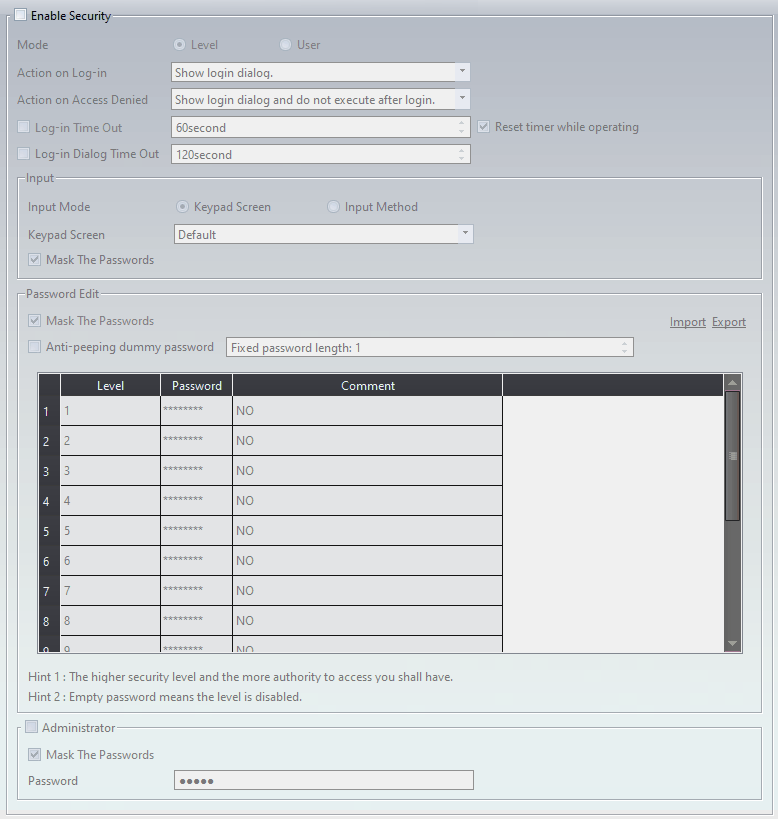
Figure 86 Basic Setting Screen for【Security】
Table 38 Basic Setting Properties of【Security】
|
Property |
Description |
|
【Enable Security】 |
Select to enable【Security】; this is the main switch of【Security】. 【Mode】 The mode can be divided into the following two types:
Only the password needs to be entered during login. Security levels range from 1~15. The higher security level allows more authority for the access.
The user name and password needs to be entered during login. Allows a maximum of 100 user accounts. Planning projects need to set【Level】and【User】 mode, the mode can not be switched during operation. 【Action on Log-in】 When the mode is【Level】, this option will be displayed, and you can choose the behavior when logging in, which is divided into the following two types:
Pop-up the login dialog to enter the password
Only pop-up the keypad to enter the password 【Action on Access Denied】 When the【Lowest User Level】allowed by a certain object is higher than the level where the user currently logged in, 【Security】will deny execution actions. This setting is used to determine the behavior of【Security】after denying the execution; it is divided into the following four types:
No response
Shows the password entry (or user name) login dialog, will execute object’s action, such as the operation control of the button needs level 2, press the button will show login dialog, login password even or bigger than level 2, the current level will be changed, and the button will do action.
Shows the default denial message of the system 【User Name Type】 When it is in【User】mode, this option will be displayed. You can select the text format of the user name to ASCII String, Unicode String(Simplified Chinese, Traditional Chinese, and Others), GB18030 String(Simplified Chinese), and BIG5(Traditional Chinese). 【Log-in Time Out】 Set to make the HMI logout to the lowest user level when the HMI has not been operated for a certain amount of time. 【Log-in Dialog Time out】 Set the staying time for the dialog. |
|
【Input】 |
Keypad mode for entering password. 【Input Mode】 Support default【Keypad Screen】and【Input Method】. 【Keypad Screen】 Can choose the keypad screen or designer-defined keypad. 【Input Method】 Can select Pinyin(Simplified Chinese) or Chewing(Traditional Chinese) input method. |
|
【Password Edit】 |
【Mask Passwords】 Set encrypt passwords in the password form. 【Anti-peeping dummy password】 The function of this function is to use the set password as a keyword. You can enter any alphanumeric characters before and after the correct password, and you can still log in normally. For example, the password is set to 1234, and when logging in, enter 1234abgt or dj1234. 【Mode】is set to【Level】, the password must be of fixed length. If it is different from the fixed length, the compilation will report an error; 【Mode】is set to【User】, the password length is not limited, but the maximum length is still 8 characters. 【Import】 Import CSV files with specific formats and updates it directly into the password from. 【Export】 Export the password form below into a CSV file with a specific format. 【New】 Adds a new user to the bottom of the table. The Level, Name, Password, and Comment can be set. This option is only available when the【Mode】is set to【User】. 【Delete】 Delete the currently selected user. By default, the bottommost entry in the table is delete. This option is only available when the【Mode】is set to【User】. 【Password Table】【Level】 Security level of a user. This option is only available when the【Mode】is set to【User】. Levels 1 to 15 are available. 【Password Table】【Name】 Set the user name. This option is only available when the【Mode】is set to【User】. 【Password Table】【Password】 Set the password. This option is only available when the【Mode】is set to【User】. 【Password Table】【Comment】 Add a comment describing the level/user. Tip: Multiple users might need to be planned when the【Mode】is【User】.【Export】can be used to generate a default CSV file for editing, and then【Import】is used to update the project. |
|
【Administrator】 |
The administrator has the highest authority of the level/user mode, and can edit the passwords of all levels/users. It is not affected by【Advanced]】【Only Modify Current Level’s Password】, and the level/password of the administrator cannot be modified when the HMI is running. 【Mask Password】 Mask the password to avoid other people’s peeping. 【Name】 Is only for【user】mode, set the administrator’s name. 【Password】 Set the administrator’s password, it can’t be empty. Note: The password of each level in the level mode cannot be the same as the password of the administrator. Each user name in user mode cannot be the same as the administrator’s name. |
5.1.2 【Security】Advanced Settings
Enter basic settings of【Security】function, and click【Advanced】paging than go to its setting page below:
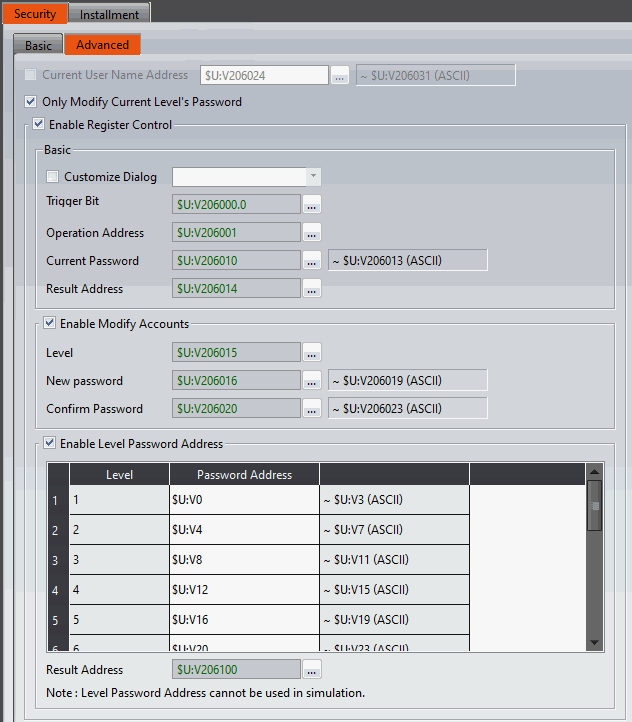
Figure 87 Advanced Setting Screen for【Security】【Level】
Table 39 Advanced Setting Properties of【Security】
|
Property |
Description |
||||||||||||||||||||||||||||||||||||||||||||||||||||||||
|
【Advanced】 |
【Current User Name Address】 Set the display address of the current login user name, can set as HMI internal address or PLC register and will occupy 8 consecutive registers, for example, setting R100, will occupy R100~R107, it can be set when the mode choose as【User】. |
||||||||||||||||||||||||||||||||||||||||||||||||||||||||
|
【Only Modify Current Level’s Password】 |
Only can modify the current level’s password. |
||||||||||||||||||||||||||||||||||||||||||||||||||||||||
|
【Allow Changing Password in Login Dialog】 |
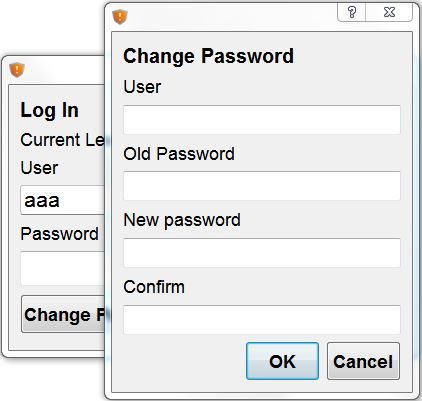
This function can choose when it’s in【User】mode.
|
||||||||||||||||||||||||||||||||||||||||||||||||||||||||
|
【Enable Register Control】 |
Check whether to enable the advanced function of 【Security】. |
||||||||||||||||||||||||||||||||||||||||||||||||||||||||
|
【Basic】 |
【Customize Dialog】 You can select the password login dialog window that designer defined, this option can only select【Window Screen】. 【Trigger Bit】 Set the trigger signal, when【Trigger Bit】turn OFF to ON will excute once, 【Operation Address】setting mode. 【Operation Address】 Depending on the mode, different operating types are provided, where you can set the HMI internal address or PLC register. Data types is 16Bit-INT. 【Level】mode provides the following 5 types of operations.
Note: Need to check the【Enable Modify Accounts】 option, the operation address in the value of 2,3,4 and other functions will take effect. 【User】mode provides the following 7 types of operations.
Note: Need to check the【Enable Modify Accounts】option, the operation address in the value of 2,3,4,5,6 and other functions will take effect. 【User ID】 User ID to sign in. 【Current Password】 Current level password, or password to login. 【Result Address】 When【Trigger Bit】turn OFF to ON, the system will excute depending on different mode of【Operation Address】settings, and the result will store in this address. The meaning of each code is as follows.
|
||||||||||||||||||||||||||||||||||||||||||||||||||||||||
|
【Enable Modify Accounts】 |
【Level】 Password level is enabled or disabled, the level to be set when modifying the user level. 【New Password】 Change the password to set the new password. 【Confirm Password】 Change Password In addition to setting a new password, also set the confirmation password,and the new password is the same as the confirmation password。 |
||||||||||||||||||||||||||||||||||||||||||||||||||||||||
|
【Enable Level Password Address】 |
Visible when the mode selects【Level】, and the password can be modified from the register after enabled. 【Result address】 The length of this address is 16 bits, and the result of whether the passwords of different levels are legal will be stored in each bit separately. The legal is 0 and the illegal is 1. The password will only be updated when the password for each level is legal. Note: 1. The new password and the old password of other levels cannot be the same 2. The new password and other levels of new passwords can not be the same |
||||||||||||||||||||||||||||||||||||||||||||||||||||||||
|
【Enable USB Security Key】 |
Please refer to chapter 5.7-USB Security Key |
Under【Level】mode or【User】mode, the relevant parameters must be set before the different operation types are triggered, as shown in the table below, for example, to modify the password,
- first in the【Current Password】to enter the password to change the level,
- 【New Password】and【Confirm Password】enter the password you want to change,
- and let【Operation Address】equal to 3,
- then let【Trigger Bit】turn OFF to ON, so that the correct implementation of advanced【Security】function of the password modification action.
【Level】mode
Table 40 The relevant control address required in the【Level】mode
|
Value of operation address |
Operation Type |
Basic |
Advanced |
||
|
Current |
Password Level |
New Password |
Confirm Password |
||
|
0 |
Log in |
V |
|||
|
1 |
Log out |
||||
|
2 |
Password Modify |
V |
V |
V |
|
|
3 |
A group of password levels is enabled |
V |
V |
V |
|
|
4 |
A group of password levels is disabled |
V |
|||
Note: Need to check the【Enable Modify Accounts】option, the operation address in the value of 2,3,4 and other functions will take effect.
【User】mode
Table 41 The relevant control address required in the【User】mode
|
Value of operation address |
Operation Type |
Basic |
Advanced |
|||
|
User ID |
Current Password |
Level |
New Password |
Confirm Password |
||
|
0 |
Log in |
V |
V |
|||
|
1 |
Log out |
|||||
|
2 |
Password Modify |
V |
V |
V |
V |
|
|
3 |
Add User |
V |
V |
V |
V |
|
|
4 |
Delete User |
V |
||||
|
5 |
Modify User Level |
V |
V |
|||
|
6 |
Modify User Level and Password |
V |
V |
V |
V |
V |
Note: Need to check the【Enable Modify Accounts】option, the operation address in the value of 2,3,4,5,6 and other functions will take effect.
5.2 Security Settings of Objects
The settings of【Security】were described above. Every object (except for drawing objects) has security settings themselves that must also be set if security management is needed.
The image below is the setting screen of an object; the security setting of objects can be found in the【Operation】tab page as shown in the image frame below, in which the green frame is the security control of visibility and the blue frame is the security control for operations. For example, the blue box in the figure below has the operation of the object set to a user level of 4. Therefore, the minimum level of user needed to operate the object is 4.
Note: Objects will not have security control for operations if the object itself does not have operation functions, such as meters etc.
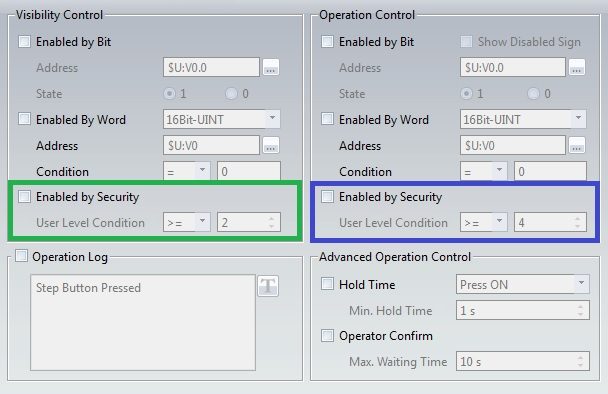
Figure 88 Security Settings for Objects
Table 42 Security Setting Properties of Objects
|
Property |
Description |
|
【Visibility Control】 |
Visibility control of the object can be controlled by a specific Bit or User Level. 【Enable by Bit】 Select to control visibility by a specific Bit. 【Address】 Set the address of the visibility control Bit. 【State】 Set the control bit as 1 or 0 to show object. 【Enabled by Word】 Check whether the visibility is controlled by word. 【Address】 Set the visibility control word address. 【Condition】 Set the condition of word control and when it is true then show up the object, when false not show the object. The condition include’ =’,’ !=’, ‘>’, ‘<’, ‘>=’, ‘<=’. 【Enabled by Security】 Select if visibility is to be controlled by the level of the user logged in. 【User Level Condition】 Set the level and condition of the object. |
|
【Operation Control】 |
Operation control of the object, which can be controlled by a specific bit or user level. 【Enable by Bit】 Select to control operation by a specific bit. 【Show Disabled Sign】 Check if you want to display the forbidden symbol, it’s valid when check【Enable by Bit】,【Enabled by Word】 or【Enable by Security】.
【Address】 Set the address of the operation control bit. 【State】 Set the control bit as 1 or 0 to operate object. 【Enabled by Word】 Check whether the operation is controlled by word. 【Address】 Set the operation control word address. 【Condition】 Set the condition of word control and when it is true then the object can be controlled, when false not the object can not be controlled. The condition include’ =’,’ !=’, ‘>’, ‘<’, ‘>=’, ‘<=’. 【Enabled by Security】 Select if operation is to be controlled by the level of the user logged in. 【User Level Condition】 Set the level and condition of the object. |

5.3 Exporting/Importing CSV Files
Described below, the exported/imported CSV file can be divided into【Level】and【User】, and they are not compatible with one another.
- CSV file for【Level】:
As shown in the figure below where the section marked with the red frame is used by the system and no changes can be made; the section marked with the green frame can be edited.
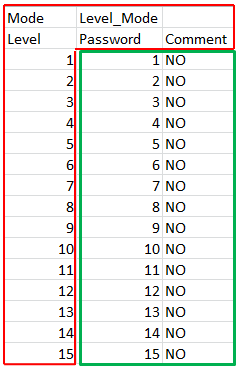
Figure 89 CSV File for【Level】
- CSV file for【User】 :
As shown in the figure below where the section marked with the red frame is used by the system and no changes can be made; the section marked with the green frame can be edited where the “Level” must be an integer between 1~15. Also, the section marked with the green frame can be appended in order to add or delete a user.
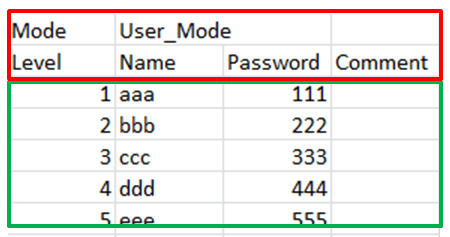
Figure 90 CSV File for【User】
5.4 Security Features of the Function Switch
The function switch has options that include【Log In】,【Log Out】,【Password Manager】, and【Import User Accounts】that are security features. Each function is explained in detail below.
5.4.1 【Log In】and【Log Out】Function Switch
The function switch is set to【Log In】. When pressed, the function switch opens a login screen Figure 91. The login screen opened depends on whether the security mode was set to【Level】or【User】. If the security mode was set to【Level】, The login screen requires only a password. Enter the password of the level the user wants to access to change the current user to that level. If the security mode was set to【User】, the login screen Figure 92 prompts the user to enter a username and password.
The function switch is set to【Log Out】. When pressed, the current level is reset to the lowest level if the security mode was set to【Level】. The username will become blank if the security mode was set to【User】.
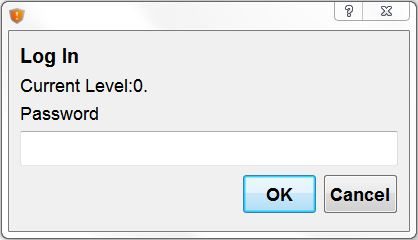
Figure 91【User】Mode Login Window
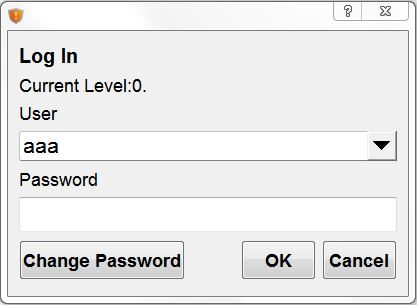
Figure 92【User】Mode Login Window
5.4.2 【Password Manager】Function Switch
The password management in the function button is mainly provided to the operator during the HMI operation for the operator to view, modify, add, or delete passwords, etc. When the password management function button is pressed, the HMI interface will display the password table for operation If you want to view, modify, add or delete, you need to log in to the security level before pressing this function button, such as the password for login level 5, the password table will show the password below level 5 (including level 5).
If the security mode is set to【Level】, as Figure 93, the【Password Manager】gives the user access to the current level’s password as well as passwords for all lower levels. If the security mode is set to【User】, as Figure 94, the【Password Manager】gives the user access to all users at the current level or lower than the current level. The user can add or delete users, change the level, name, and password of other users. The level can only be changed to at most the current user’s level.
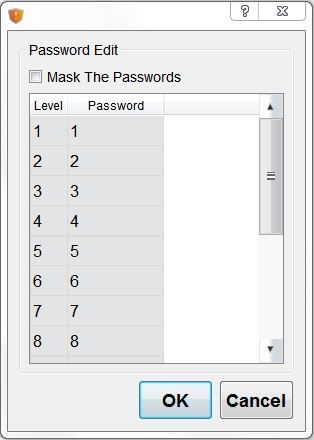
Figure 93【Level】Mode Password Manager Window
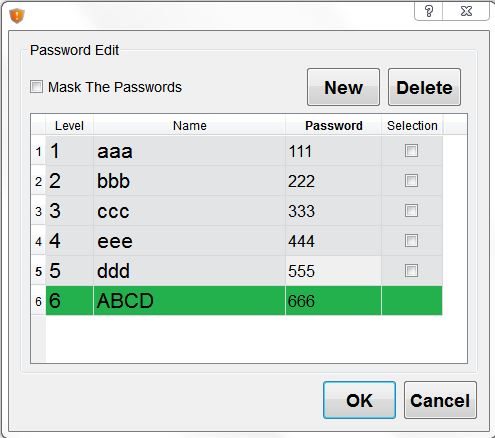
Figure 94【User】Mode Password Manager Window
5.4.3 【Import User Accounts】Function Switch
This function allows the account information saved in a CSV file to be imported into the current program. When the function switch is pressed, the user can choose to import from the HMI internal memory, the microSD card, or USB. After selecting a file to import, a confirmation dialog will appear.
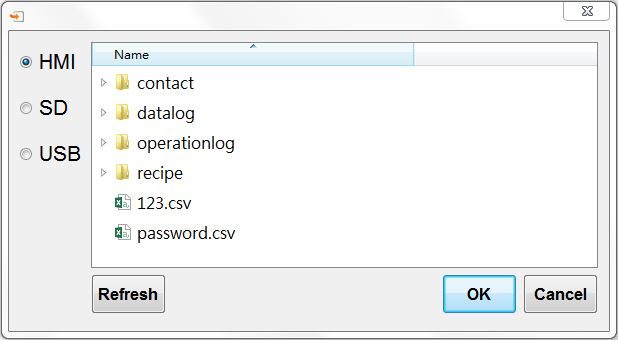
Figure 95 Import User Account Window
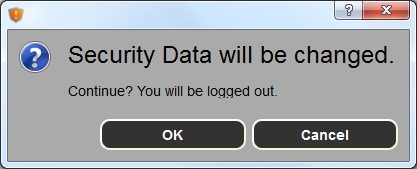
Figure 96 Import User Confirmation Window
5.5 Security Features in Screen Properties
Security features can be applied to base screens in the project. These features include the【Security Level】of a screen,【Change Screen Auto Logout】, and 【Change User Level】for【Change Screen】buttons.
5.5.1 Screen Properties Security Level
The【Security Level】in screen properties can set the security level of the screen. As a result, access to this screen by a user with lower level than the one set will require a password. For example, in screen 12, the security level has been set to 2 and screen 1 contains a change screen button set to change the current screen to screen 12. If the user’s level is less than 2, upon pressing the change screen button, a password prompt require a password in order to change the screen.
【Change Screen Auto Logout】In the screen properties, you can check whether you want to reduce the level to the lowest level when leaving this screen.
If screen 2 has the【Change Screen Auto Logout】option set, upon exiting from screen 12, the user has to enter the appropriate password in order to gain access to screen 12 if the change screen button is pressed again.
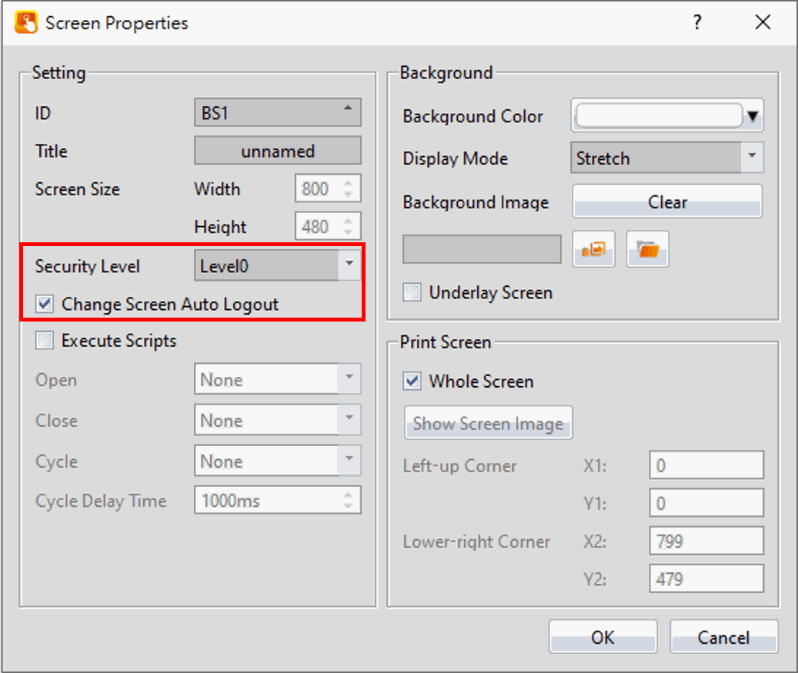
Figure 97 Security Settings in Screen Properties
Note: When cancel is pressed on the password dialogue screen, it is set such that the prompt will not continuously pop up. Access the object again for another password prompt.
5.5.2 Change Screen Button Change User Level
In the【Change Screen】button properties, there is an option to【Change User Level】. For example, the【Change User Level】option is selected and the level is set to 3. When the screen has switched to the selected screen, the user’s level is now 3.
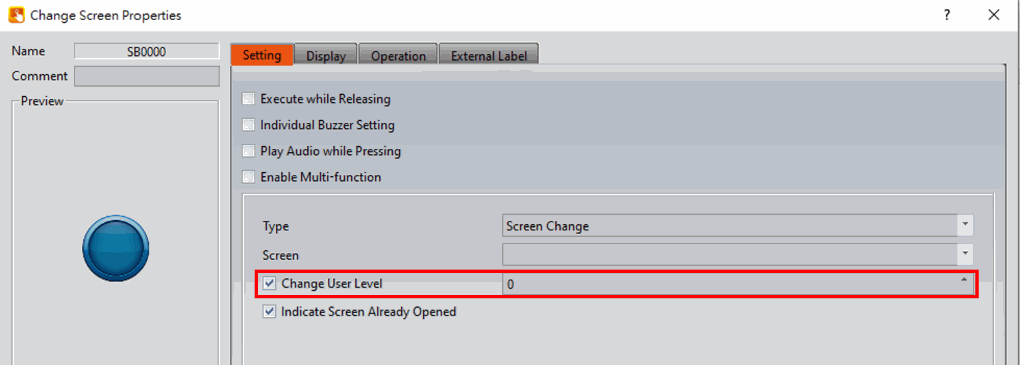
Figure 98 Security Settings in Change Screen Button
5.6 Installment
This function allows the user to a authorization time period. When this period ends, the HMI device will be locked. A window will appear on the HMI that does not let the HMI operate before the new authorization password is entered. Once the password is entered, the HMI device can be used. This function provides both static and dynamic modes.
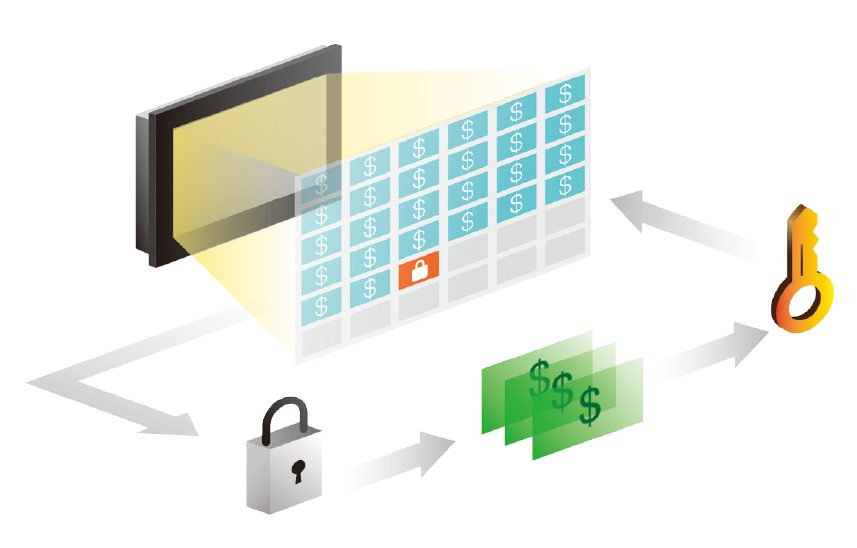
Figure 99 Installment application illustration
5.6.1 Installment Basic Settings
To get to the【Installment】settings, open the Project Explorer, click on Security (In the System section) and go to the second tab labeled Installment.
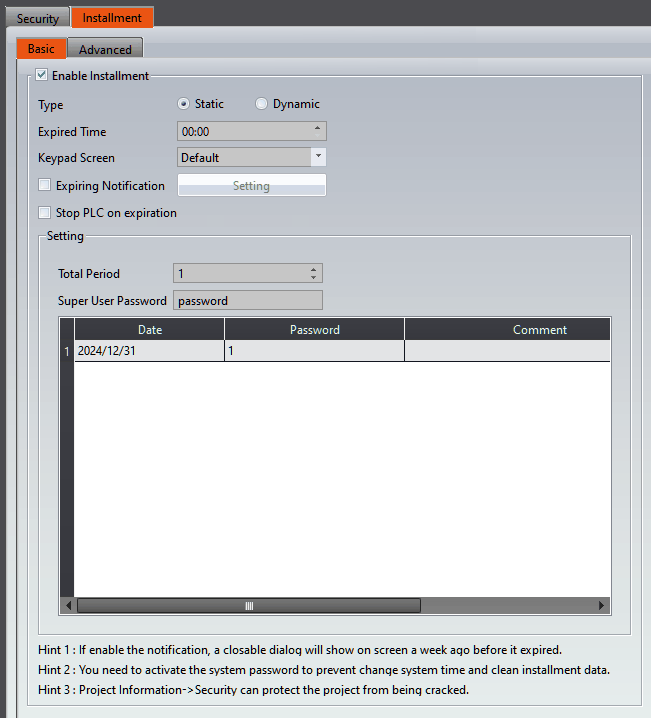
Figure 100 Installment Settings
Table 43 Installment Attributes
|
Field |
Description |
|
【Enable Installment】 |
Check whether to enable【Installment】, it’s able to do the advanced settings after enable this function. 【Types of Installment】: 【Static Installment】specifies the total number of expiration periods during design the project, the date of each period, and the password. 【Dynamic Installment】allows the user to adjust the expiration period on the running HMI device 【Expired Time】 Set the expiration time on the due date. 【Keypad】When the【Expiration Notification】pops up, a keypad will also pop-up, which is used to enter the new password. 【Expiration Notification】 Set whether to use the expiration reminder, if you check the 【Expiration Notification】, you can set how many days before you want to pop up a password input window for the operator to enter the password. 【Stop PLC on expiration】 When checked, this option will stop the FATEK PLC (FBs/B1/HB1) at the specified expiration time. |
|
【Static Installment】 |
【Total Period】 The amount of periods to be set, maximum is 48 periods. 【Super User Password】 The password that is used to disable static installment. Can bypass the installment password. 【Installment】【Date】 Set the expiration date of the installment period. The due date of the subsequent installment must be later than that of the previous one. The device will be locked until the password is entered. 【Installment】【Password】 The password for the installment period. When the installment mode is【Static】, the password can be modified. The maximum amount of charactars per installment password is 20. 【Installment】【Comment】 Edit installment period comment. |
|
【Dynamic Installment】 |
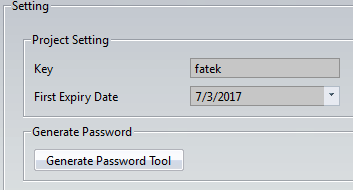
Click【Dynamic】and the setting window below will appear
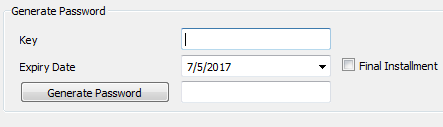
【Project Setting】【Key】 Key that is stored in the project. The password generator can be used to generate the next password. Up to 8 characters can be entered. 【Project Setting】【First Expiry Date】 First expiration date of the dynamic installment. 【Password】 You can generate a password using the next expiration date as shown below:
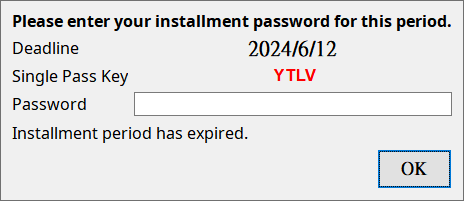
【Password Generator】【Key】 Needs to be consistent with the key set for the project. 【Password Generator】【Expiration Date】 The expected date for the next period. 【Password Generator】【Single Pass Key】 The HMI will generate a single-use key (as shown in red in the image below). The user provides 【Single Pass Key】 to the sales department, which can then create a password that only this specific HMI can use.
【Password Generator】【Final Installment】 Check if it the last installment period of the dynamic installment. 【Password Generator】【Generate Password】 Press this button and the password will be generated. This password allows the user to use the device until the next period. |
5.6.2 Installment Advanced Setting
Provides advanced control options for the【Installment】function, allows designers to achieve advanced installment payment functions through register control, click 【Security】in the【System】window in the【Project Explorer】on the left of the FvDesigner, select【Installment】, and check【Enable Installment】to enter the advanced settings page
As shown in the figure below, the meaning of each setting option is as follows:
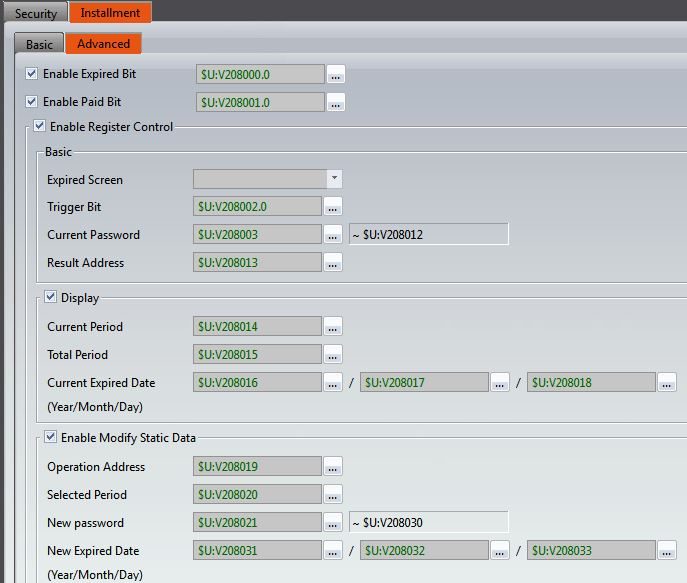
Figure 101【Static】setting window of【Installment】【Advanced】
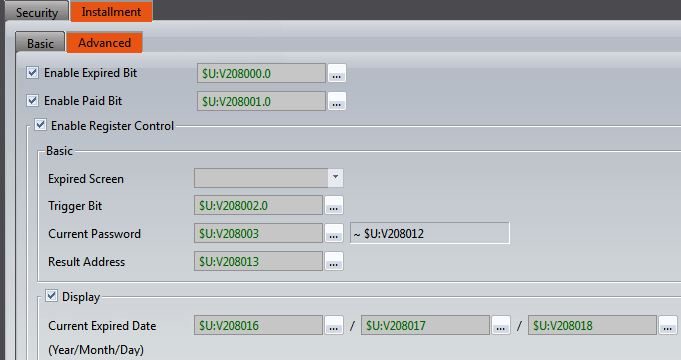
Figure 102【Dynamic】setting window of【Installment】【Advanced】
Table 44 【Installment】properties setting
|
Properties |
Description |
||||||||||||||||||||||||||||||||
|
【Advanced】 |
【Enable Expired Bit】 Check whether to send a bit signal when the installment expires, the bit signal can be internal address or PLC address. 【Enable Paid Bit】 Check whether to send a bit signal when the installment has been paid , the bit signal can be internal address or PLC address. |
||||||||||||||||||||||||||||||||
|
【Enable Register Control】 |
Check【Installment】function has enable the register’s advanced control. |
||||||||||||||||||||||||||||||||
|
【Basic】 |
【Expired Screen】 Select the custom login screen for which you want to enter the password. 【Trigger Bit】 Set the trigger bit for the password of the【Installment】, the bit signal can be internal address or PLC address , when the signal turned from OFF to ON , then the bit will tiggger a time. 【Current Password】 Set the address of the current password. 【Result Address】 Set after【Trigger Bit】signal has turn OFF to ON, system will check the execution result then put the result to this address, each code of the meaning as below.
|
||||||||||||||||||||||||||||||||
|
【Display】 |
【Current Period】 Display the current period, this function can only be used in【Static】mode. 【Total Period】 Display the total periods, this function can only be used in【Static】mode. 【Current Expired Date】 Display the current expired date, and the year, month, day will display in three different setting addresses. |
||||||||||||||||||||||||||||||||
|
【Enable Modify Static Data】 |
Check whether to enable modification of【Static】mode’s data, including changing passwords, adding or removing periods, etc. 【Operation Address】 Provide different kinds of operation modes, table as below, the adderss can be internal address or PLC address.
【Selected Period】 Select the【Installment】period that would like to modify or remove, when the value of the address is 0 will display or modify the data of【Super User】. 【New Password】 Provide new password that midified, if the mode is【Display the period revelant information】then the address will display the password for this period. 【New Expired Date】 Provide new expired date that midified, if the mode is【Display the period revelant information】then the address will display the expiration date for this period. If has checked【Enable Modify Static Data】then the meaning of each code of【Result Address】are as follows
|
Table 45【Operation Address】relevant control address required in【Static】mode
|
Value of operation address |
Operation type |
Basic |
Advanced |
||
|
Current password |
Select period |
New password |
New expied date |
||
|
0x0000 |
Used in【Enable Register Control】 【Basic】function |
V |
|||
|
0x0001 |
Display this period’s revelant information |
||||
|
0x0002 |
Modify this period’s revelant information |
V |
V |
V |
V |
|
0x0003 |
Add a new period |
V |
V |
V |
|
|
0x0004 |
Remove the selected periods |
V |
|||
5.6.3 Installment Related Function Switch
Function buttons and security-related functions, including【Installment: Enter Installment Password】,【Installment: Modify Static Installment】. These functions can be used through a【Function Switch】.
5.6.3.1 【Installment: Enter Installment Password】Function
When using the installment function, includes【Installment: Enter Installment Password】and【Installment: Modify Installment】buttons.
When the mode selection is【Static】, the following figure will appear, which will allow the operator enter the next password.
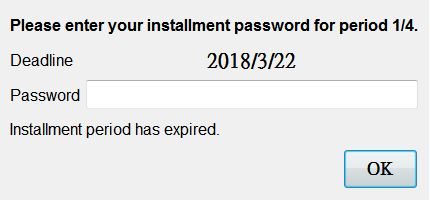
Figure 103 Static【Installment】password input window
When the mode is【Dynamic】the following window will appear, which will allow the operator to enter the next password.
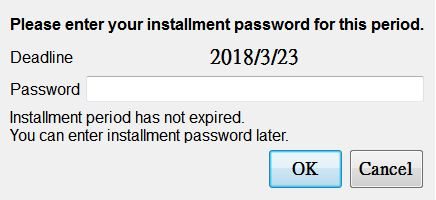
Figure 104 Dynamic【Installment】mode password input window
5.6.3.2 【Installment: Modify Installment】
The【Modify Installment】function allows the supplier of the application to be able to modify, add, delete, the installment periods. After clicking on the button, passwords and installment dates can be changed.
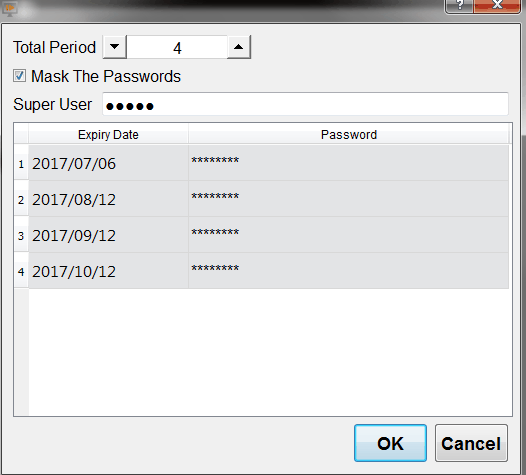
Figure 105【Modify Installment】Window
Table 46【Modify Installment】
|
Field |
Description |
|
【Modify Installment】 |
【Total Periods】 The amount of installment periods to be set, maximum amount of periods is 48. 【Mask the Passwords】 This option allows the user to hide the passwords currently on the screen. The characters turn into black dots for safety. This can also be disabled by unchecking the box. 【Super User Password】 Password that can bypass all installment period passwords. Can be changed by user controlling the installment periods. It is hidden for safety but can be made visible by unchecking the Mask the Passwords box. 【Expiry Date】 The user is able to adjust the【Expiry Date】. The expiration date needs to be a later date than the previous installment period. 【Password】 The password that is set to let the user be able to operate the machine again. The maximum number of characters per password is 20. |
5.7 USB Security Key
The USB security key function is a secure login method. Use the tool to generate a key file and place it in the flash drive, and you can log in to the corresponding level according to the settings.
5.7.1 Enable USB Security Key
To use the USB security key function, the mode of the security function needs to be selected【User】, and then the screen can be found in the【Advanced】tab.
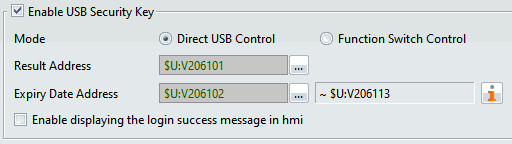
Figure 106 Enable USB Security Key
Table 47 USB Security Key setting properties
|
Function |
Description |
||||||||||||
|
【Enable USB Security Key】 |
Check whether to enable USB security key function. |
||||||||||||
|
【Mode】 |
2 methods to login: Direct USB Control and Function Switch Control. 【Direct USB Control】 When plug the USB flash disk into the HMI with security key inside, it will longin the recorded user, and log out automatically when remove the USB flash disk. 【Function Switch Control】 After plugging the USB flash disk into the HMI with security key inside, press the function switch【Security: USB Log In】to log in. |
||||||||||||
|
【Result Address】 |
When the USB flash disk removed, the system will put the automatically log in/out result in this register address. This function can be used under Direct USB Control, each code meaning introduce as follow:
|
||||||||||||
|
【Expiry Date Address】 |
When the USB flash disk plug into the HMI, the system will automatically store the validity period of the security key in the USB at this address. After the address is set, 12 consecutive addresses with it as the starting address will be used, and the corresponding data type is fixed as【16Bit-UINT】. The meaning of each address is: start date year/month/day, start date Time hour/minute/second, end date year/month/day, end time hour/minute/second |
||||||||||||
|
【Enable displaying the login success message in HMI】 |
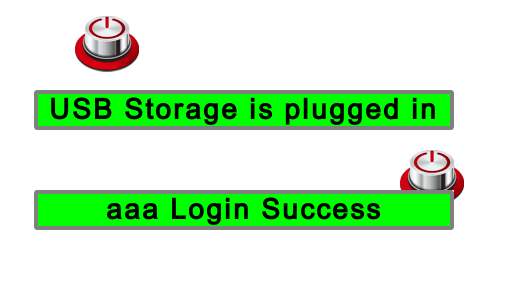
When the USB flash disk plug into the HMI, check whether to display the user login successful message on the HMI. As shown in the figure below, the display on the second line is the login message (aaa is the user name).
|
5.7.2 Create USB Security Key
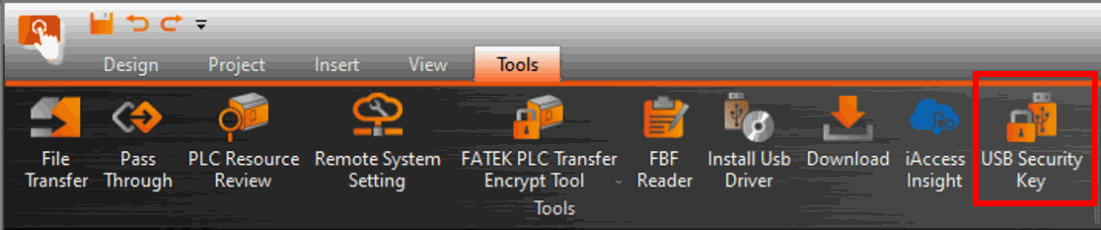
Figure 107 USB Security Key tool
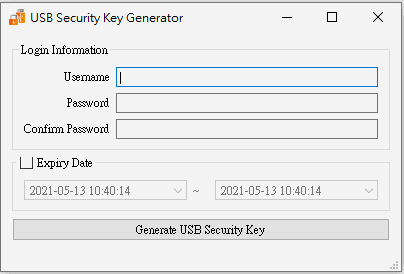
Figure 108 USB Security Key Generator
Table 48 USB Security Key Generator setting properties
|
Function |
Description |
|
【Username】 |
Enter the user name you want to log in. Note: The user account entered must be a user account that already exists on the HMI program |
|
【Password】 |
Enter the password of the user. |
|
【Confirm Password】 |
Confirm the password again. |
|
【Expiry Date】 |
Check whether to enable the expiry date of the security key. If checked, the system will restrict the security key to be used within the entered time range. If the expiry date expires after logging in within the time range, the system will automatically log out. |
|
【Generate USB Security Key】 |
After clicking, a window will pop up for the user to choose the key storage location. |
5.7.3 Notice for Using USB Security Key
- The name of the generated security key file is "usbkey", please do not modify the name to avoid unreadable
- The key file needs to be placed in the root directory of the USB flash disk, if it is placed in the folder, it cannot be read
- The USB security key function only supports P5 series HMI
5.8 Enable RFID Security Operation
To enable the advanced features of the RFID card reader, you need to activate this option.
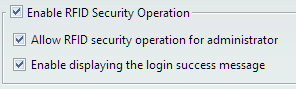
Figure 109 RFID Security Operation
Table 49 RFID Security Operation
|
Function |
Description |
|
【Enable RFID Security Operation】 |
When the mode is set to 【User】, the option becomes visible, and the advanced features of RFID can only be accessed after it’s checked. |
|
【Allow RFID security operation for administrator】 |
After checking, only the super administrator can utilize RFID-related security operations. |
|
【Enable displaying the login success message】 |
Upon successful login, the screen will flash a message (similar to the prompt message when inserting a USB). |
Tip: press ← → to switch chapters, Ctrl+K to search