MQTT is a kind of communication protocol designed for IoT with simple and slight features, it’s suitable with limited hardware and internet bandwidth environment, can reach the needs of remote monitor and data exchange.
The mechanism of message delivery includes publish and subscribe modes, and each of the message needs a topic name to be identified, such as Temperature. Client side includes Publisher and Subscriber, Publisher publish message with topic, Subscriber subscribe topic; Server side is the Broker, charge for receive the message from Publisher then transfer to Subscriber.
When enable MQTT function on HMI, it can play the above mentioned three roles: Publisher, Subscriber and Broker. HMI can publish the data that in the HMI and PLC register address to Broker via MQTT, also can connect with Broker to get the Subscriber’s data. HMI has built-in Broker and no need to search another Broker tool.
This chapter will describe the MQTT settings.
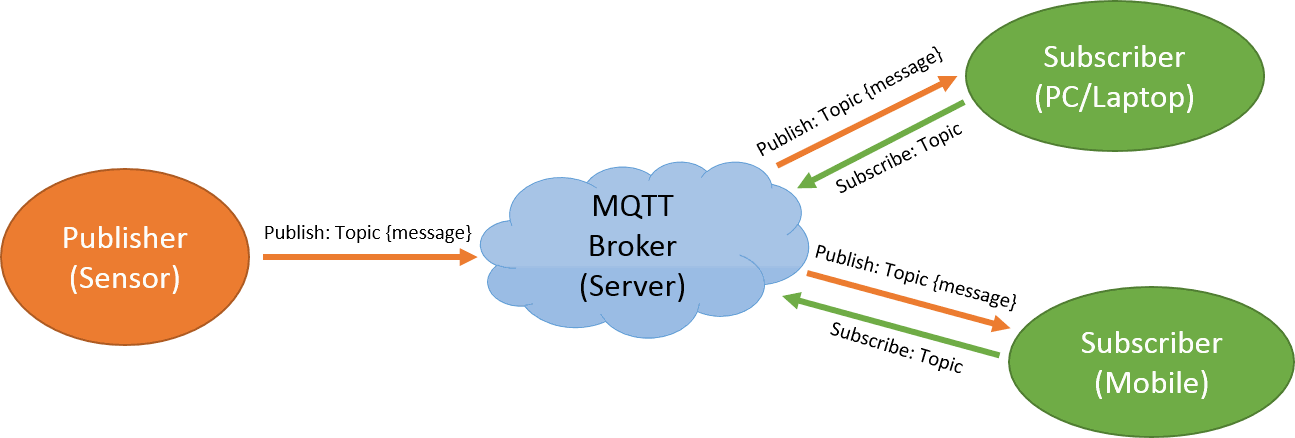
Figure 181 MQTT application schematic diagram
14.1 Server Settings
The MQTT function is in【Project Explorer】【Functions】,【Broker】paging is used to set MQTT server (Broker), figure as below:
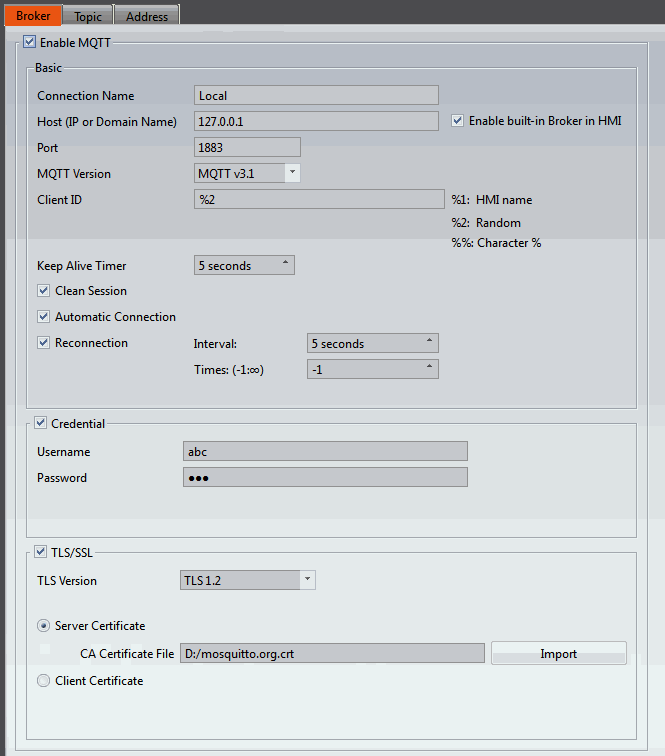
Figure 182【MQTT】【Broker】setting page
Table 91【MQTT】【Broker】setting properties
|
Field |
Description |
|
【Enable MQTT】 |
Enable to use【MQTT】. If want to use MQTT, enable the function to setup. |
|
【Basic】 |
【Connection Name】 Set the connection name, can be used as a description. 【Host (IP or Domain Name)】 Set the address of Broker, can field up IP or domain name. Default is 127.0.0.1. (Note: If specified local side 127.0.0.1, means to connect the HMI built-in Broker, needs to check【Enable built-in Broker in HMI】to connect successfully.) 【Port】 Set the Broker’s port. Default is 1883. 【Enable built-in Broker in HMI】 Decide whether to enable HMI built-in Broker, if enabled, the link limitations are1024, IP and Port will automatically change to default 127.0.0.1 and 1883. 【MQTT Version】 MQTT communication protocol version. 【Client ID】 Client-specific ID, can customized or use a special code starting with % to form a unique ID: %1: HMI name %2: Random code %%: Character% (Note: if use the same Client ID to connect with the same Broker may cause identification error and disconnection.) 【Keep Alive Timer】 Indicates the maximum time interval for the server to receive messages from the client. If the server does not receive a message from the client within one and a half of the connection period, it will automatically disconnect from the client. By the unit of second. 【Clean Session】 The settings in the broker will all be cleared after offline, includes the subscribe topics. 【Automatic Connection】 MQTT will automatically connected when turn on the HMI. 【Reconnection】 Whether to reconnect automatically if MQTT disconnect.
Time interval for reconnection, by the unit of second.
Reconnection times, set ‘’-1’’ as unlimited times. (Note: this reconnection mechanism will not be enabled when the control address for control disconnection is used.) |
|
【Credential】 |
Enter the username and password when the connected broker has set credential. 【Username】Credential user name. 【Password】Credential password. |
|
【TLS/SSL】 |
If the connected broker has use TLS/SSL encrypted message to transfer, user can import the certificate file here. 【TLS Version】 TLS version. 【Server Certificate】 Use server side to certificate. 【Import】the need of certification. 【Client Certificate】 Use client side to certificate. 【Import】the need of certificate file and private key. |
14.2 Topic Settings
The MQTT function is in【Project Explorer】【Functions】, check the checkbox【Enable MQTT】then will appear the【Topic】paging.【Topic】is divided into【Topic Publish】and【Topic Subscribe】. Click【Add】to add new topic, click【Delete】to delete the selected topic, click【Edit】or double click the selected topic to edit, if there is an existing item in the topic list, click【Export】to export the topics into specific format of CSV file, click【Import】to import specific format of CSV file to update the topics directly. There is an unique ID in the left side of the list, is for topic’s ID.
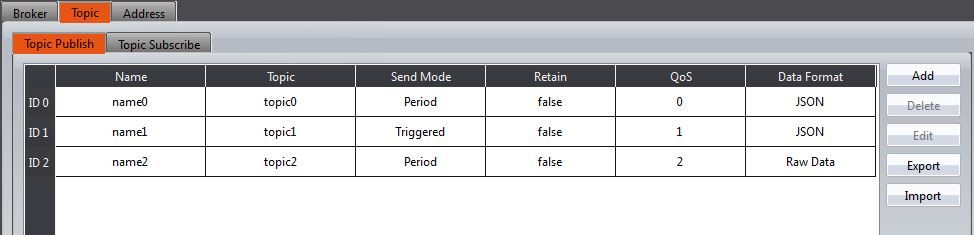
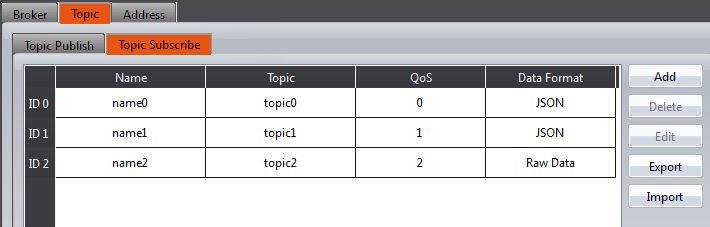
Figure 183【MQTT】【Topic】setting page
The following is a detailed description of the settings for【Topic Publish】and【Topic Subscribe】.
14.2.1 【Topic Publish】
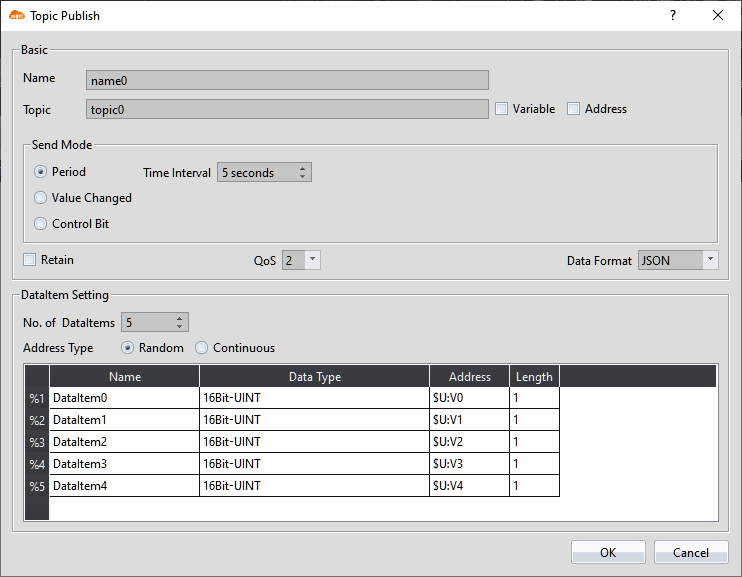
Figure 184【MQTT】【Topic Publish】setting page
Table 92【MQTT】【Topic Publish】properties setting
|
Field |
Description |
||||||||
|
【Basic】 |
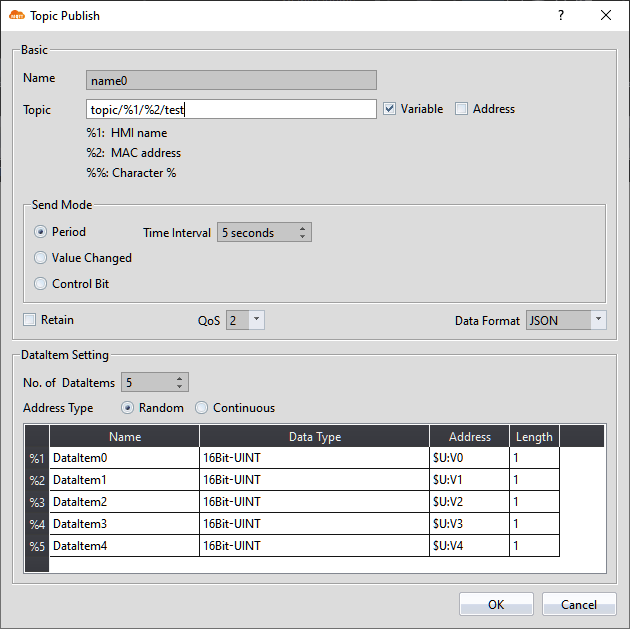
【Name】 Set the topic name, can be used as a description. 【Topic】 The topic used by MQTT to send messages. (Note: #,+ are wildcard character, cannot be used) 【Variable】 When selected, you can dynamically adjust the theme.
【Address】 When selected, you can dynamically adjust the theme. Note: If both “Variable” and “Address” options are selected, 【Send Mode】
Send messages periodically, can set the interval times in seconds.
The message is sent only when the value of a data item changes.
The message is sent when the specified bit transitions from OFF to ON. 【Retain】 Determine whether the MQTT message should keep in the server. Check this option as true then the server will retain this topic message. If there is new subscriber or the previous disconnected subscribers, will receive the latest remain message. 【QoS】 Set the QoS (Quality of Service) of MQTT, divided in three level:
【Data Format】 The message content of each topic is composed of the value of the data item address, there are 3 formats as follows:
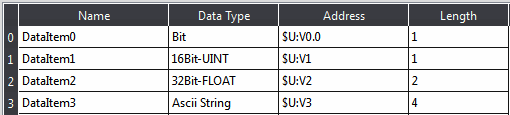
{ "d": { "DataItem0": [true], "DataItem1": [810], "DataItem2": [1.7899999618530273], "DataItem3": ["love"] }, "error": [], "ts": "2019-06-18T10:55:41.491" }
01 2a 03 b8 1e e5 3f 6c 6f 76 65 (Note: In order to exchange data successfully, the format and data item settings for publish and subscribe must be the same.)
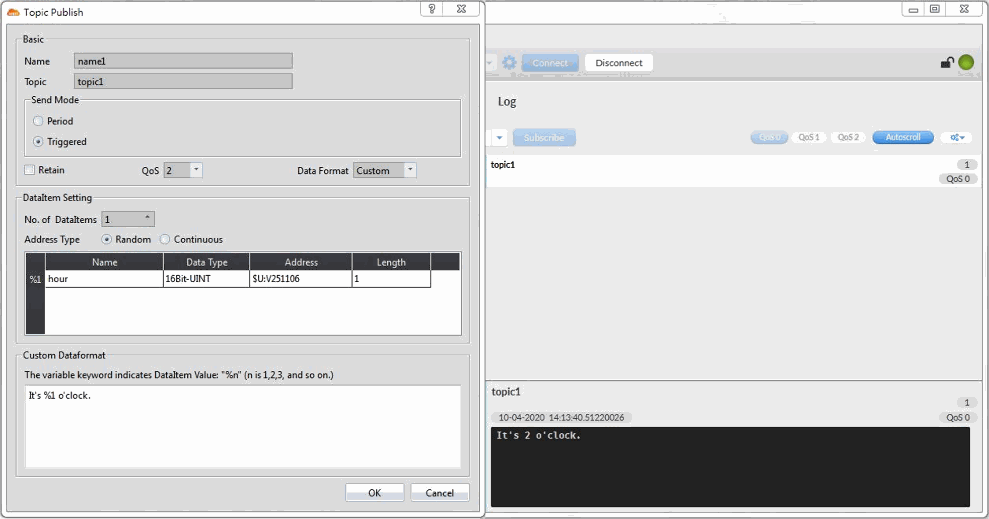
Users can customize their own publish messages. The variable keyword indicates DataItem Value “%n”. Example figure as following, and the right side shows the custom message result.
|
||||||||
|
【DataItem Setting】 |
【No. of DataItems】 Set the numbers of data items for this topic. 【Address Type】
Users can set the address of each data item.
Only the first item can set the address, the other item address will automatically generate, user cannot modify. The following is the setting description of the data item. 【Name】 DataItem name cannot be blank and each of them should be unique. 【Data Type】 【Bit】,【16Bit-BCD】,【16Bit-INT】,【16Bit-UINT】,【32Bit-BCD】,【32Bit-INT】,【32Bit-UINT】,【32Bit-FLOAT】,【Ascii-String】can select. 【Address】 According to data type, user can set each of the data item address. 【Length】 If the data type is 16-bit then will occupy 1 word, 32-bit will occupy 2 words; if use Ascii-String, user can decide to use how many words. Each word can contain 2 characters. |
14.2.2 【Topic Subscribe】
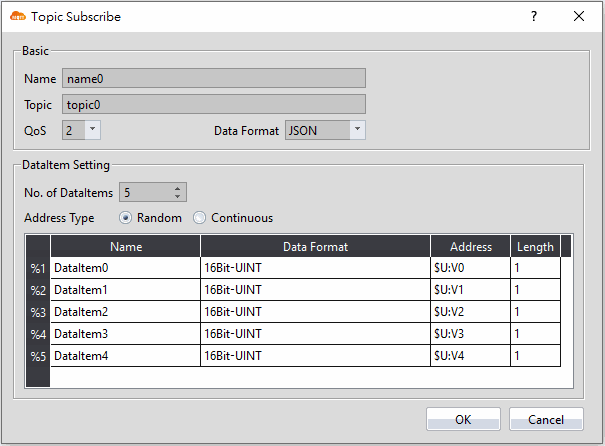
Figure 185【MQTT】【Topic Subscribe】setting page
Table 93【MQTT】【Topic Subscribe】properties setting
|
Field |
Description |
||||||||
|
【Basic】 |
【Name】 Set the topic name, can be used as a description. 【Topic】 The topic used by MQTT to send messages. (Note: #,+ are wildcard character, cannot be used) 【QoS】 Set the QoS (Quality of Service) of MQTT, divided in three level:
【Data Format】 The message content of each topic is composed of the value of the data item address, there are two formats as follows:
{ "d": { "DataItem0": [true], "DataItem1": [810], "DataItem2": [1.7899999618530273], "DataItem3": ["love"] }, "error": [], "ts": "2019-06-18T10:55:41.491" }
01 2a 03 b8 1e e5 3f 6c 6f 76 65 (Note: In order to exchange data successfully, the format and data item settings for publish and subscribe must be the same.)
When using a customized subscription format, please note that it needs to be the same as that of the publisher to receive complete data, otherwise there will be data errors. (Note: The data format and data item settings of publish and subscribe must be the same to data transmission successfully) |
||||||||
|
【DataItem Setting】 |
【No. of DataItems】 Set the numbers of data items for this topic. 【Address Type】
Users can set the address of each data item.
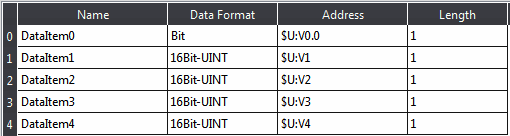
Only the first item can set the address, the other item address will automatically generate, user cannot modify. The following is the setting description of the data item. 【Name】 DataItem name cannot be blank and each of them should be unique. 【Data Type】 【Bit】,【16Bit-BCD】,【16Bit-INT】,【16Bit-UINT】,【32Bit-BCD】,【32Bit-INT】,【32Bit-UINT】,【32Bit-FLOAT】,【Ascii-String】can select. 【Address】 According to data type, user can set each of the data item address. 【Length】 If the data type is 16-bit then will occupy 1 word, 32-bit will occupy 2 words; if use Ascii-String, user can decide to use how many words. Each word can contain 2 characters. |
14.2.2.1 Custom Subscription Format Examples
Because each project has different content, a fixed format cannot handle all situations. In such cases, a custom format must be used.
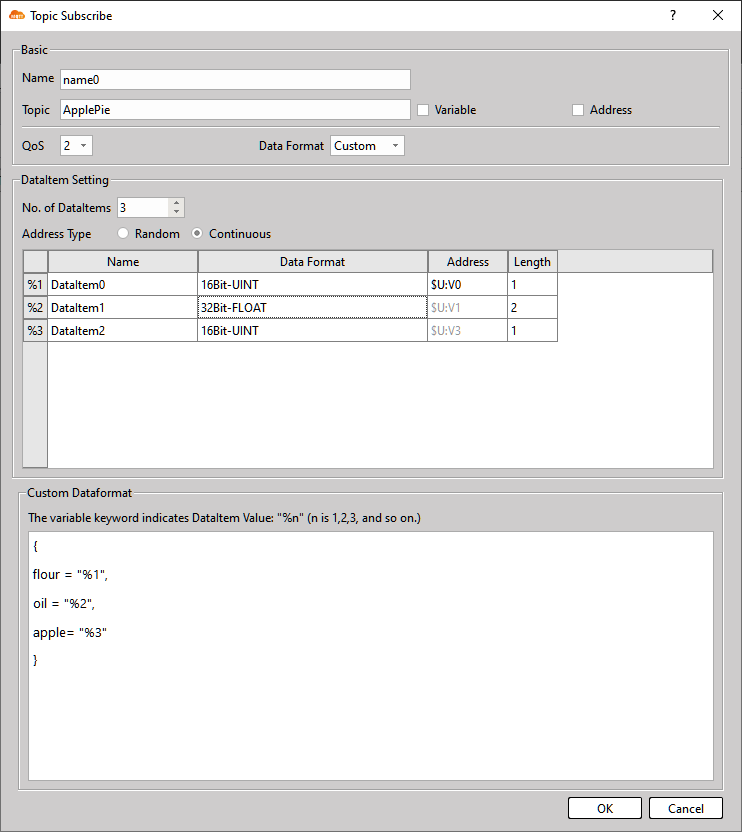
When configuring a custom format, you need to pay attention to the data type of the reading items, and the format must match the publisher side. Any differing parts should be replaced with variables.
Example 1
Publishe content
|
{ flour = "300", oil = "115.5", apple= "200" } |
Subscribe settings
|
{ flour = "%1", oil = "%2", apple= "%3" } |
Replace the variable portions with %n, and the data can then be read in the custom format.
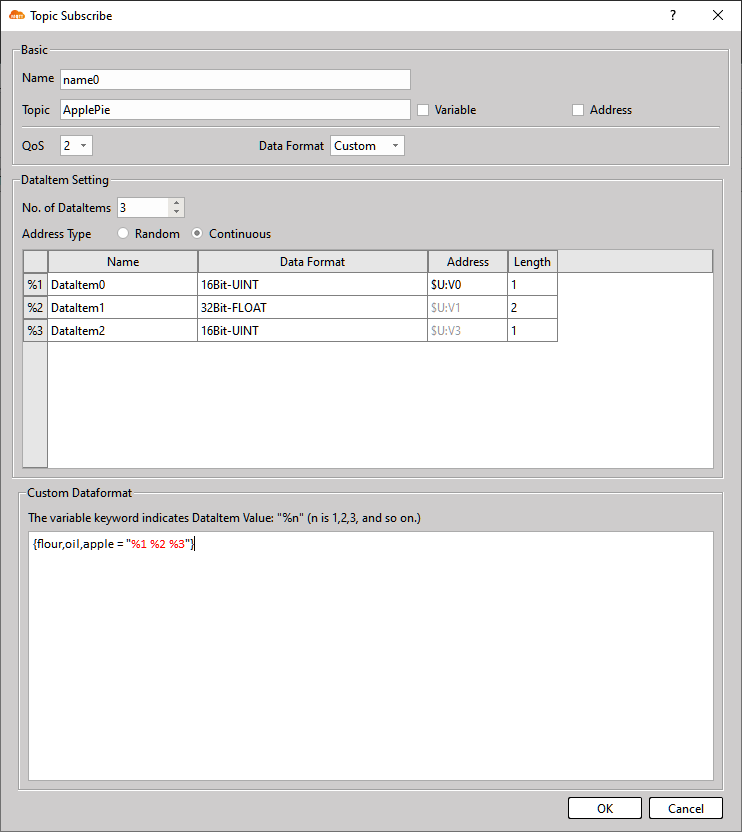
Example 2
Publishe content
|
{flour,oil,apple = "300 115.5 200"} |
Subscribe settings
|
{flour,oil,apple = "%1 %2 %3"} |
Sometimes the publisher data may appear disorganized, but as long as the format matches, the values can still be read correctly.
14.3 Address Setting
The MQTT function is in【Project Explorer】【Functions】, check the checkbox【Enable MQTT】then will appear the【Address】paging. Use【Status Address】to monitor the MQTT connected status and use【Control Address】to control the connection and broker settings of the MQTT. Figure as below:
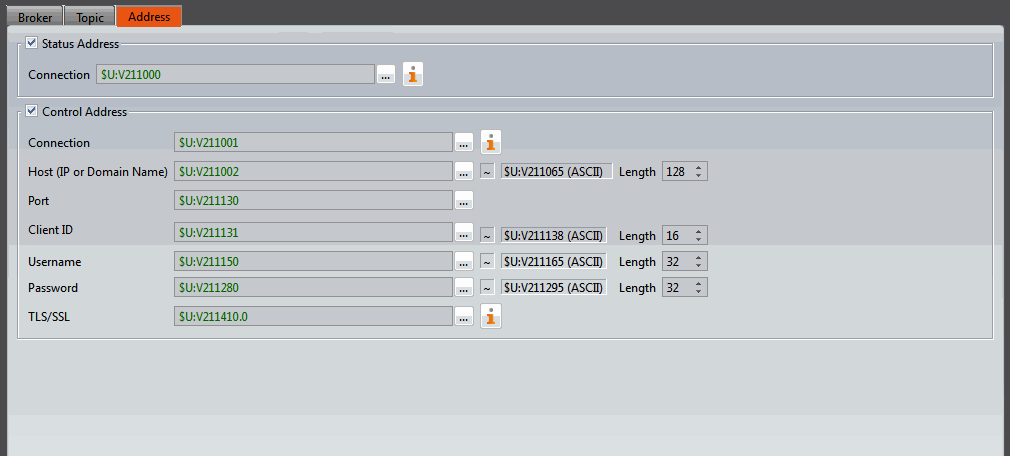
Figure 186【MQTT】【Address】setting page
Table 94【MQTT】【Address】properties setting
|
Field |
Description |
|||||||||||||||||||||||||
|
【Status Address】 |
Use status address can monitor the connection status of the MQTT. 【Connection】 Set the status address of the MQTT connection. Following is the connection status definition table, also can click
|
|||||||||||||||||||||||||
|
【Control Address】 |
Use control address to control the connection of MQTT or the real time update the broker’s setting. 【Connection】 Set the control address of the MQTT connection. Following is the control connection definition table, also can click
After changing the following control address related to broker, update the control address command to update the broker’s setting immediately. 【Host (IP or Domain Name)】 Set the IP control address, you can set the length of the string, it will automatically calculate the length of the continuous occupation register, the string can be up to 253 words, dynamically change the IP address of the broker by changing the content of the register. 【Port】 Set the control address of the port, is control by a word, dynamically change the port by changing the content of the register. 【Client ID】 Set the control address of Client ID, you can set the length of the string, it will automatically calculate the length of the continuous occupation register, the string can be up to 23 words, dynamically change the Client ID by changing the content of the register. 【Username】 Set the control address of username, you can set the length of the string, it will automatically calculate the length of the continuous occupation register, the string can be up to 256 words, dynamically change the username by changing the content of the register. 【Password】 Set the control address of password, you can set the length of the string, it will automatically calculate the length of the continuous occupation register, the string can be up to 256 words, dynamically change the password by changing the content of the register. 【TLS/SSL】 Set whether to enable TSL/SSL control address, is control by a bit, dynamically decided whether to enable TSL/SSL certificate by changing the content of the register. Following is the definition table, also can click
|
|||||||||||||||||||||||||
 to view.
 to view.
 to view.
14.4 Tool
Introduce how to use MQTT related tool.
14.4.1 Select server (Broker)
- HMI built-in broker
To enable the built-in broker, check the checkbox【Enable built-in Broker in HMI】in 【Broker】setting page, if【Host (IP or Domain Name)】set as local side 127.0.0.1 indicates MQTT will use the HMI built-in broker and it must check the【Enable built-in Broker in HMI】to connect successfully. If use the third party MQTT client program, then set the broker’s IP as HMI’s IP indicates to use the HMI broker to connect.
- Public Broker
Enter the public broker IP or domain name in【Host (IP or Domain Name)】.
For example: Use Mosquitto public test broker (https://test.mosquitto.org/)
- Host: test.mosquitto.org
- Port: 1883
- Set up your own Broker
Users can set up your own Broker.
For example: Use Mosquitto(http://mosquitto.org/download/), is free and open source, for detail installation and operations please refer to the website.
14.4.2 Client-Side Application
To monitor the information transmitted by MQTT, needs to use a third-party MQTT client application to connect to the selected broker and subscribe HMI’s publish topic to receive the updated data. There are many free MQTT client-side applications that can be downloaded to use.
For example: MQTT.fx (https://mqttfx.jensd.de/index.php/download)
Tip: press ← → to switch chapters, Ctrl+K to search