8-1 High-Speed Counter
M series hosts are divided into two counter types: HSC and HSC[MC] according to specifications. The highest specification can provide 4 HSCs and 4 HSC[MCs]. HSC can be set as a 32-bit or 16-bit high-speed counter, and HSC[MC] is perfectly integrated with the motion function. Specifications vary by model.
※※There are slight differences in the usage of HSC 16BIT and 32BIT modes. Please refer to 8-1-4 for details.
8-1-1 Counting Modes
As shown in the table below, HSC provides 6 kinds of counting modes to choose from:
※For general and advanced motion control CPU Units, HSC4~7 only support ABx4.
|
Counting Mode |
HHSC |
Counting Waveform |
|||
|
Up Counting(+1) |
Down Counting(−1) |
||||
|
Up-down pulse |
MD0 |
U |
○ |
|
|
|
MD1 |
U×2 |
○ |
|
||
|
Pulse-direction |
MD2 |
P/R |
○ |
|
|
|
AB phase |
MD3 |
A/B |
○ |
|
|
|
MD4 |
A/B×2 |
○ |
|
||
|
MD5 |
A/B×4 |
○ |
|
||






Table 14 Counting modes of the high-speed counter
The up/down arrow(↑,↓)on the positive/negative edge in the waveform represents where counting (+1 or –1) occurs.
8-1-2 System Architecture
The diagrams below are the system architecture for HSC where has multi-purpose input and counting functions. Some of the functions are built-in (such as CV register number, PV register number, interrupt label and relay number for software MASK, CLEAR and direction selection) that user need not to assign for configuration. However, some functions, with a “*” marked in the diagrams below, must use the UperLogic to configure the HSC (such as HSC application selection, counting mode, application of each function input, inverse polarity and appointment of corresponding input point number Xn) etc. For detailed structure and operation of the 6 kinds of counting modes that assigned in configuration, please refer to section 10.2.1~10.2.3 for explanation.
Note: CV (Current Value); PV (Preset Value).
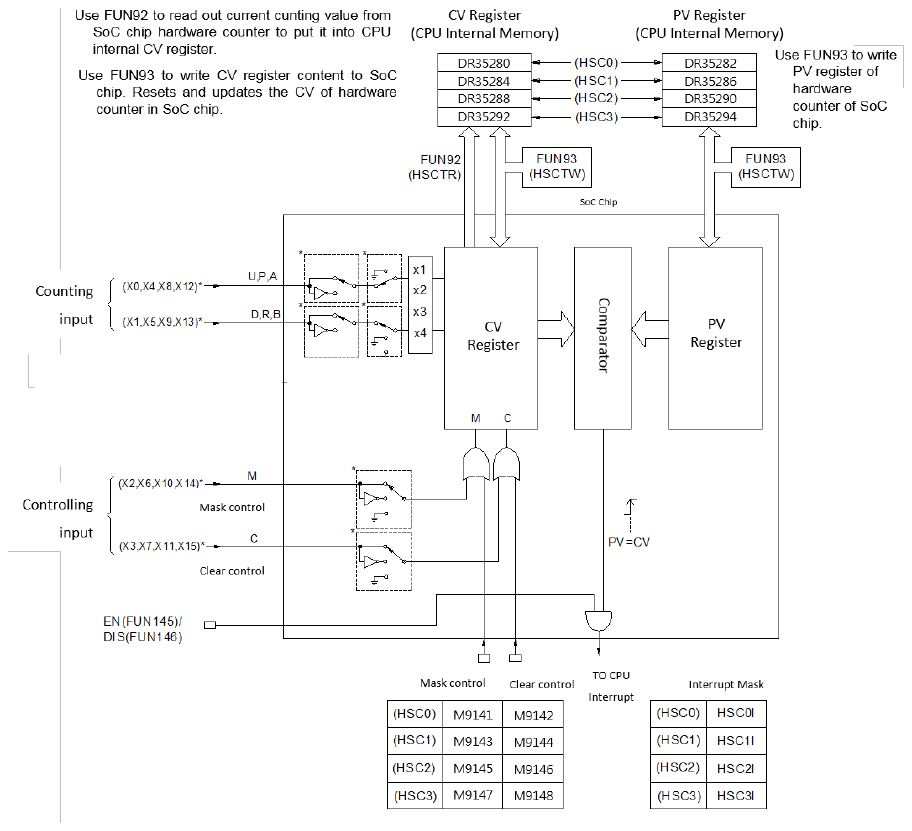
Figure 26 System architecture of hardware high-speed counter (HSC0-HSC3)
- All control signals of HHSC are default as Active High (i.e., Status =1 for active and 0 for non-active). In order to cooperate with the sensor’s polarity, the HSC counting inputs (U, D, P, R, A and B) and control inputs (M and C) can be selected for polarity inverse.
- By default, when the MASK control signal, M is 1, the HSC counting pulse will be masked without any counting being performed and all HSC internal status (such as CV and PV) will remain unchanged. The HSC will function normally only when M returns to “0”. Some sensors have Enable outputs which function is on the contrary to MASK. Counters will not count when Enable = 0 and can only start functioning when Enable = 1. Then, function of inverse polarity input of MASK can be selected to cooperate with the sensors having Enable output.
- When the CLEAR control signal, C is 1, the HSC internal CV register will be cleared to 0 and no counting will be performed. The HSC will start counting from 0 when C returns to 0. Ladder program can also directly clear the CV register (DR35280, DR35284, DR35288, and DR35292), so as to clear the current counting value to 0.
- The 8 sets of M-Series PLC HHSC are located in the SoC chips where the CV or the PV registers the user can’t access directly. What the user can access are the CV registers (DR35280~DR35292) located in the CPU internal memory. Ideally, the contents of CV and PV registers in the chips should be updated simultaneously with the CV and PV registers in the CPU internal memory. However, to keep the correspondence between the two must be loaded or read by the CPU when they, in fact, belong to two different hardware circuits. It is necessary to use FUN93 to load the CV and the PV registers inside the CPU to the respective CV and PV registers (to allow HHSC to start counting from this initial value. Then, FUN92 can be used to read back the counting value of the HHSC CV register in the chips to the CV register in the CPU (i.e., the CV register in the CPU has the bi-direction function). Since read can only be carried out when FUN92 is executed (so-called “sampling” reading), it might result in difference between the HHSC CV value in the chips and the CV value in the CPU, the deviation will getting greater especially when the counting frequency is high.
- When the counting frequency is not high or the demand for positioning precision is not so much, using FUN92 in the main program to read the current counting value and then incorporate comparator instruction is adequate for a simple counting positioning control.
- When the demand for positioning precision is higher, or in the multi-zone count setting control, it may use the FUN92 to read the current counting value while in the time base interrupt routine and incorporate compare instruction to perform more precise counting positioning control.
- As the demand for positioning precision is extremely high, it must use the preset interrupt function of hardware counter. The preset value can load by FUN93 into the PV register of HHSC in the chipset. When CV value of HHSC reaches this preset value, the hardware comparator in the HHSC will send interrupt to CPU at the very moment CV=PV, and jump to interrupt subroutine to do real time control or procession.
- None of the special relay controls, such as software MASK, CLEAR and direction control, is real time. This means that although MASK, CLEAR or direction change has been set during routine scanning, the signal will only be transmitted to HSC when I/O updating is under way after the completion of routine scanning. Hence, it is not suitable for the real time control in HSC operation (which should be mainly used for initial setting before HSC operation). Should real time control be required, please use hardware to control input or apply the FUN145(EN), FUN146(DIS), FUN92(HSCTR), and FUN93(HSCTW) etc. instructions for control.
- Every HSC is equipped with the functions, Enable (FUN145) and Disable (FUN146), when HSC is Enable, HSC can count and can generate an interrupt signal when the count is up, when HSC is disabled, the counting still works but the interrupt function being disabled. In I/O configuration, after selecting count mode (P, AB, etc.) for HSC, HSC is set to be on by default, and the program can use the Enable (FUN145) and Disable (FUN146) functions to turn it on or off at any time according to the control needs.
- The specifications of the high-speed counters varies depending on the model. For details, please refer to Chapter 1 System Specifications.
- Pulse-direction relative up/down counting high-speed counter
(MD2)
Pulse-direction relative up/down counting high-speed counters have only one counting pulse input P (Pulse), and the up/down counting must be determined by the other direction input R (Direction) when the counting pulse positive edge arrives. The value is to be +1 (R=0) or -1 (R=1). MD2 only counts at the positive edge of the PS pulse (+1 or -1). When the control function is not used, its state (such as M9143 and M9144 in this example) must be kept at 0. In addition to the built-in software masking and software clearing, hardware masking and hardware clearing control can also be used. The soft/hardware masking is OR first, and then connected to the masking control M pin of the HSC. Soft/hardware clearing is the same way, the following is the function diagram of constructing HSC1 into MD2 HSC.
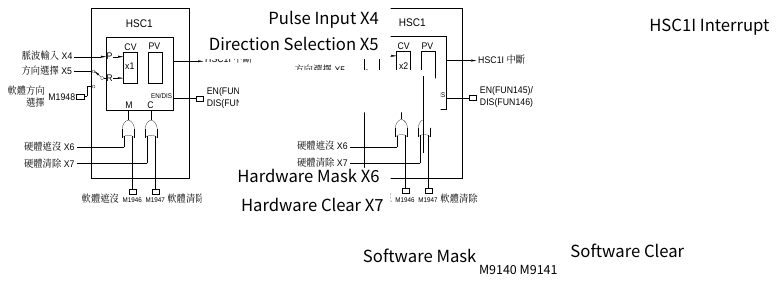
Figure 27 MD2(P/R)
- When HSC is working in MD2 mode, it can choose external input (such as X5 in this example) for direction selection.
The figure below is the waveform diagram of the counting and control relationship of the HSC in MD2 mode in this example when the set value PV is 6. 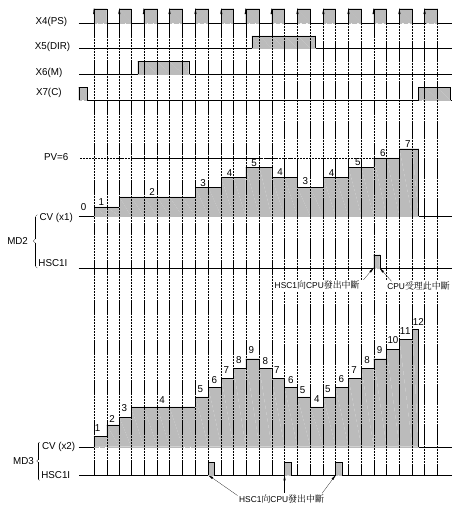
Figure 28 HSC in MD2 mode
8-1-3 AB Phase Input Mode of High-Speed Counter (MD3, MD4, MD5)
The AB phase high-speed counter is equipped with phase A and phase B pulse input with counting value +1 or –1, depending on the phase relationship between the two. i.e., the related counting of the two phases. If phase A is ahead of phase B, the CV value should be +1, else, the CV value should be –1. The counting of the three modes, MD3 (A/B), MD4 (A/Bx2), MD5 (A/Bx4), of AB phase HSC are similar. Their differences are:
➀MD3(A/B) :The rising edge of A is +1 when A is ahead of B and the falling edge
of A is –1 when A is behind B.
➁MD4(A/B×2) :The rising and falling edges of A are +1 when A is ahead of B, and
–1 when A is behind B (twice the counts of MD3).
➂MD5(A/B×4) :The rising and falling edges of A and B are +1 when A is ahead of B
and the rising and falling edges of A and B are –1 when A is behind B (four times the counts of MD3).
Mode MD3~MD5 HSC has built-in software MASK and software CLEAR. When control function is not in use, it must keep the status (such as M9145 and M9146 in this example) to be 0. Apart from the built-in software MASK and CLEAR, the controls of hardware MASK and CLEAR can also be configured. The MASK control is first performed by the OR operation of the hardware and software control, then the result is send to the HSC MASK control M, and so does CLEAR. The function schematic diagrams of HSC2 for the four MD3~MD5 HSC modes are shown as below.
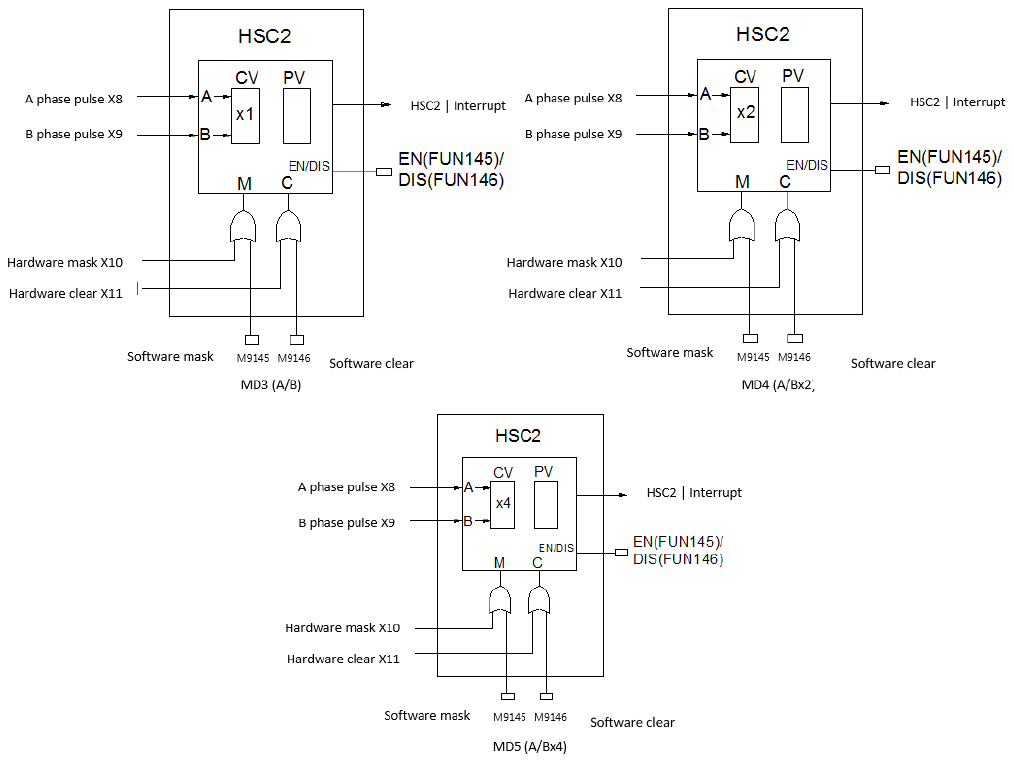
The diagram below is the waveform diagram for the relationship between counting and control of the four HSC modes in this example when the PV value is set as at -4.
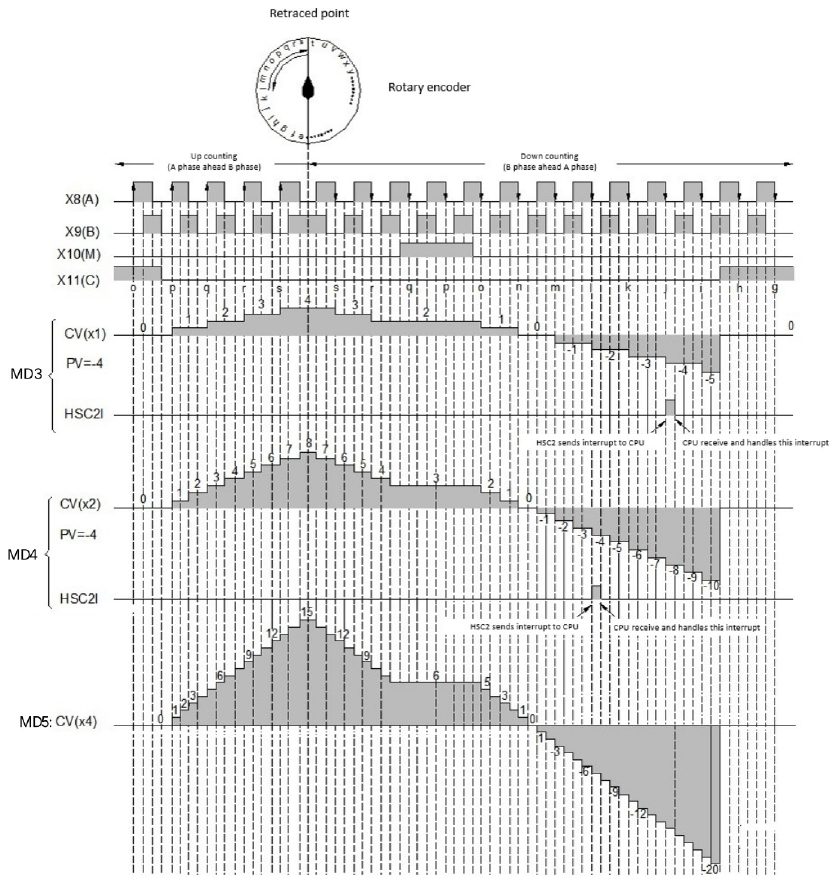
Figure 31 Three modes of HSC
8-1-4 Procedure for Counting
16 BIT HSC
– Supports up/down counting interrupt.
– CV and PV values can be set arbitrarily within the numerical range.
|
Start |
||
|
• Configure HSC counting mode and respective input (by UperLogic) |
|
|
|
• Complete hardware wiring according to the previous input assignment |
||
|
• Set HSC initial CV value and interrupt PV value in the main program |
|
|
|
• Write necessary handling procedures to be taken during interrupt and condition for next interrupt in sub program area |
1. Please refer to Section 5.1 for subroutine structure. 2. Please refer to Section 8.1.7.2 “Actual Examples” for program examples. |
|
|
• Start the operation |
1. Please refer to Section 8.1.7.2 for program examples and description. |
|
|
End |
Table 15 Steps of 16-bit high-speed counter
32BIT HSC
– Supports up/down counting interrupt.
– CV and PV values can be set arbitrarily within the numerical range.
– It will be ineffective when the PV value is set to be the same as the CV value
– After the interruption occurs, the PV value needs to be set again before the next counting
interruption can be performed
|
Start |
||
|
• Configure HSC counting mode and respective input (by UperLogic) |
1. Please refer to Section 8.1 for respective HSC counting modes and principles. 2. Please refer to Section 8.1.7 for setting examples. |
|
|
• Complete hardware wiring according to the previous input assignment |
||
|
• Set HSC initial CV value and interrupt PV value in the main program |
1. It is necessary to apply FUN93 to load it into the HHSC CV and PV in the SoC chip. 2. Please refer to Section 8.1.7.2 for program examples. |
|
|
• Write necessary handling procedures to be taken during interrupt and condition for next interrupt in sub program area |
1. Please refer to Section 5.1 for subroutine structure. 2. Please refer to Section 8.1.7.2 “Actual Examples” for program examples. |
|
|
• Start the operation |
1. Please refer to Section 8.1.7.2 for program examples and description. |
|
|
End |
Table 15 Steps of 32-bit high-speed counter
8-1-3 Counter Configuration
Construction of HSC with UperLogic
In project window, click “I/O Configuration Setup”: Project Name
System configuration
I/O configuration Select “High Speed Counter”
- After displaying the “High Speed Counter” picture, you may click the external input that will be suspended in the window.
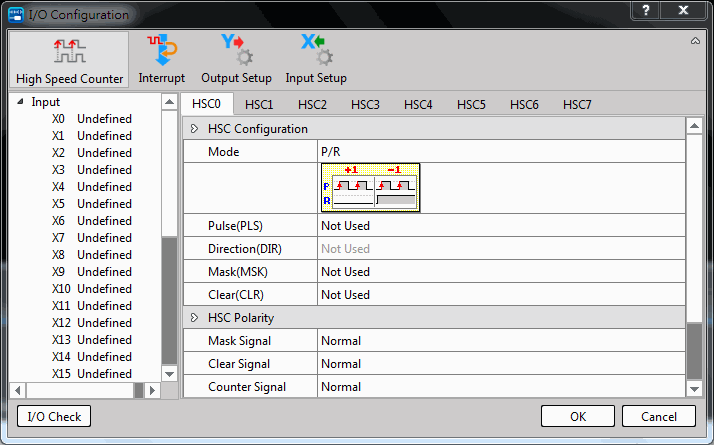
Figure 32 I/O Configuration _ High-Speed Counter
[Counter setting]:
Usage Mode: Selectable hardware counter or hardware timer.
Count Mode: The count mode can be selected, such as U, P/R, A/B, etc.
UP: Select the input of the count up signal. If the count mode is P/R, this field is PS;
If the count mode is A/B, this field is A
DN: Select the input of the count-down signal. If the count mode is P/R, this field is DIR;
If the count mode is A/B, this field is B
MSK: Select the input mask signal.
CLR: Select the input clear signal.
[ HSC polarity setting]:
Mask: Determines whether the mask signal is positive or negative.
Clear: Determines whether the clear signal is positive or negative.
Count: Determines whether the count signal is positive or negative.
[ HSC Content length setting]:
The mode that can be selected is to store the count value in double word group (32-Bit counter) or single word group (16-Bit counter). Customers can apply it according to their own needs.
The following table summarizes the relevant numbers of input point numbers, software mask, clear, direction selection, etc. that are set or selectable by HSC.
|
Type No. HSC |
HSC |
|||||||||
|
HSC0 |
HSC1 |
HSC2 |
HSC3 |
HSC4 |
HSC5 |
HSC6 |
HSC7 |
|||
|
CV Register |
DR35280 |
DR35284 |
DR35288 |
DR35292 |
DR35296 |
DR35300 |
DR35304 |
DR35308 |
||
|
PV Register |
DR35282 |
DR35286 |
DR35290 |
DR35294 |
DR35298 |
DR35302 |
DR35306 |
DR35310 |
||
|
Count |
P/A/U |
X0 |
X2 |
X4 |
X6 |
MS/ME (A only) |
X8 |
X10 |
X12 |
X14 |
|
MQ |
X16 |
X18 |
X20 |
X22 |
||||||
|
R/B/D |
X1 |
X3 |
X5 |
X7 |
MS/ME (B only) |
X9 |
X11 |
X13 |
X15 |
|
|
MQ |
X17 |
X19 |
X21 |
X23 |
||||||
|
Input |
M |
Even X points (X0~X6) except for P/A/U |
MS/ME |
NC |
||||||
|
MQ |
Even X points (X0~X22) except for P/A/U |
|||||||||
|
C |
Odd X points (X1~X7) except for R/B/D |
MS/ME |
NC |
|||||||
|
MQ |
Odd X points (X1~X23) except for R/B/D |
|||||||||
|
Software mask |
M9141 |
M9143 |
M9145 |
M9147 |
M10512 |
M10514 |
M10516 |
M10518 |
||
|
Software clear |
M9142 |
M9144 |
M9146 |
M9148 |
M10513 |
M10515 |
M10517 |
M10519 |
||
|
Interrupt label |
HSC0I |
HSC1I |
HSC2I |
HSC3I |
MS/ME |
NC |
||||
|
MQ |
HSC4I |
HSC5I |
HSC6I |
HSC7I |
||||||
Table 16 Summary of HSC related numbers
When working in bidirectional mode (HHSC is MD3~MD5), the input points must be paired with consecutive numbers, and the even number is the A-phase input (Example X4), and the odd number is the B-phase input (Example X5).
The X0~X15 input points in the above table can only be assigned once (that is, only used as one function) and cannot be used repeatedly.
Examples of Application of High-Speed Counter
Example 1.This example uses high-speed counter for equal-length cutting control.
#Due to consideration of convenience, M series PLC supports the interrupt fixed length function, you can refer to Chapter 9-5-2 Interrupt Fixed Length (ICF)
Mechanism
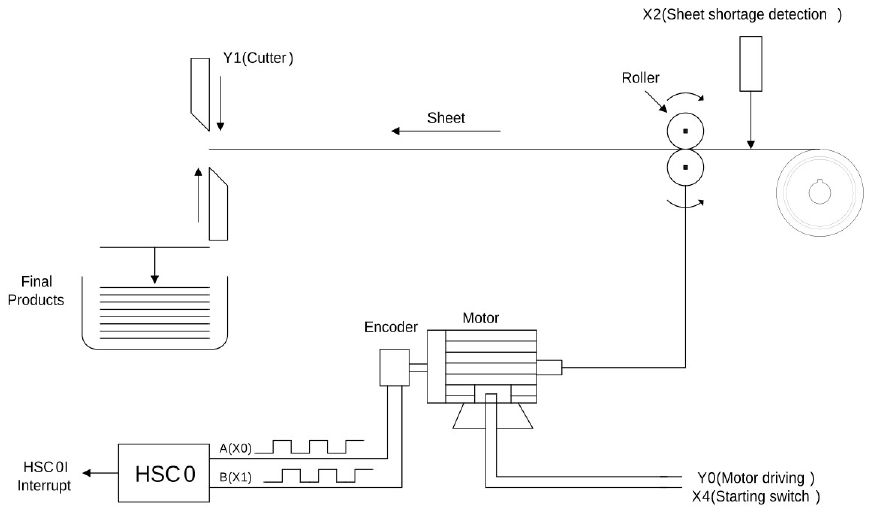
Figure 33 Schematic diagram of equal-length cutter control using high-speed counter
HSC configuration(Set HSC0 to MD5 to increase the cutter resolution by a factor of 4)
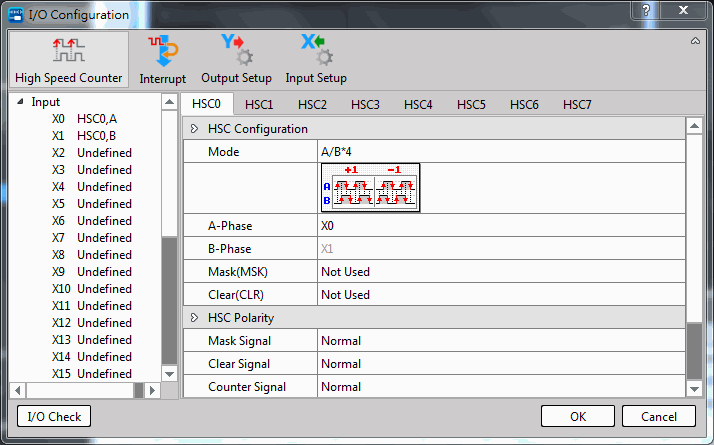
Figure 34 Configuration window of high-speed counter
Control program
【Main Program】
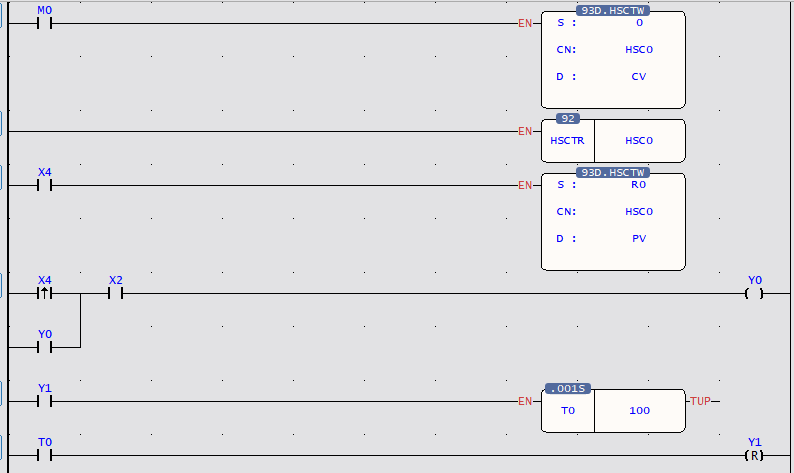
• Use FUN93 to write the contents of the current value register DR35280 into the CV register of HSC0 in the SoC chip.
CN =0 indicates HSC0
D=0 indicates CV
• Use FUN 92 to read the counting value of the HSC0 CV register in the SoC chip (store into DR35280)
• Store the counting of cutting length DR0 into DR35282 and use FUN93 to store the value into the PV register of HSC0 in the SoC chip
CN =0 indicates HSC0
D=1 indicates PV
• Start the motor
• Turn the cutter Y1 ON for 0.1 second
【Subroutine】
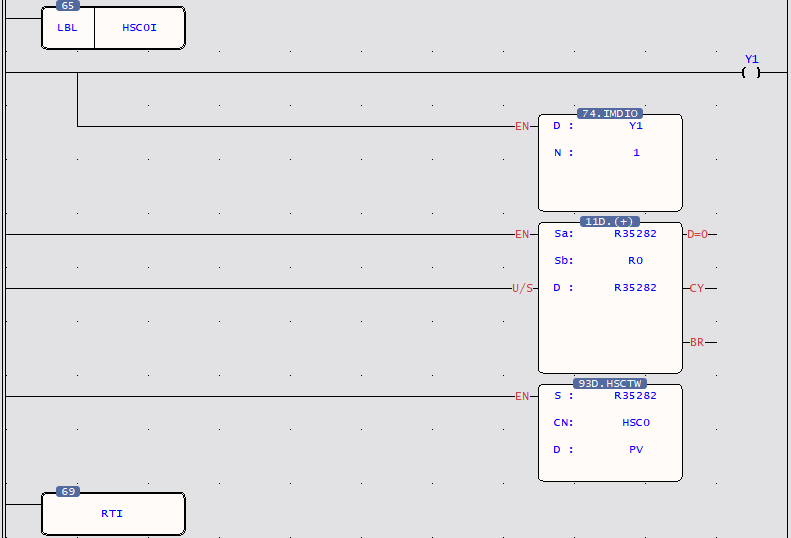
• When HSC0 CV=PV in the SoC chip, the hardware will automatically execute the interrupt subroutine labeled HSC0I.
• When counting is up, turn Y1 ON (to cut materials)
• Output Y1 immediately to reduce the error caused by scan time
• Calculate new cutting position and load HSC0 PV
【Description】
The main program will initialize the HSC0 CV (CV=0) in advance and move the cropping length (DR0) to the HSC0 PV before starts Y0 to turn on the motor for material conveying.
When CV reaches PV, the length of R0 is added to the PV before being reloaded into HSC0 PV.
When all materials are rolled out, the material shortage detector X2 will be ON and stop the motor.
Example 2.Example of high-speed counting up action processed by Interrupt
【Main program】
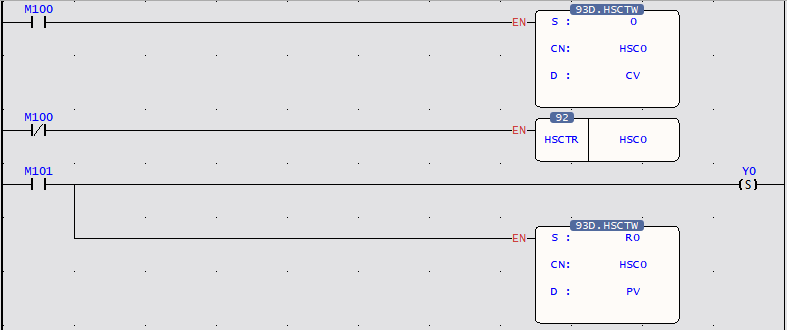
• Employ FUN93 to write the content of current value register DR35280 into the CV of HSC0 in SoC chip (reset)
CN=0, represents HSC0
D=0, represents CV
• Employ FUN92 to read out the current counting value of HSC0
in SoC chip, and store it into the CV register (DR35280)
CN=0, represents HSC0
• As M101 change from 0→1, start Y0 ON (begin to operate)
• Employ FUN93 to write the content of preset register into HSC0 PV in SoC chip, which serves as setting value of counting up interrupt
CN=0, represents HSC0
D=1, represents PV
【Subroutine】
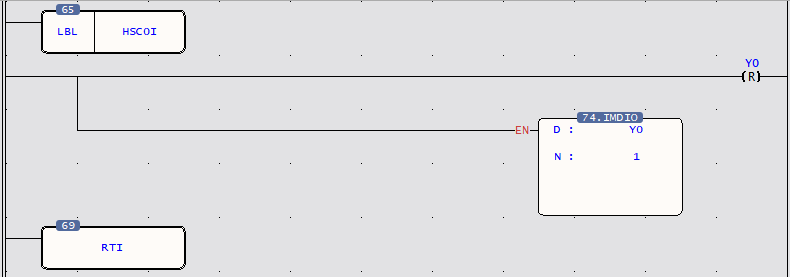
• Hardware high speed counter #0 interrupt label
• When time up, it sets Y0 OFF (stop)
• Let Y0 out immediately, so as to stop promptly
(Otherwise, Y0 will have a scan time output delay)
8-2 High-Speed Timer
The finest time base for most of the ordinary PLC is 1mS or 10mS. Though some PLC may have HST with a time base of 1mS. When deviations in the PLC scan time is taken into consideration (e.g. if the scan time is 10mS when the time base is 1mS, the total deviation still exceeds 10mS), the figure of 1mS becomes meaningless. Therefore, these PLCs can’t be applied in high precision timing. The M-series CPU Unit provides 3 kinds of time bases, a total of 13 timing timers, including 4 STM timers, 4 LTM timers, and 4 HST with the fastest time base of 0.1mS. The time up is sent out by interrupt to provide a precision 100 times better than ordinary PLC timer application and can be used for many applications demanding precision timing. Also built in a 0.1ms 32-bit HSTA cycle timer. For detailed usage of HST, please refer to the example in section 8.2.1 of this Manual.
8-2-1 STM Time-setting Timer
M-series CPU Unit provides a 16-bit 1ms STM time-setting timer, which can be used to set the corresponding period register and trigger the corresponding special relay. Relevant relay and register information are as follows:
|
Item |
Relay |
|
1 ms time-setting timer STM 0 control |
M9166 |
|
1 ms time-setting timer STM 1 control |
M9167 |
|
1 ms time-setting timer STM 2 control |
M9168 |
|
1 ms time-setting timer STM 3 control |
M9169 |
|
Item |
Register |
|
1 ms time-setting timer STM 0 cyclic setting |
R35435 |
|
1 ms time-setting timer STM 0 current time |
R35436 |
|
1 ms time-setting timer STM 1 cyclic setting |
R35437 |
|
1 ms time-setting timer STM 1 current time |
R35438 |
|
1 ms time-setting timer STM 2 cyclic setting |
R35439 |
|
1 ms time-setting timer STM 2 current time |
R35440 |
|
1 ms time-setting timer STM 3 cyclic setting |
R35441 |
|
1 ms time-setting timer STM 3 current time |
R35442 |
8-2-2 LTM Time-setting Timer
M-series CPU Unit provides a 16-bit 10ms LTM time-setting timer, which can be used to set the corresponding period register and trigger the corresponding special relay. Relevant relay and register information are as follows:
|
Item |
Relay |
|
10 ms time-setting timer LTM 0 control |
M9170 |
|
10 ms time-setting timer LTM 1 control |
M9171 |
|
10 ms time-setting timer LTM 2 control |
M9172 |
|
10 ms time-setting timer LTM 3 control |
M9173 |
|
Item |
Register |
|
10 ms time-setting timer LTM 0 cyclic setting |
R35443 |
|
10 ms time-setting timer LTM 0 current time |
R35444 |
|
10 ms time-setting timer LTM 1 cyclic setting |
R35445 |
|
10 ms time-setting timer LTM 1 current time |
R35446 |
|
10 ms time-setting timer LTM 2 cyclic setting |
R35447 |
|
10 ms time-setting timer LTM 2 current time |
R35448 |
|
10 ms time-setting timer LTM 3 cyclic setting |
R35449 |
|
10 ms time-setting timer LTM 3 current time |
R35450 |
8-2-3 HST High-Speed Timer
M-series CPU Unit provides four (HST0-HST3) 32-bit high-speed time-setting timer, which can be used to set the corresponding period register and trigger the corresponding special relay. Relevant relay and register information are as follows:
|
Item |
Relay |
|
0.1 ms time-setting HST 0 control |
M9174 |
|
0.1 ms time-setting HST 1 control |
M9175 |
|
0.1 ms time-setting HST 2 control |
M9176 |
|
0.1 ms time-setting HST 3 control |
M9177 |
|
項目 |
Register |
|
0.1 ms time-setting HST 0 cyclic setting LW |
R35451 |
|
0.1 ms time-setting HST 0 cyclic setting HW |
R35452 |
|
0.1 ms time-setting HST 0 current time LW |
R35453 |
|
0.1 ms time-setting HST 0 current time HW |
R35454 |
|
0.1 ms time-setting HST 1 cyclic setting LW |
R35455 |
|
0.1 ms time-setting HST 1 cyclic setting HW |
R35456 |
|
0.1 ms time-setting HST 1 current time LW |
R35457 |
|
0.1 ms time-setting HST 1 current time HW |
R35458 |
|
0.1 ms time-setting HST 2 cyclic setting LW |
R35459 |
|
0.1 ms time-setting HST 2 cyclic setting HW |
R35460 |
|
0.1 ms time-setting HST 2 current time LW |
R35461 |
|
0.1 ms time-setting HST 2 current time HW |
R35462 |
|
0.1 ms time-setting HST 3 cyclic setting LW |
R35463 |
|
0.1 ms time-setting HST 3 cyclic setting HW |
R35464 |
|
0.1 ms time-setting HST 3 current time LW |
R35465 |
|
0.1 ms time-setting HST 3 current time HW |
R35466 |
8-2-3 Example of HST High-Speed Timer
Configuration of HST (with UperLogic)
|
Start |
|||
|
HST value being set in Main Program field. Set R35451 per the HST 0 cycle |
For special register, please refer to Software User Manual Instruction Chapter 2. |
||
|
In Main Program field, trigger the special register suspension. For example: M9174 of HST 0 |
For special register, please refer to Software User Manual Instruction Chapter 2 |
||
|
In Sub-program field, write the suspension of Service Program HST0I. |
Please refer to Section 5.6. |
||
|
End |
|||
Taking the 0.1 ms time-setting HST 0 relay as an example, the ladder diagram program is as follows:
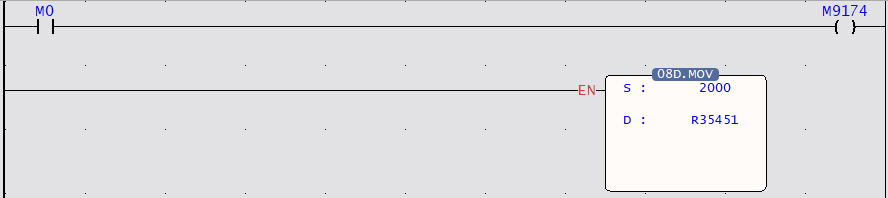
Figure 36 Main program of cyclic pulse
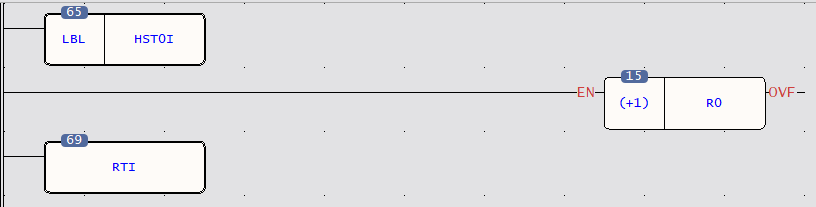
Figure 37 Interrupt subroutine of cyclic pulse
Example 1.Application of High-Speed Delay Timer
This example uses HST0 as a cyclic timer, cooperating with HSC1, to connect the rotary motor of the automatic woodworking drilling machine to its rotation number, and an interrupt will be issued every fixed time period, and the number of motor rotations counted during this period will be read. The number of revolutions when there is no load (idling without drilling), and the speed change when the drill is pressed down (drilling), and the condition of the drill can be known; because the resistance of the motor is small when the drill is normal (sharp), The rotation speed is moderate, but when the drill bit becomes dull, the resistance is larger and the rotation speed becomes slower, and when the drill bit is broken, there is no resistance, the rotation speed will be the same as the idling speed, which is the fastest, because the difference between fast, medium and slow speeds is usually not large. If a general timer is used for sampling and detection, since the error is as high as tens of mS, the error value alone exceeds the difference between fast, medium and slow speed, and it is impossible to judge the speed change. At a relatively low cost, it can detect whether the drill bit is normal, dull or broken, and can warn or stop the replacement of the drill bit. [Fixed time, variable number of pulses]
|
Mechanism |
|
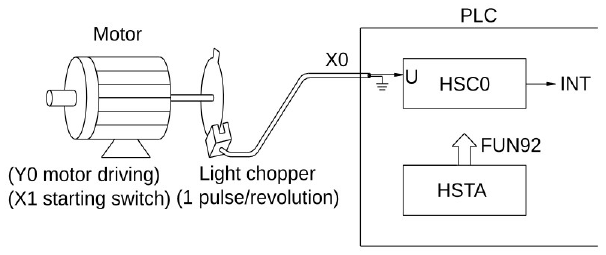
Figure 38 Schematic diagram of motor paired with high-speed counter and timer
【Main Program】
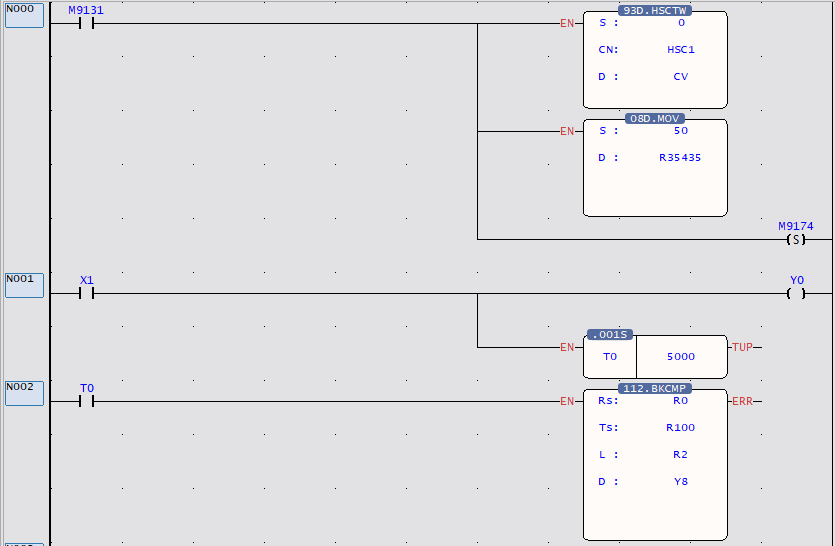
- CN=1 of FUN93 means HSC1; D=0 represents CV
- PV value of HST0 is set to 50, that is, every 5mS
(50×0.1mS) interrupt once
- Start the motor for 5 seconds before using FUN112 to compare the speed of the drill bit
- R0: Obtain the pulse number of HST1 every 5mS
【Subroutine】
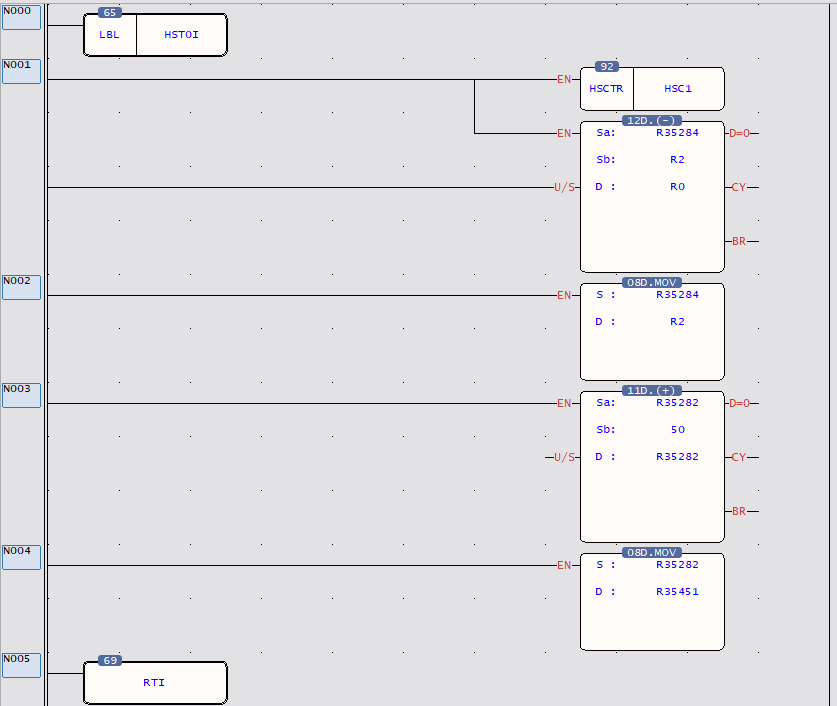
- Every 5mS, the hardware will automatically run this interrupt subroutine.
- Read the HSC1 CV and store to DR35284
- Calculate the increase value of HSC1 CV within 5mS and store it in DR0 (in practice, R1=0)
- Calculate the new PV value of HST0
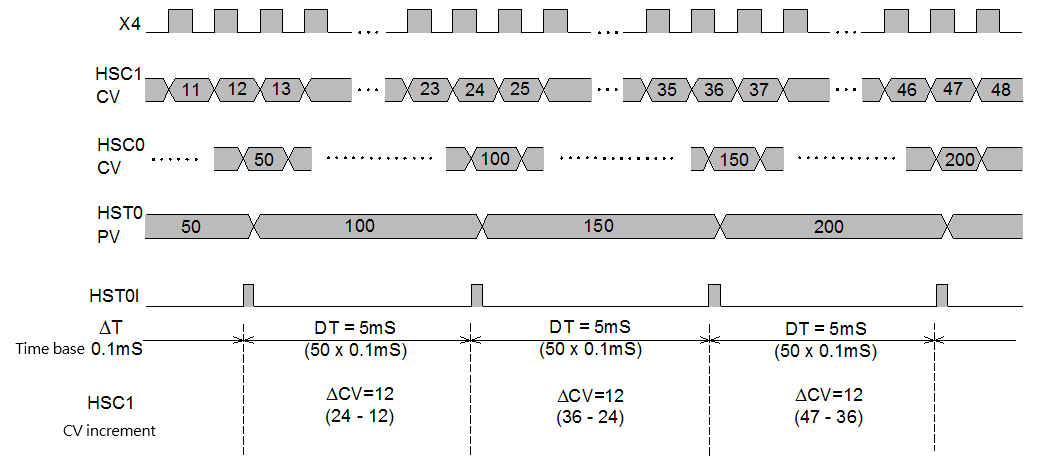
【Explanation】Assuming that the speed of the drill bit is 18000RPM under normal conditions, and 1 revolution will cause the photo interrupter to generate 8 pulses, then the frequency of the U pin of HSC1=18000/608=2400Hz, that is, there will be 12 pulses within 5mS . Therefore, HST0 can be used to interrupt every 5mS, and the CV value of HSC1 can be read to know the speed status.
|
Upper limit |
Lower |
|||||
|
R101 |
R100 |
←────→ |
R0 (△CV) |
──→ |
Y8 |
※Set different upper and lower limits to detect the speed condition |
|
R103 |
R102 |
←────→ |
──→ |
Y9 |
||
|
R105 |
R104 |
←────→ |
──→ |
Y10 |
Example 2.HST3 serves as time-setting interrupt timer program
【Main program】
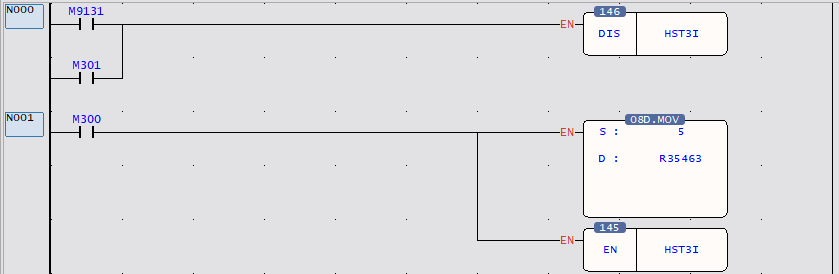
- When power on or M301 is ON, disable HST3 sent a time-setting interrupt.
- When M300 changes from 0 to 1, start using HST3I interrupt.
- Set up the period of timely interrupt time. S=5 represents that it performs the interrupt service subroutine with the label name of HST3I every 0.5mS.
- Use FUN8 to write the set value into the PV of HST3, as the timer to interrupt the set value.
Enable the HST3 time-setting interrupt
【Subroutine】
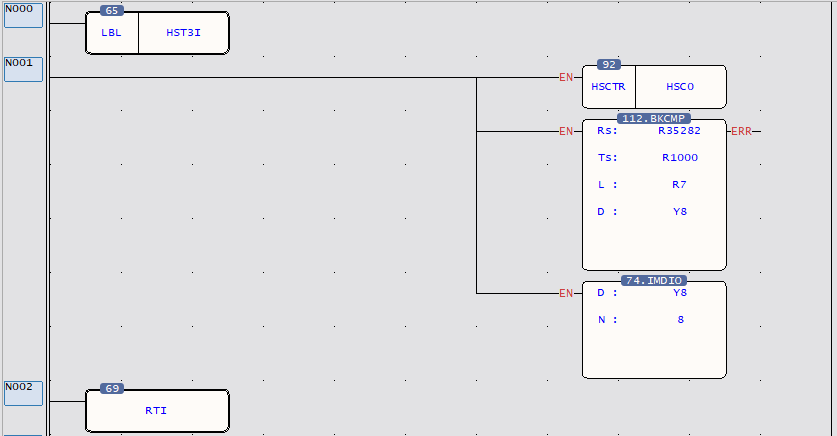
- Interrupt service subroutine with the label name of HST3I.
- Read the current value of hardware high speed counter HSC0 once every 0.5mS.
- Determine which section of the electronic cam the current count value falls on, and turn the corresponding output point ON.
- Immediately output Y8 to Y15
8-2-4 HSTA High-Speed Cyclic Timer
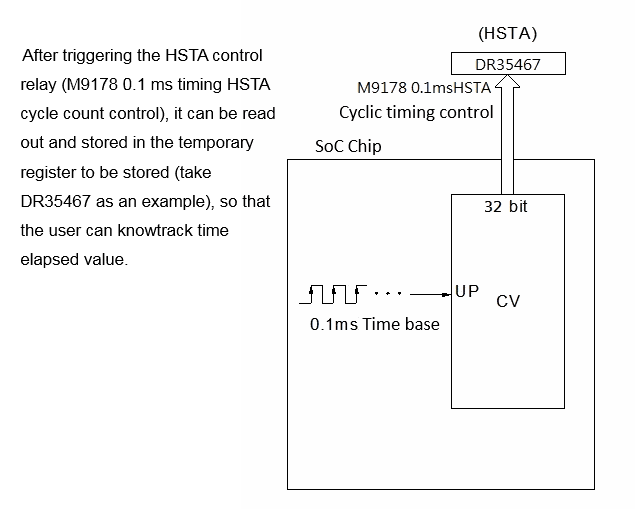
HSTA is a 32-bit hardware timer built in the SoC chip, is a 32-bit cyclic timer, It can be enabled by special relay M9178, and the current timing time can be obtained in the special register DR35467, and the numerical scale is 0.1ms. Information about related relay and register is as follows:
|
Item |
Relay |
|
0.1 ms time-setting HSTA cyclic counting control |
M9178 |
|
Item |
Register |
|
0.1 ms HSTA cyclic current time LW |
R35467 |
|
0.1 ms HSTA cyclic current time HW |
R35468 |
The user is not required to configure HSTA because it is a built-in unit. To use, simply set Special Relay M9178 as “1” and you may read HSTA value to the HSTA-related Special Relay (DR35467).
A. HSTA 32-bit cyclic timer
The so-called “Cyclic Timer” is a timer that add 1 to its current value for every fixed interval and will persistently carry out up counting cyclic timing. Its CV value will cycle around as 0, 1, 2, … 2147483647, 2147483648, 2147483649, …… 4294967295, 0, 1, 2, … (as the time base is 0.1mS, CV value x 0.1mS will be its accumulative time). In fact, the cyclic timer is an up counting cyclic timing clock having a time base of 0.1mS that can operate endlessly and be used to read any two events at the time when they occurred and to calculate the time interval between the occurrence of the said two events. After triggering the HSTA control relay (M9178 0.1ms timing HSTA cycle count control), read out the cycle timer register value when the two events occur, and do the calculation, that is, the time difference can be obtained. The typical application of the cyclic timer is for more precision of turning speed (RPM) detection under the circumstances when the change in turning speed (RPM) is huge or when it is extremely low. Please refer to Example of Section 8.2.3 for description.

8-2-5 Examples of Application of High-Speed Timer HSTA
Example 1.HSTA serves as 32-bit cyclic timer
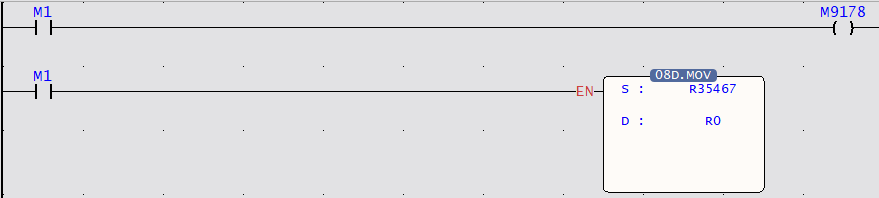
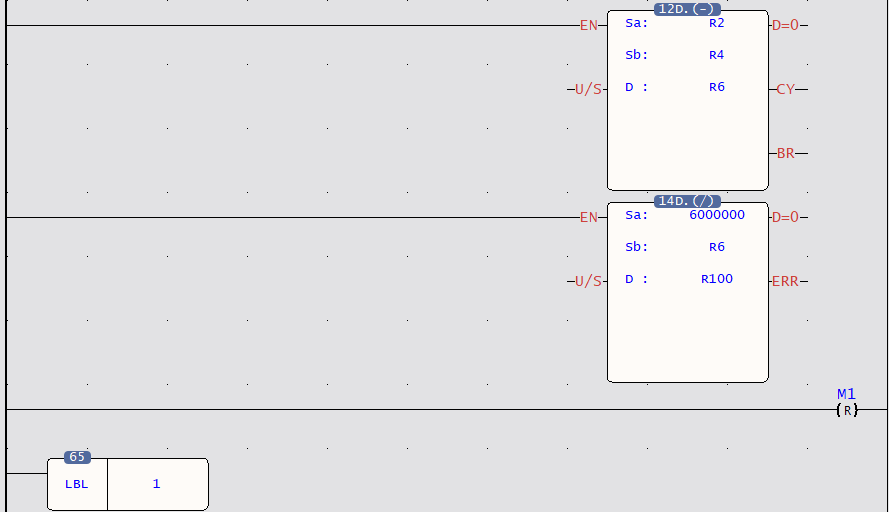
When M1=1, M9178 HSTA cycle timer control is triggered, and the value in the special register DR35467 is moved into R0.
Example 2.Application example for cyclic timer
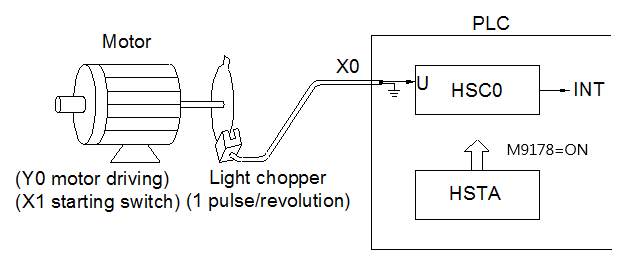
This example uses HSTA as a cyclic timer, cooperating with HSC0, to read the time interval for accumulation of 10 pulses and sending an interrupt out each time as 10 pulses are accumulated and, reciprocally, find out the required RPM (the number of pulses is fixed when the time varies).
Note: This example is suitable for high-speed RPM applications (300-6000RPM), not suitable for low-speed RPM (at low speed, the RPM value is updated too slowly).
|
Mechanism |
Figure 42 Schematic diagram of cyclic timer application |
HSC and HST configuration
➀ As HSTA is built in, no configuration is required. Just need to trigger M9178 to use.
➁ To cooperate with the photo interrupter, set the HSC0 as an up-counting counter having single input (MD0, but use only U input).
【Main Program】
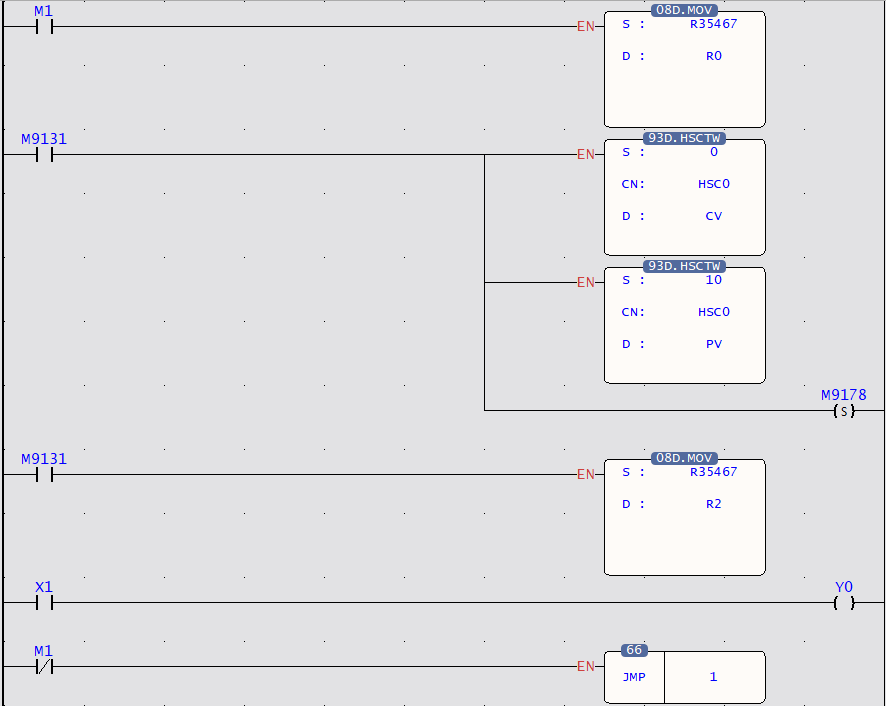
- Employ FUN93 to write current value 0 into the CV of HSC0 in SoC chip (reset)
- FUN93 CN=0, represents HSC0 ; D=0, represents CV
- Write 10 into the preset register in SoC chip, which acts as interrupt value for counting up;
- FUN93 CN=0 indicates HSC0 and D=1 indicates PV
- Enable HSTA control
- The initial value of HSTA CV register is stored to DR2, find interval for each HSC0 interrupt
△T(DR6×0.1mS)
N=10,
Therefore,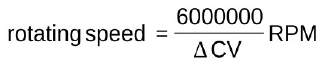
R100=RPM - Clear the calculation flag of RPM (reset M1)
【Subroutine】
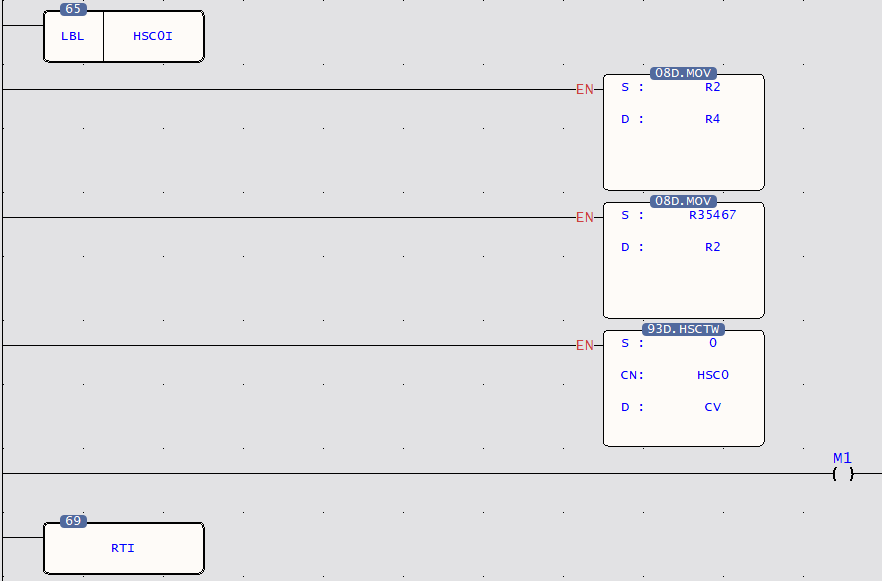
- Each time when HSC0 accumulates 10 pulses, the hardware will automatically run this interrupt subroutine
- Read the HSTA CV
- Reset the current value to 0
- M1=ON, RPM calculating flag
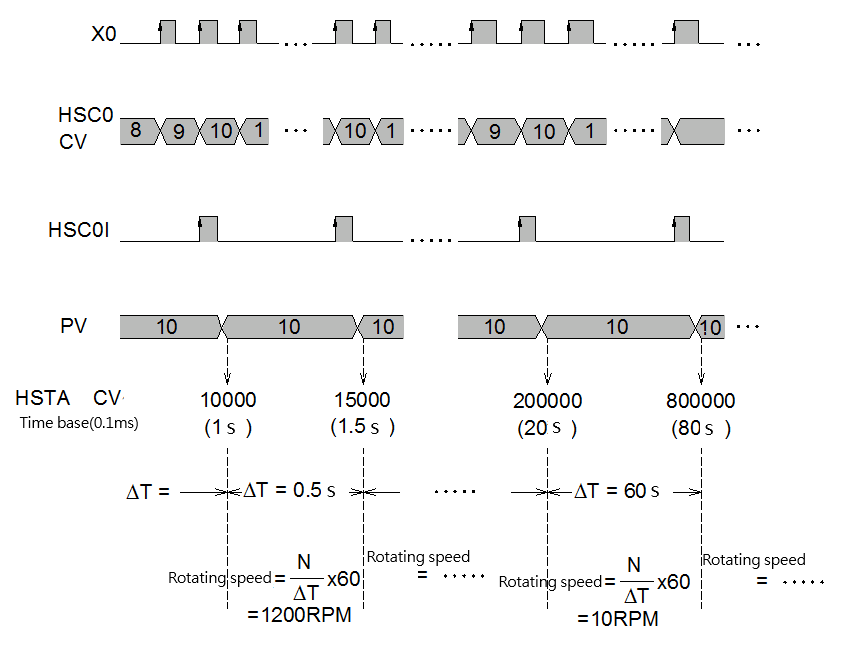
Figure 43 Comparison chart of the obtained motor RPM
8-3 Captured Input
For many high-speed applications, in addition to using the interrupt input to prevent signal omission, the input point included in the CPU Unit can also be set as a capture input to capture its fleeting signal. The setup using capture input is fairly simple:
In project window, click “I/O Configuration Setup”: Project name
System configuration
I/O configuration 🡪 Select “Input Setup”
After the capture input setting screen appears, simply click the input points you want to capture.
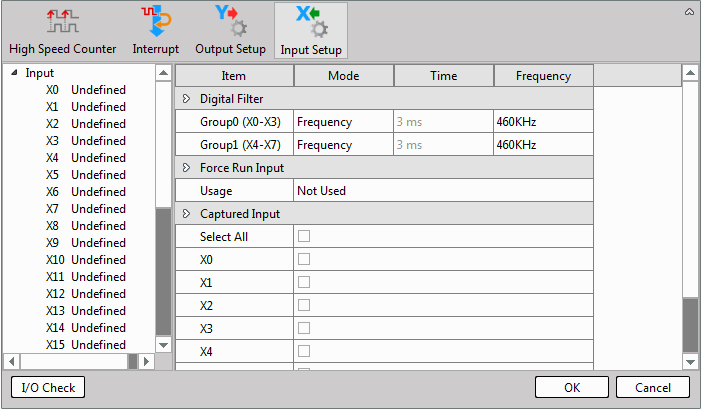
Example 1
If the capture input is to be used for counting, the input period must be at least twice as long as the scan period, so that there will be no omission. For example, if the frequency of an input signal is 50Hz, the scan time must be at least less than 10mS for the input count to be correct. If you need to set the PLC scan time, you can refer to the Chapter 6 of this Manual.
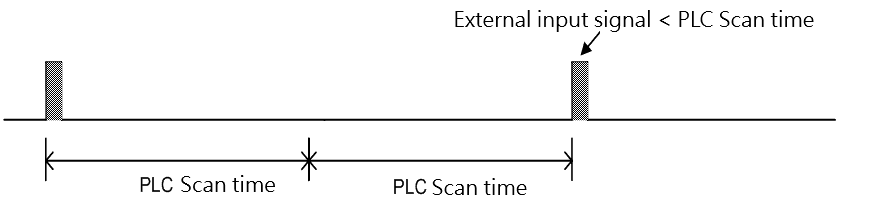
Figure 45 Schematic diagram of minimum signal frequency of captured input
Example description
The following example can set the capture input to capture the external input signal shorter than the PLC scan time (Scan Time). In addition, it must be noted that the setting of the capture input is only for the number of points contained in the CPU Unit, and the number of points can be expanded. no effect
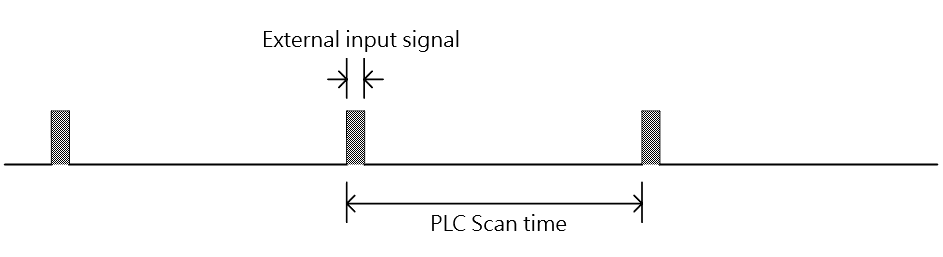
Figure 46 Schematic diagram of capturing signals that can be set to capture inputs that are shorter than the PLC scan time
8-3-1 Input Digital Filter
The input points included in the M-Series CPU Unit can not only be set to capture input, but also can be input filter.
The digital filter setting can be divided into setting filter conditions for time or frequency. The first 2 groups of input signals (X0~X15) can be used to set the filter frequency or filter time; when the frequency is used as the setting, 8 options such as 28KHz~1.8MHz can be set; when the time is set, it can be set (3~15) ×1mS. Set the input filter time to eliminate the noise lower than the set time; set the input filter frequency to eliminate the noise higher than the set frequency.
Example description 1
When the filter time is set to 2mS, when the signal ON or OFF time is less than 2mS, the ON or OFF signal cannot be detected.
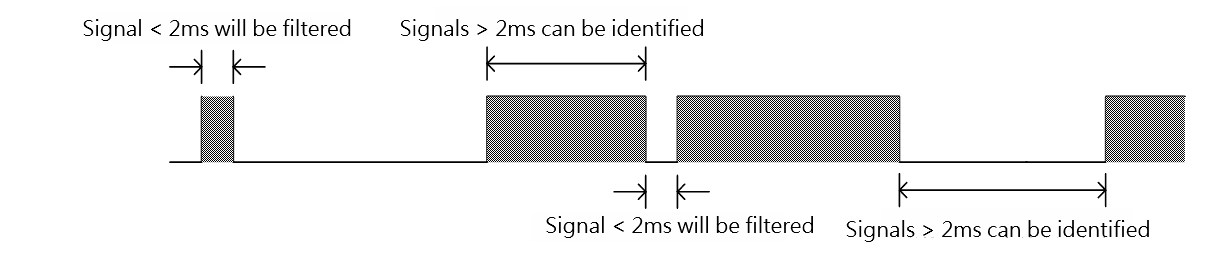
Figure 47 Schematic diagram of input points of digital filter time parameters
Example description 2
When the filter frequency is set to 28KHz, when the input frequency is greater than 28KHz, the input signal cannot be detected.

Figure 47 Schematic diagram of input points of digital filter frequency parameters
Tip: press ← → to switch chapters, Ctrl+K to search