In this chapter, we would like to introduce you the basic principles of ladder diagram.
1-1 The Operation Principle of Ladder Diagram
Ladder Diagram is a type of graphic language for automatic control systems it had been used for a long period since World War II. Until today, it is the oldest and most popular language for automatic control systems. Originally there are only few basic elements available such as A-contact (Normally ON), B contact (Normally OFF), output Coil, Timers and Counters.
Not until the appearance of microprocessor-based PLC, more elements for Ladder Diagram, such as differential contact, retentive coil (refer Table 2) and other instructions that a conventional system cannot provide, became available.
The basic operation principle for both conventional and PLC Ladder Diagram is the same. The main difference between the two systems is that the appearance of the symbols for conventional Ladder Diagram are closer to the real devices, while for PLC system, symbols are simplified for computer display. There are two types of logic system available for Ladder Diagram logic, namely combination logic and sequential logic. Detailed explanations for these two logics are discussed below:
1-1-1 Combination Logic
Combination logic of the Ladder Diagram is a circuit that combines one or more input elements in series or parallel and then send the results to the output elements, such as Coils, Timers/Counters, and other application instructions.
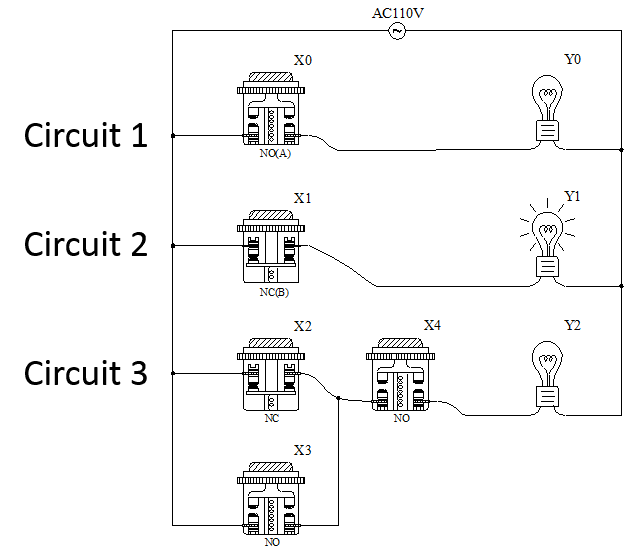
Combination logic_Actual wiring diagram
The example illustrated the combination logic using the actual wiring diagram, conventional Ladder Diagram, and PLC Ladder Diagram. Circuit 1 uses a NO (Normally Open) switch that is also called "A" switch or contact. Under normal condition (switch is not pressed), the switch contact is at OFF state and the light is off. If the switch is pressed, the contact status turns ON and the light is on.
In contrast, circuit 2 uses a NC (Normally Close) switch that is also called "B" switch or contact. Under normal condition, the switch contact is at ON state and the light is on. If the switch is pressed, the contact status turns OFF and the light also turns off.
Circuit 3 contains more than one input element. Output Y2 light will turn on under the condition when X2 is closed or X3 switches to ON, and X4 must switch ON too.
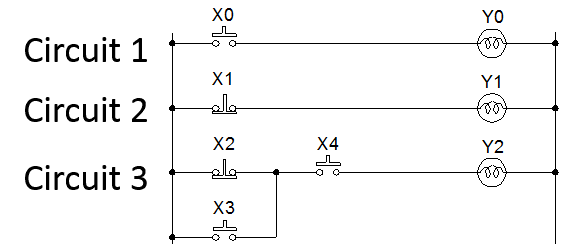
Combination logic_Conventional Ladder Diagram
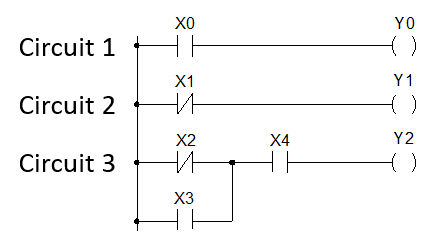
Combination logic_PLC Ladder Diagram
1-1-2 Sequential Logic
The sequential logic is a circuit with feedback control; that is, the output of the circuit will be feedback as an input to the same circuit. The output result remains in the same state even if the input condition changes to the original position. This process can be best explained by the ON/OFF circuit of a latched motor driver as shown in below.
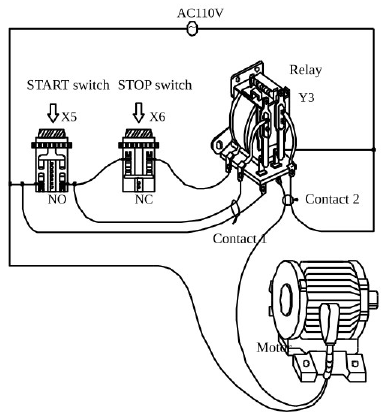
Sequential logic_Actual wiring diagram
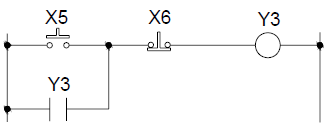
Sequential logic_ Conventional Ladder Diagram
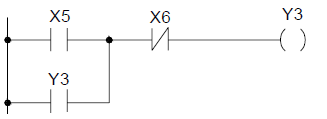
Sequential logic_ PLC Ladder Diagram
When we first connect this circuit to the power source, X6 switch is ON but X5 switch is OFF, therefore the relay Y3 is OFF. The relay output contacts 1and 2 are OFF because they belong to A contact (ON when relay is ON). Motor does not run. If we press down the switch X5, the relay turns ON as well as contacts 1and 2 are ON and the Motor starts. Once the relay turns ON, if we release the X5 switch (turns OFF), relay can retain its state with the feedback support from contact 1 and it is called Latch Circuit. The following table shows the switching process of the example we have discussed above:
|
X5 Switch (NO) |
X6 Switch (NC) |
Motor (Relay) Status |
|
|
① |
Released |
Released |
OFF |
|
② |
Pressed |
Released |
ON |
|
③ |
Released |
Released |
ON |
|
④ |
Released |
Pressed |
OFF |
|
⑤ |
Released |
Released |
OFF |
Sequential logic_Action
From the above table we can see that under different stages of sequence, the results can be different even the input statuses are the same. For example, X5 and X6 switches are both released, but the Motor is ON (running) at status ③ and is OFF (stopped) at status ①. This sequential control with the feedback of the output to the input is a unique characteristic of Ladder Diagram circuit. Sometimes we call the Ladder Diagram a "Sequential Control Circuit" and the PLC a "Sequencer”. In this section, we only use the A/B contacts and output coils as the example. For more details on sequential instructions please refer to Chapter 5 "Introduction of Sequential Instructions”.
1-1 Differences Between Conventional and PLC Ladder Diagram
Although the basic operation principle for both conventional and PLC Ladder Diagram are the same, but in reality, PLC uses the CPU to emulate the conventional Ladder Diagram operations; that is, PLC uses scanning method to monitor the statuses of input elements and output coils, then uses the Ladder Diagram program to emulate the results which are the same as the results produced by the conventional Ladder Diagram logic operations. There is only one CPU, so the PLC has to sequentially examine and execute the program from its first step to the last step, then returns to the first step again and repeats the operation (cyclic execution). The duration of a single cycle of this operation is called the scan time. The scan time varies with the program size. If the scan time is too long, then input and output delay will occur. Longer delay time may cause big problems in controlling fast response systems. At this time, PLCs with short scan time are required. Therefore, scan time is an important specification for PLCs. Due to the advance in microcomputer and ASIC technologies nowadays the scan speed has been enhanced a great deal. M PLC takes approximately 1us for IK steps of contact under the condition of continuous address reading. The following diagram illustrates the scanning process of a PLC Ladder Diagram.
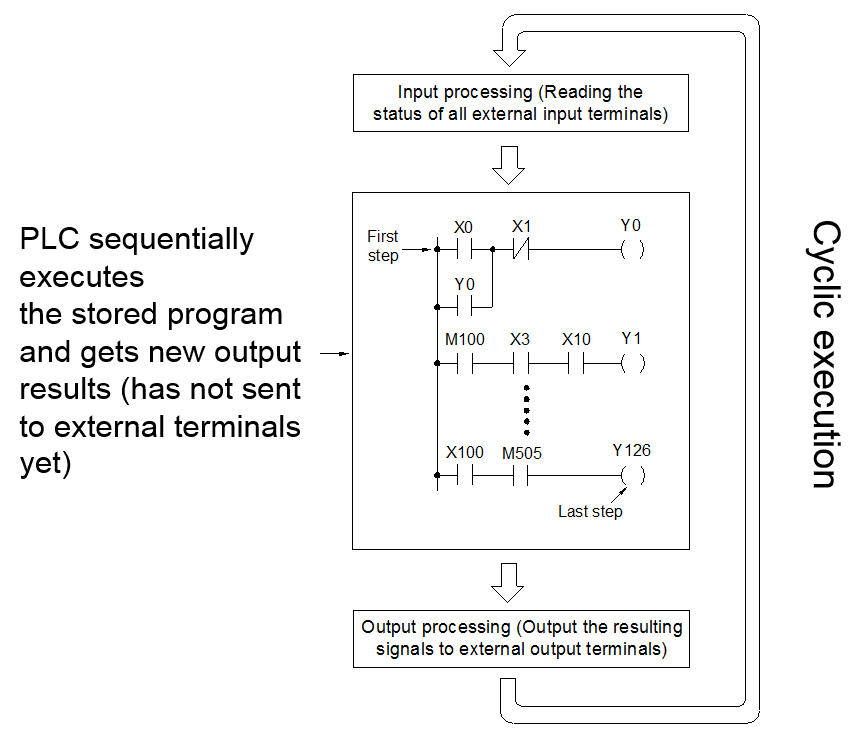
Schematic diagram of PLC ladder diagram program scan
Besides the time scan difference mentioned above, the other difference between the conventional and PLC Ladder Diagram is “Reverse Flow”. As shown in the diagram below, if X0, X1, X4 and X6 are ON, and the remaining elements are OFF: In a conventional Ladder Diagram circuit, a reverse flow route for output Y0 can be defined by the dashed line and Y0 will be ON; while PLC scans from left to right and from top to bottom when the PLC CPU is calculating the result of the ladder diagram program. Under the same input conditions, the state of point “a” in this illustration is considered OFF by the CPU because X3 contact is OFF. Although point a is connected to point “b” via X4 and both are ON, because the PLC ladder diagram only scans from left to right, the CPU Unable to detect, so Y0 output is OFF.
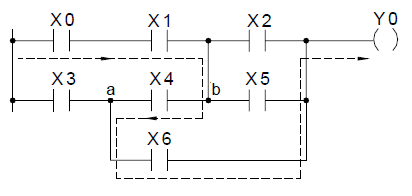
Reverse flow of conventional Ladder diagram
1-2 Ladder Diagram Structure and Terminolog
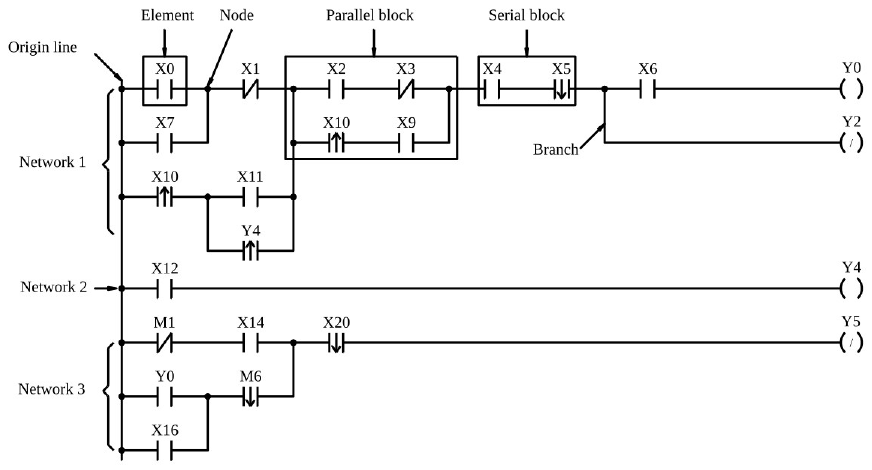
Ladder Diagram Program Example
Note: The maximum size of M PLC network is 22 columns X 16 rows.
As shown above, the Ladder Diagram can be divided into many small cells. There is total 88 cells (8 rows X 11 columns) for this example Ladder Diagram. One cell can accommodate one element. A completed Ladder Diagram can be formed by connecting all the cells together according to the specific requirements. The terminologies related to Ladder Diagram are illustrated below:
- Contact
Contact is an element with open or short status. One kind of contact is called "Input Contact"(reference number prefix with X) and its status reference from the external signals (the input signal comes from the input terminal block). Another one is called "Relay contact" and its status reflects the status of relay coil (please refer to ②). The relation between the reference number and the contact status depends on the contact type. The 6 contact elements provided by M PLC include: A contact, B contact, Up/Down Differential (TU/TD) contacts and Open/Short contacts. Please refer to ④.
- Relay
Same as the conventional relay, it consists of a Coil and a Contact as shown in the diagram below.
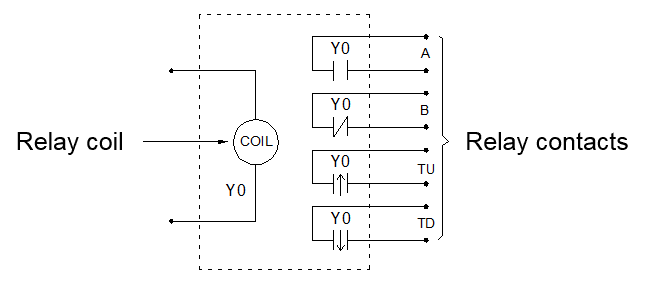
Relay_Coil and Contact
As shown in the figure, the relay must have a coil. To make the relay act, the coil must be driven (by OUT command). After the coil is driven, the state of its contacts will be affected
As shown in the example, if Y0 is driven with 1 (make it ON), then the A contact of the relay is 1, the B contact is 0, the TU contact is only ON for one scan time, and the TD contact is 0.
When Y0 turns OFF, the A contact is 0, the B contact is 1, the TU contact is 0, and the TD contact is only ON for one scan time (for the actions of A, B, TU, and TD contacts, please refer to Chapter 4 "Sequential Instructions").
There are four types of M PLC relays, namely Y△△△ (output relay), M△△△△(internal relay), S△△△ (step relay) and TR△△ (register relay). The status of output relays will be sent to the output point of terminal block.
- Origin
The starting line at the left side of the Ladder Diagram.
- Element
Element is the basic unit of a Ladder Diagram.
An element consists of two parts as shown in the diagram below. One is the element symbol which is called “OP Code” and another is the reference number part which is called “Operand”.
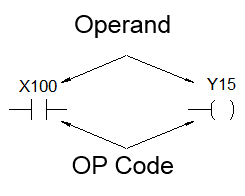
Element
The components of M PLC have the following 8 types:
|
Element type |
Symbol |
Note |
|
A Contact (Normally OPEN) |
□△△△△△
|
□ can be X、Y、M、S 、T 、C (please refer to section 2.2) |
|
B Contact (Normally CLOSE) |
□△△△△△
|
|
|
Up Differential Contact |
□△△△△△
|
□ can be X、Y、M、S |
|
Down Differential Contact |
□△△△△△
|
|
|
Open Circuit Contact |
|
|
|
Short Circuit Contact |
|
|
|
Output Coil |
□△△△△△
|
□ can be Y、M、S |
|
Inverse Output Coil |
□△△△△△
|


M PLC Elements
Note: Please refer to section 2.2 for the ranges of X, Y, M, S, T and C contacts or coils. Please refer to section 2.2 for the element characteristics.
There is a special sequential instruction: FOn, which is also one of the elements. Please refer to section 5.1.4 “Function Output FO”.
- Node
The connection point between two or more elements.
- Block
A circuit consists of two or more elements.
There are two basic types of blocks:
- Serial Block: Two or more elements are connected in series to form a single row circuit.
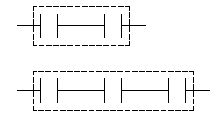
Serial Block
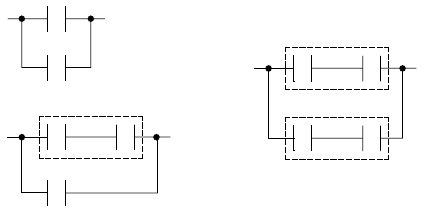
- Parallel Block: A parallel (rectangular) closed circuit composed of components or series blocks connected in parallel.
Parallel Block
Note: Complicated block can be formed by the combination of the single element, serial blocks and parallel blocks. When designing a Ladder Diagram with mnemonic entry, it is necessary to break down the circuits into element, serial, and parallel blocks.
- Branch
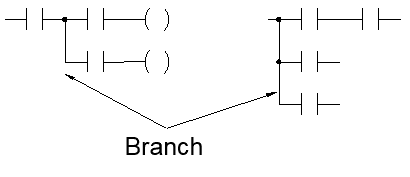
If there are two or more loops connected to the right of the vertical line in any network, this is a branch, and this vertical line is called a branch line.
Branch
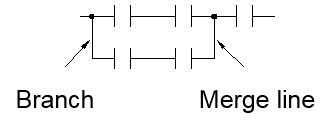
If there is another vertical line on the right side of the branch line to merge the two branch columns of circuits (this vertical line is called the merging line), then this circuit will form a closed circuit (forming a parallel block), and this circuit is a non-branching circuit.
Branch line and Merge line
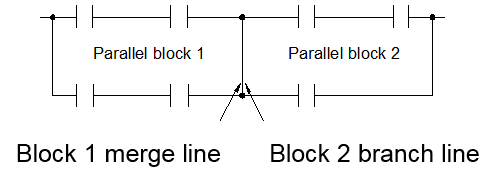
If both the right and the left sides of the vertical line are connected with two or more rows of circuits, then it is both a branch line and a merge line as shown in the example below:
For both branch and merge lines
- Network
A loop that can perform specific functions is composed of elements, branches, and blocks, which is called a network. A network is the basic unit that can perform complete functions in a ladder diagram program, and a ladder diagram program is composed of a series of networks. The beginning of the network must start from the busbar, and any two columns of circuits without a vertical line connection belong to two different networks (the ones connected by a vertical line belong to the same network). According to this rule, such as the ladder diagram program example, it can be divided into three networks: network 1~3.
Tip: press ← → to switch chapters, Ctrl+K to search