OPC UA (OPC Unified Architecture) is a communication standard designed for industrial automation. The characteristic advantage is cross-platform, unified communication standardization, suitable for the communication environment of a variety of machines and equipment, and can meet the needs of data exchange and remote monitoring.
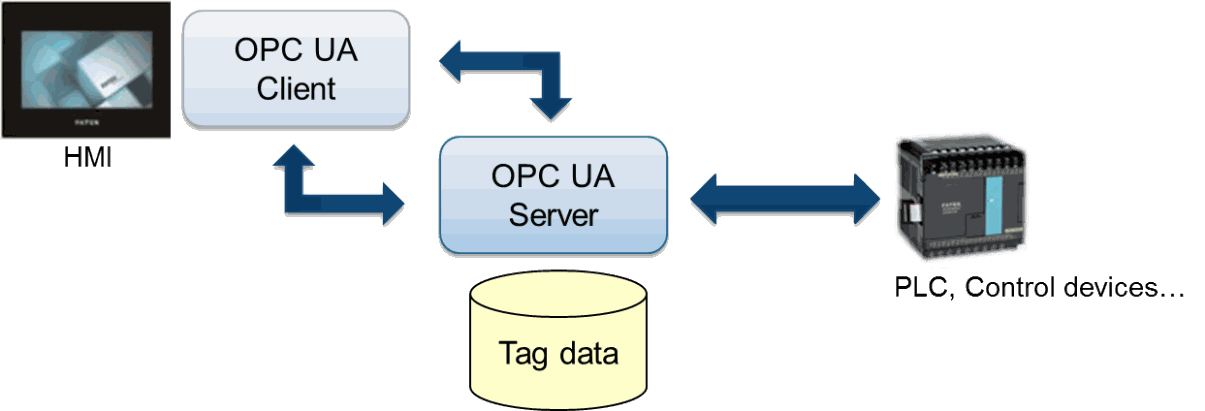
Figure 194 OPC UA Application architecture diagram
The main features of the FATEK【OPC UA Server】include:
- Simple and fast establishment of OPC UA server data structure
- Support for folder structures, enabling grouping and classification of related data
- Remote browsing and access support
- Read and write functionality, enabling access to PLC register data
- Real-time display of server connection status on the execution screen
16.1 OPC UA Server
16.1.1 Setting
16.1.1.1 Server
When selecting the product series as 【FvRT(PC)】or 【OPC UA(PC)】, you can access the settings page for the OPC UA server by clicking on 【OPC UA Server】in the 【Function】window of the 【Project Explorer】panel on the left, the【Server】tab can be used to set the the basic connection information and security verification mechanism of the OPC UA Server, as shown below:
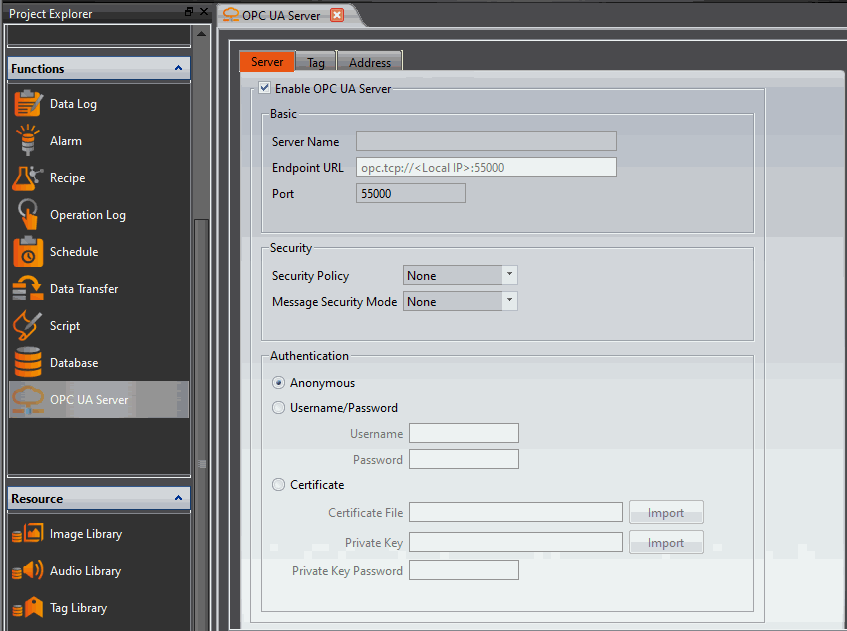
Figure 195【OPC UA Server】【Server】setting page
Table 99【OPC UA Server】【Server】properties setting
|
Properties |
Description |
|
【Enable OPC UA Server】 |
Check whether to enable【OPC UA Server】, this is the main switch of【OPC UA Server】function. The detailed fields can be set only after it is enabled, and the related 【Tag】and【Address】tabs will appear. |
|
【Basic】 |
【Server Name】 Set the name of the server, which can be used as a description 【Endpoint URL】 The server address will be automatically set to the IP of the host (PC or HMI). This field is only for display and cannot be changed manually 【Port】 Set the server port. Default is 55000 |
|
【Security】 |
Security protection and encryption method can be set. 【Security Policy】 You can specify the method of security protection, you can choose "None" or one of the following:
【Message Security Mode】 You can specify the encryption mode, select "None" or one of the following:
|
|
【Authentication】 |
Set the authentication method. 【Anonymous】 No authentication required 【Username/Password】 Enter the username and password for authentication 【Certificate】 Import the certificate file and private key, and enter the corresponding private key password. After the password is entered, it will be mask. |
16.1.1.2 Tag
Check【Enable OPC UA Server】to see this page, in which you can create tags and their corresponding addresses.
Click the【Add Group】button on the right to add a new group, click the【Add Tag】button to add a new tag, the group and the tag are in a tree structure: a group can be created underneath Added new groups and tags. Click the【Delete】button to delete the selected group or taf. Double-click the item to directly edit the field settings of the selected group or tag.
The OPC UA server specification supports the Embedded UA Server Profile 1.03 of the OPC Foundation.
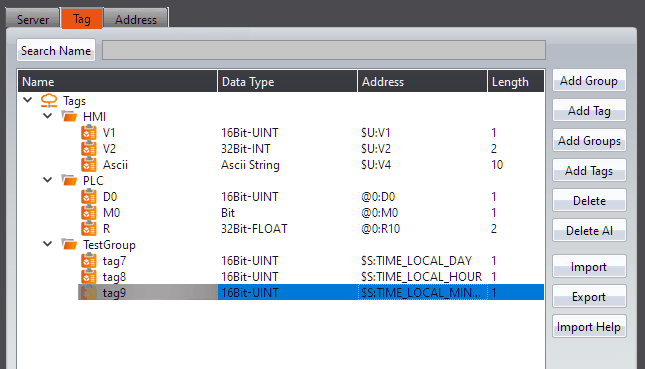
Figure 196【OPC UA Server】【Tag】setting page
Table 100【OPC UA Server】【Tag】properties setting
|
Properties |
Description |
|
【Group】 |
Each group can directly set the fields as follows 【Name】 Click on the name to directly enter and modify. |
|
【Search Name】 |
You can search by group or tag name, but it must be an exact match to navigate directly. |
|
【Tag】 |
Each tag can directly set the fields as follows. 【Name】 Click on the name to directly enter and modify. 【Data Type】 There are【Bit】,【16Bit-INT】,【16Bit-UINT】,【32Bit-INT】,【32Bit-UINT】,【32Bit-FLOAT】, 【ASCII】can be selected. 【Address】 According to the data type, the user can set the address corresponding to each tag 【Length】 If the data type is 16-bit, it will occupy 1 word, and 32-bit will occupy 2 words; if it is Ascii-String, the user can decide how many words the tag occupies. Each word group can contain 2 bytes. |
|
【Add Group】 |
Click on the group or tag on the left to add a new group in that directory. |
|
【Add Tag】 |
Click on the group or tag on the left to add a new tag in that directory. |
|
【Add Groups】 |
Click on the group or tag on the left to add multiple groups in that directory. |
|
【Add Tags】 |
Click on the group or tag on the left to add multiple tags in that directory. |
|
【Delete】 |
Delete the selected group or tag. |
|
【Delete Al】 |
Delete all tags. |
|
【Import】 |
Import tag files from *.csv. |
|
【Export】 |
Export the current tags as a *.csv file. |
|
【Import Help】 |
Documentation for importing tags. |
【OPC UA Server】 supports OPC Foundation’s Embedded UA Server Profile 1.03.
In the 【Enable OPC UA Client】, register tags can be found in the "Objects/Tags" folder. Other tags contain default server information, as shown in the image below:
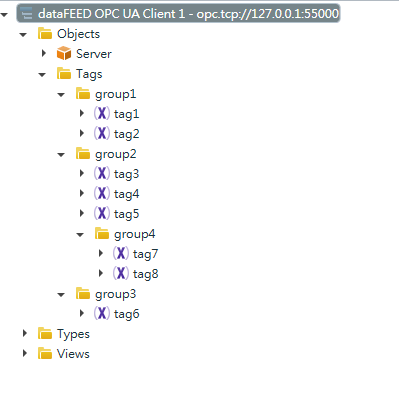
Figure 197 Reading Information with OPC UA Client
16.1.1.3 Address
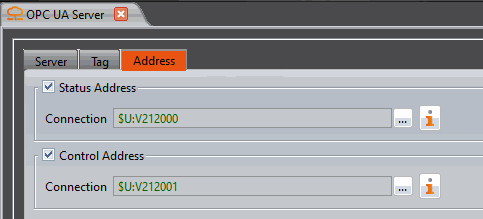
Figure 198【OPC UA Server】【Address】setting page
Table 101【OPC UA Server】【Address】properties setting
|
Properties |
Description |
||||||||||
|
【Status Address】 |
Use the status address to monitor the running status of the OPC UA server 【Connection】 Set the status address of the OPC UA server. The following is the state definition table.
|
||||||||||
|
【Control Address】 |
Use the control address to control the operation of the OPC UA server in real time 【Connection】 Set the control address of the OPC UA server. The following is the state definition table.
|
16.1.2 Server setting steps
16.1.2.1 Adding a new project
To create a new project in FvDesigner, click 【New】on the left side of the project window. Choose either 【FvRT(PC)】or 【OPC UA(PC)】,then click 【Finish】to create the project.
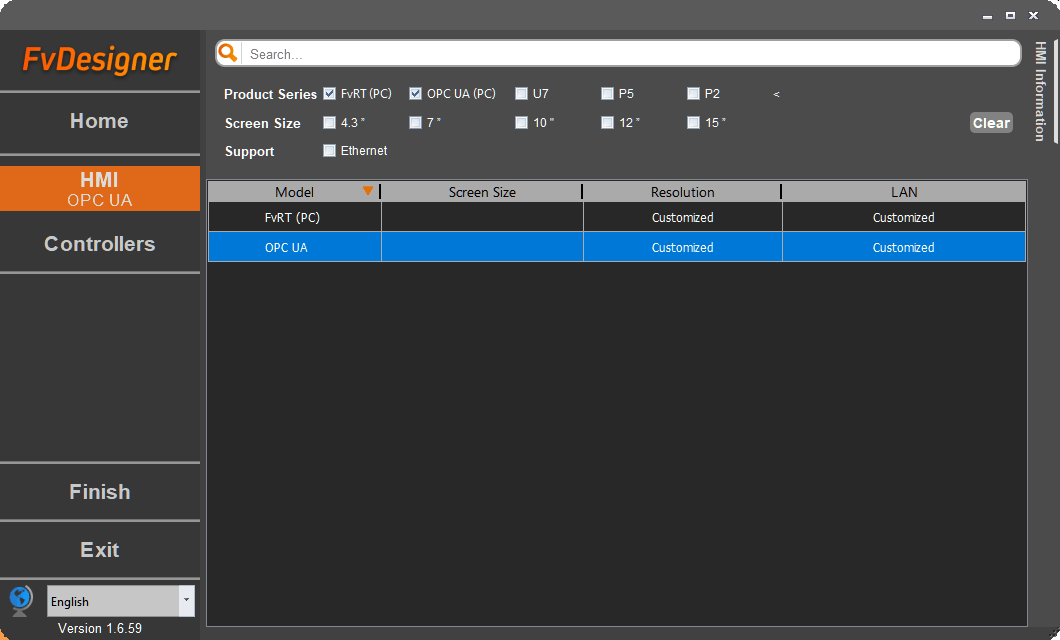
Figure 199 Choose product series of the project
16.1.2.2 Setting up PLC Connection
In the 【System】window of the 【Project Explorer】 panel on the left, click 【Link】to enter the link setup page. This page allows you to configure the PLC device that OPC UA will access. If 【OPC UA(PC)】is selected as the project model, only FATEK PLCs can be used.
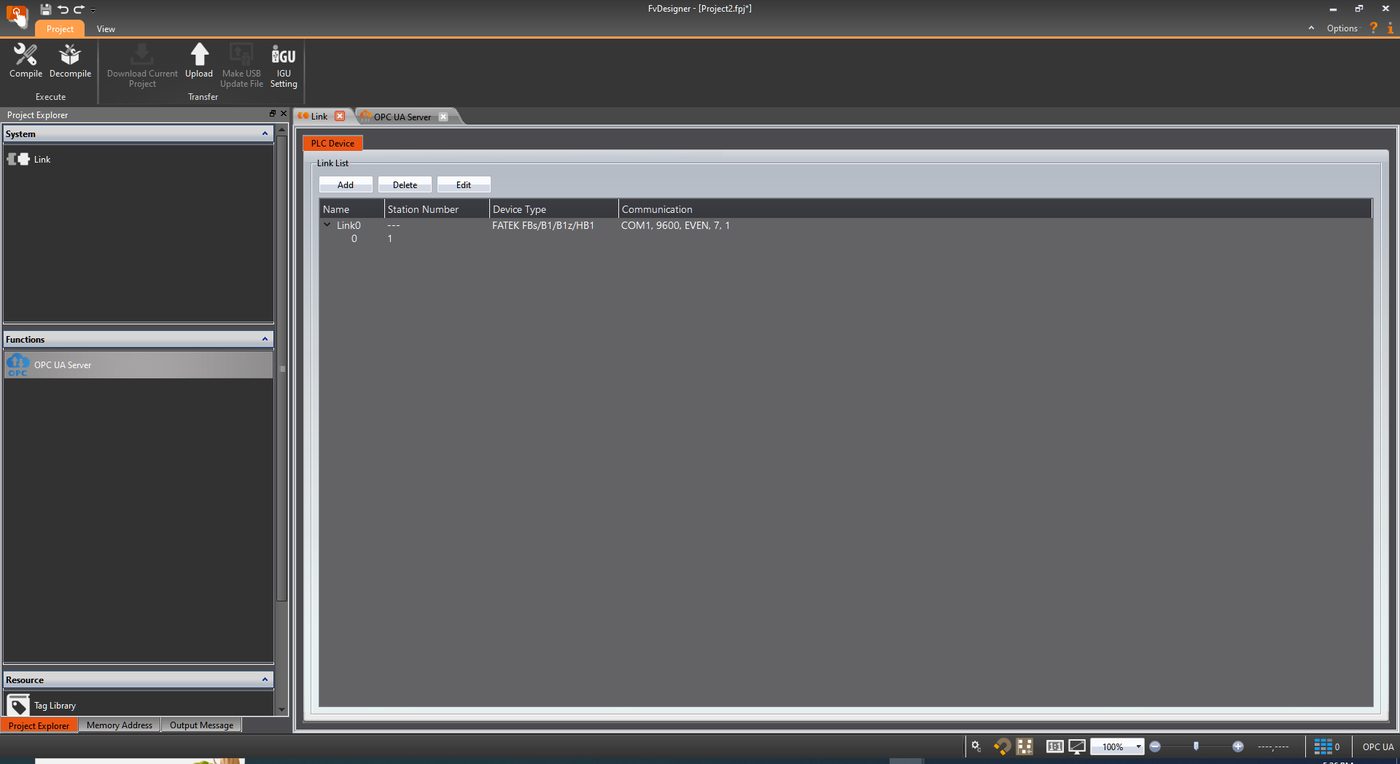
Figure 200 Choose external device connection
16.1.2.3 Setting up Server and Tags
On the left-hand side of the screen, in the 【Functions】window under 【Project Explorer】, click on 【OPC UA Server】. Check the box for 【Enable OPC UA Server】to configure the server. (The default port for the OPC UA server is 55000, but it can be changed as needed.)
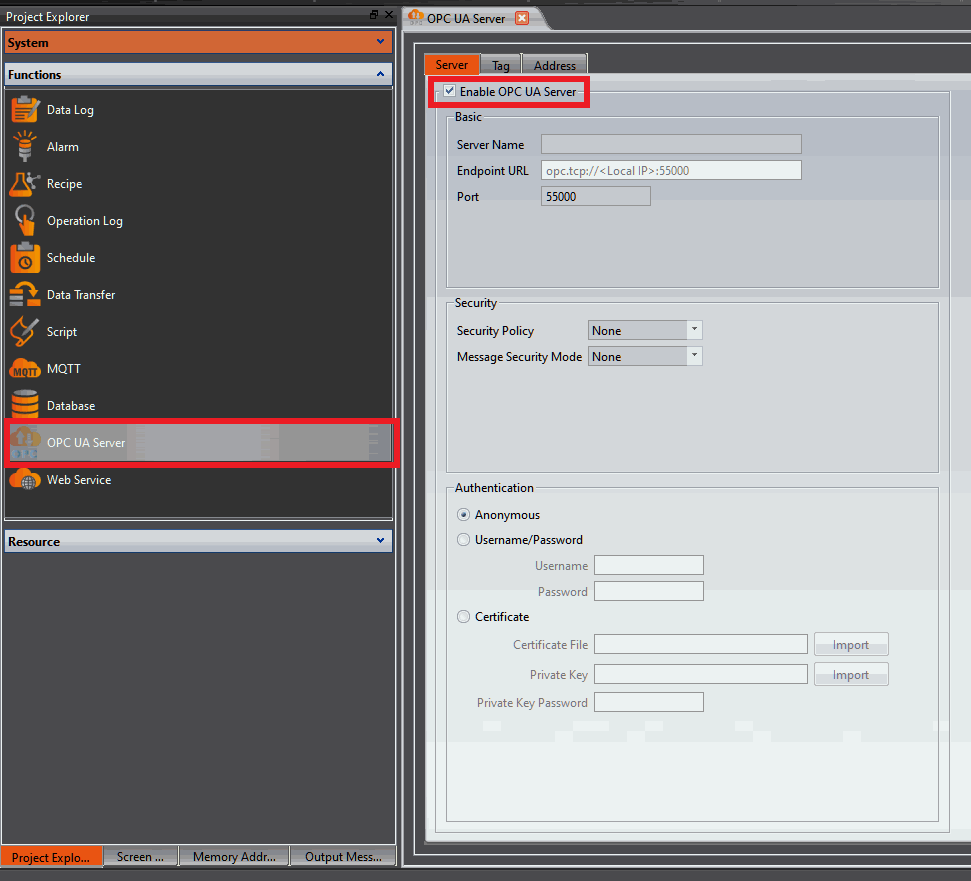
Figure 201 Enable OPC UA Server
On the 【Tags】page, you can create tags to access PLC register data. The steps are as follows : click the 【Add Tag】button to create a new tag, then click on the 【Address】of that tag to input the linked PLC register address. In the settings page, you can create multiple 【Group】and 【Tags】according to your own needs to establish a categorized data structure.
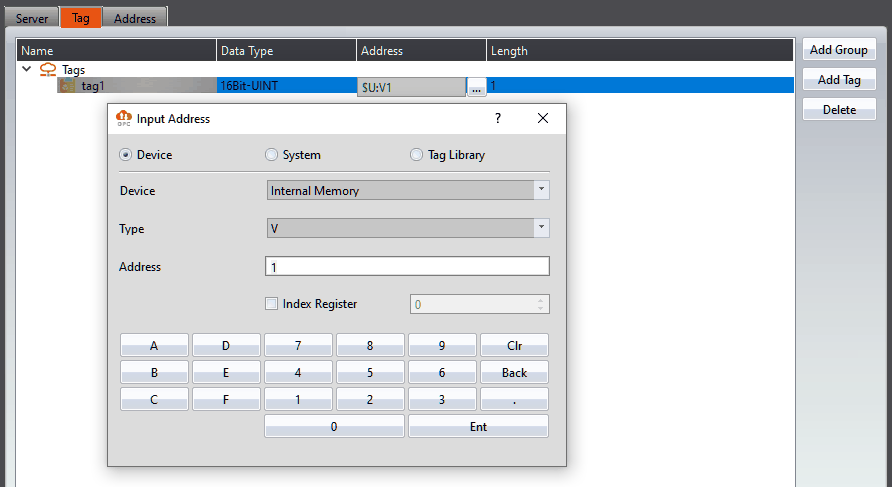
Figure 202 Set OPC UA Tags
16.1.2.4 Compilation and Simulation
After configuring the OPC UA server and tags, click 【Compile】to generate a .cfrp file upon successful compilation. The compilation result will display the location where the project is stored and information about the applicable dongle model. After compilation, click 【Simulation】to perform functional testing. Once testing is successful, use 【FvRT.exe】to run the project.
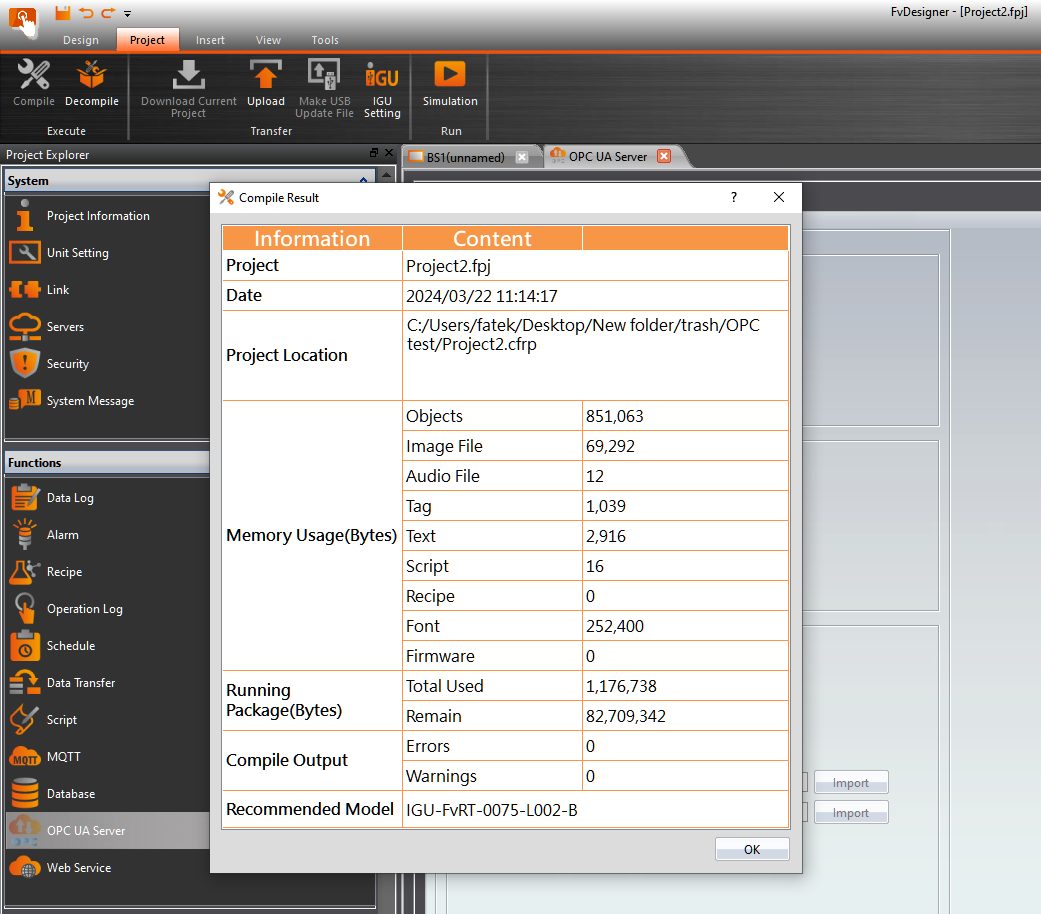
Figure 203 Compile project
16.1.2.5 Running the OPC UA Server
Insert 【IGU-FvRT】or 【IGU-OPC UA】into the computer, open the 【FvRT】software, click "Open Project," select the compiled project (.cfrp), and then click the 【Run】button to start running the OPC UA server.
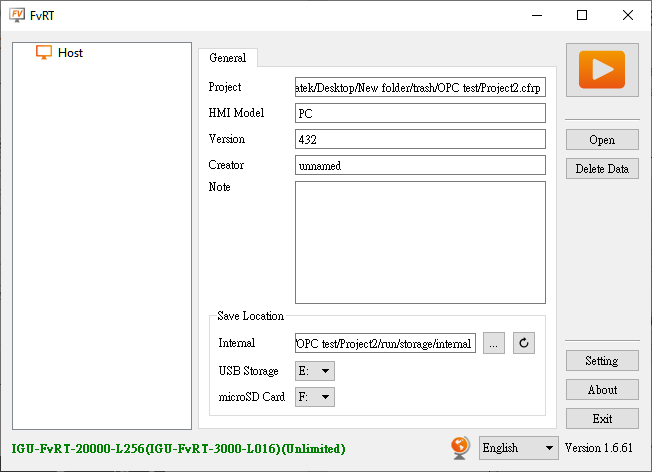
Figure 204 Choose project to run
If the project model is "OPCUA," the server running status and connection count information will be displayed.
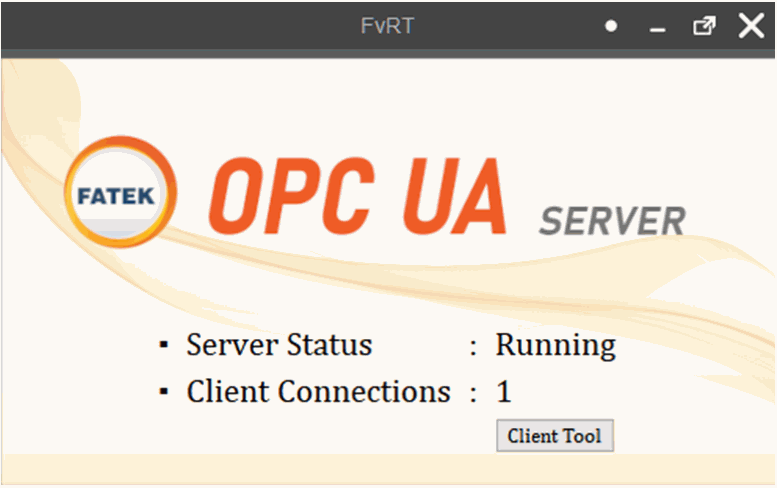
Figure 205 OPC UA Server running screen
16.2 OPC UA Client
For the OPC UA client function,go to【Project Explorer】->【System】->【Link】, and add a link property in【PLC Device】:
【Interface Type】select【Direct Link (Ethernet)】,
【Manufacturer】select【OPC UA】
【Product Series】select【OPC UA Client】,then can set OPC UA Client connection
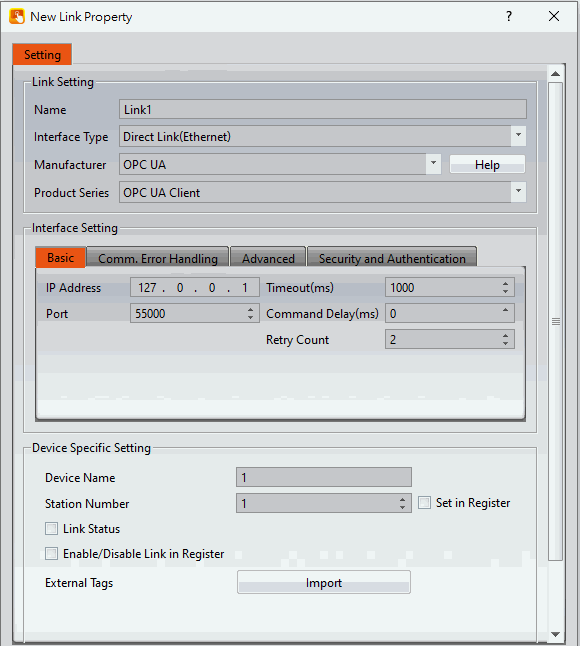
Figure 206【OPC UA Client】setting page
The setting method is same as 3.3.1-PLC Device
16.2.1 Tag
In the settings tab, click the external tags【Import】button on the below to open the import tag window
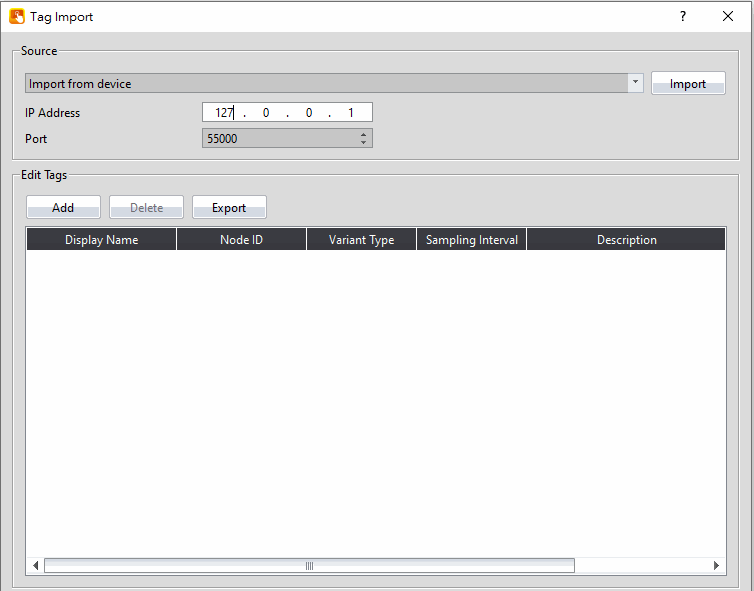
Figure 207【OPC UA Client】【Tag Import】setting page
Table 102【OPC UA Client】【Tag Import】properties setting
|
Properties |
Description |
|
【Source】 |
【Import from device】 Same as the IP address and port set before, which is the connection setting of the OPC UA server.
【Import from file】 Import a CSV file in a specific format and update the tag table directly |
|
【Edit Tags】 |
【Add】 Select a new tag from the OPC UA server to add. (Note: You need to import tags from the device first and make sure to connect to an OPC UA server before you can add tags directly from the server) 【Delete】 Delete the selected tag 【Export】 Export the current label settings into a CSV file in a specific format, which can be imported and used later |
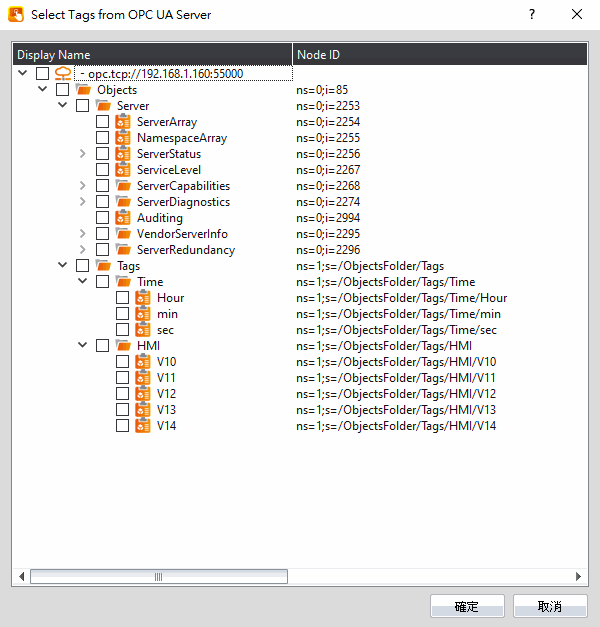
16.2.2 Security and Authentication
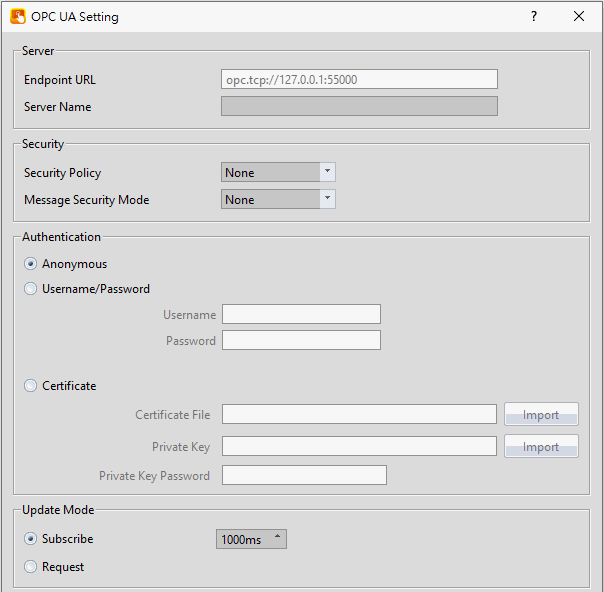
Figure 208【OPC UA Client】【Security and Authentication】setting page
Table 103【OPC UA Client】【Security and Authentication】properties setting
|
Properties |
Description |
|
【Server】 |
【Endpoint URL】 The URL of the OPC UA server will automatically use the【IP Address】and【Port】in the【Interface Setting】【Basic】to form the format "opc.tcp://IP:port". This field cannot be used, only for display purposes. 【Server Name】 Set the name of the server, which can be used as a description |
|
【Security】 |
Security protection and encryption methods can be set, please note that this setting must be the same as the connected server: 【Security Policy】 You can specify the method of security protection, you can choose "None" or one of the following:
【Message Security Mode】 You can specify the encryption mode, select "None" or one of the following:
|
|
【Authentication】 |
The authentication method can be set. Please note that this setting must be the same as the connected server: 【Anonymous】 No authentication required 【Username/Password】 Enter the username and password for authentication 【Certificate】 Import the certificate file and private key, and enter the corresponding private key password. After entering the password, it will be masked |
|
【Update Mode】 |
Select the mode for updating tag data 【Subscribe】 A fixed time (milliseconds) can be set to read the tag data, read the data when it has been updated. 【Request】 Will continue to read tag data |
16.2.3 FATEK OPC UA Client Tool
When running an OPC UA project using "Simulation" or "FvRT," the "Client Tool" will appear on the screen (supported from version 1.6.66 onwards). This tool can be used to view information about tags in the server.
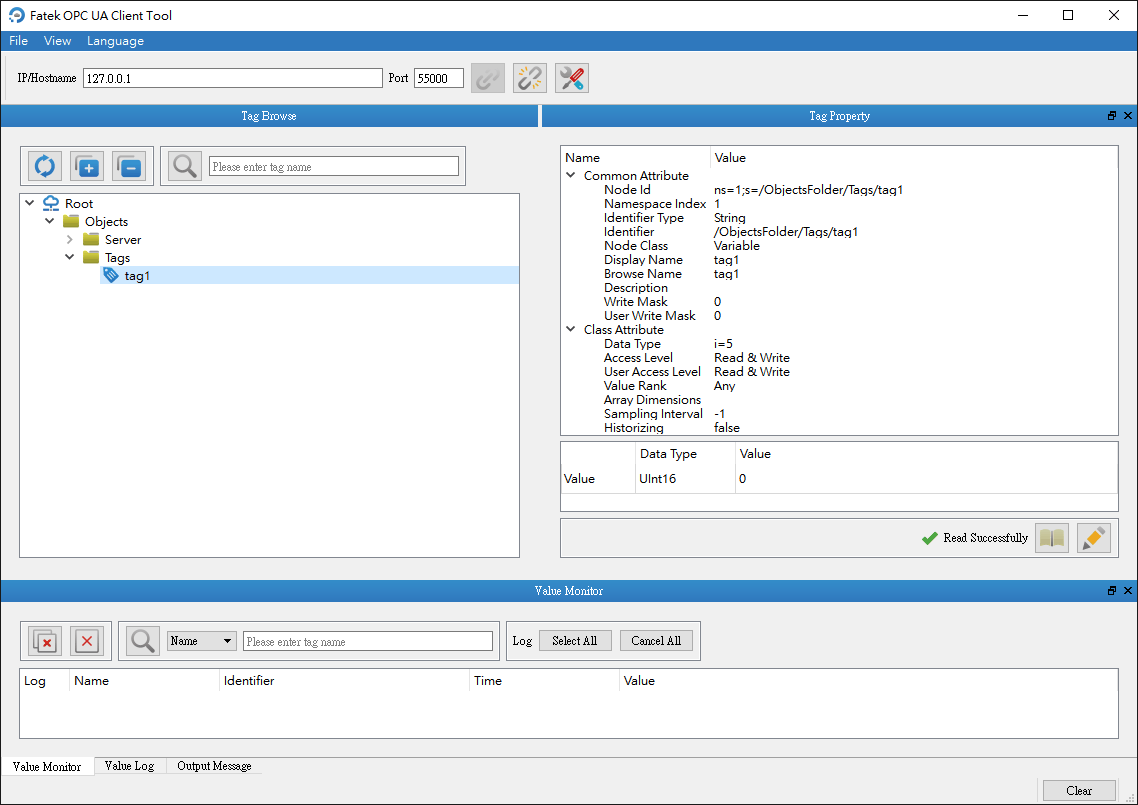
Figure 209【FATEK OPC UA Client Tool】setting page
Moving the mouse cursor over various options will display tooltips.
For example,  options like "Connect," "Disconnect," and "Security Settings" will appear.
 "Read" and "Write" options will also appear, and if you want to modify values using this tool, you need to click after entering the values.
Tip: press ← → to switch chapters, Ctrl+K to search