In practical applications, settings with similar properties or behaviors but have different data contents for parameters are frequently used on equipment for manufacturing processes or actions; the collection of these parameter contents is called Recipe. Excellent recipe management helps increase engineering or production efficiencies.
9.1 Recipe Data Flow
Before we start explaining the data flow of recipes on HMI, we must first understand what recipe group files, recipe groups and recipes are.
Recipe
For instance, if a machine is able to produce bread and cakes, and their ingredients are both flour, eggs, butter and chocolate, the ingredients can be viewed as the parameters of the machine. However, because the ratio of ingredients for making bread is different from making cakes, the ingredient ratios of the two can be made into two sets of parameters: one for making bread and one for making cakes. The two sets of parameters described above are two different recipes; and every recipe will have a unique number.
Recipe Group
A group of recipes that have the same parameters is called a Recipe Group; take the example above for instance, the two recipes (bread and cake) can form a Recipe Group. The recipe function allows users to edit multiple recipe groups, and every recipe group will have a unique Recipe Group ID. All the recipes in the recipe group will have a unique number starting from 0. (For example, the number of bread is 0 and the number of cake is 1)
Recipe Group File
There is the common format csv file which the user can use text editors on their own computers or the Recipe Editor in the recipe function to edit the csv file. A recipe group file saves all the data of a recipe group, including all the parameter names and parameter values in the recipe.
Recipe Data Flow
When projects are executing on the HMI, all of the parameter data are saved in the recipe group file first, and the user can use the function switch object to import the file into the HMI. Complete parameter contents can be seen if the project has the recipe table object.
There is a buffer in the HMI used to save the data of the current recipe; which recipe to save in this buffer is determined by the Control Address of Recipe No., and the Control Address of Recipe No. is set in the recipe function. Please note that no matter what the Recipe No. currently is, once the import file function is used, the Recipe No. will be reset to 0.
The export function can be used to export the recipe group of the HMI into the recipe group file if the user changed the parameter data of the recipe group, and the contents in the original recipe group file will be overwritten.
The function switch object can be used to write the contents of the current recipe of the HMI to the target address (usually the PLC controller), and it can write the data of the target address into the current recipe of the HMI.
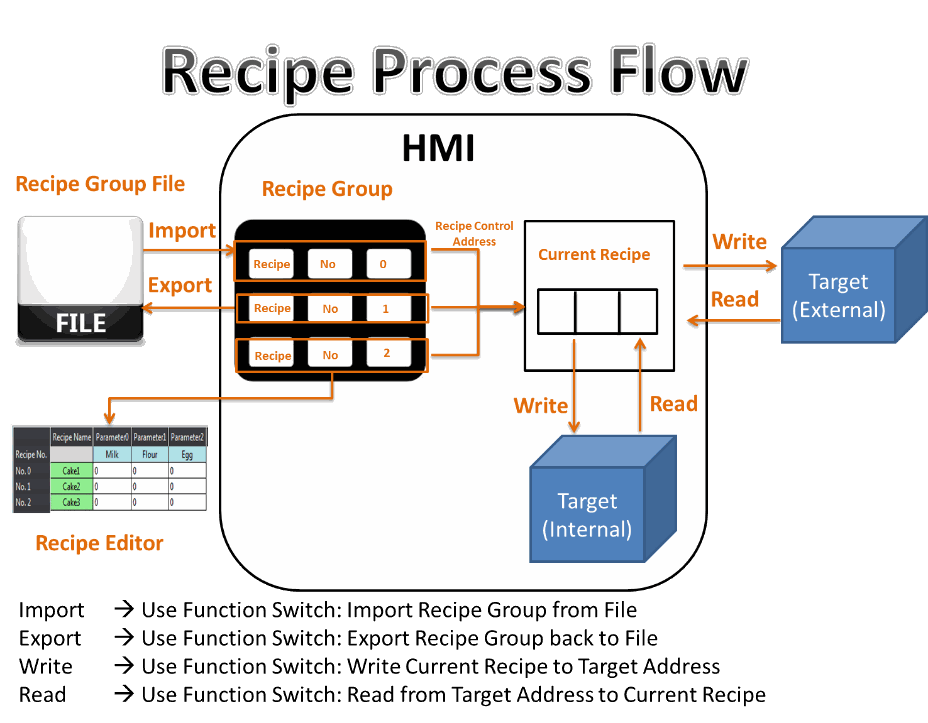
Figure 141 Recipe Data Flow
The recipe function can be found by clicking【Recipe】in the【Functions】window of【Project Explorer】located on the left side, to enter【Recipe Group List】.
Note: Each model of HMI has a different maximum number of recipes. For example, the P5 series has a maximum of 20.
The【Add】or【Delete】button on the right can be clicked to add a new recipe group or delete the selected recipe group; items in the recipe group list can also be double-clicked to edit the selected recipe group. On the left side of every recipe group in the recipe group list has a unique ID. This is called the recipe group ID.
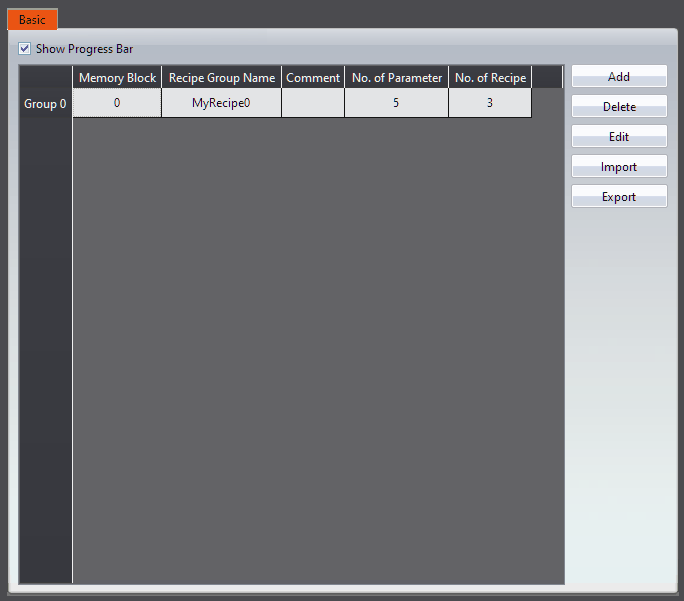
Figure 142 Recipe Settings Screen
【Recipe】in the【Insert】tab function group of the Ribbon workspace can also be clicked to add a new recipe group directly and enter the【Recipe Group Properties】editing page. The new recipe group will be added after pressing the【OK】button.
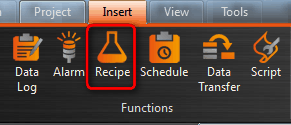
Figure 143 Insert Recipe Screen
The following are detailed explanations of the【Recipe Group Properties】.
9.2 Recipe Group Properties
9.2.1 【General】
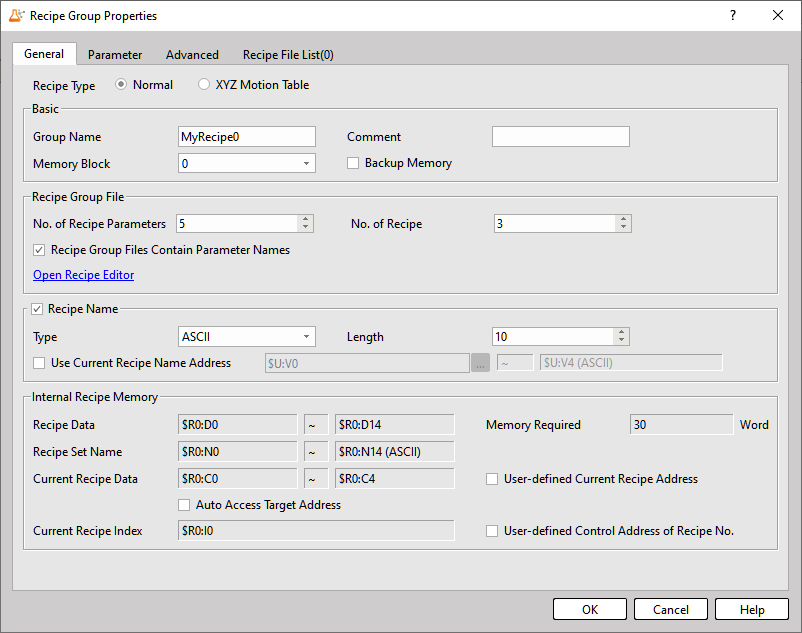
Figure 144【General】Screen of【Recipe】
Table 63【General】Properties of【Recipe】
|
Property |
Description |
|
【Basic】 |
【Group Name】 The name of the recipe group. 【Comment】 Comment describing this recipe group. 【Memory Block】 The number of the buffer area of this recipe group, the number of each recipe group is different. 【Backup Memory】 Select to save the recipe data of the HMI into the backup memory of the HMI when the power to the HMI is interrupted in order to avoid loss of data. |
|
【Recipe Group File】 |
【No. of Recipe Parameters】 Set the number of parameters for this recipe group. 【No. of Recipe】 Set the number of recipes for this recipe group. Note: The memory size of every recipe group cannot exceed 6291456 words, which means that (the total number of words for every parameter) x (the number of recipes) ≦ 6291456. If the user is uncertain whether the limit has been exceeded, the user can move the mouse cursor onto the text and a tooltip will tell the user how many words are currently used.
【Open Recipe Editor】 The recipe editor will appear, allowing the user to add a new recipe group file when this button is pressed or edit a recipe group file saved on the PC storage. Note: When using the recipe editor to modify an existing file, if the parameter name is not same as the original, a warning window will pop up to ask whether to overwrite. When you use the function of simulation, the recipe group file will be put in the path: C:\Users\UserAccount\Documents\Fatek\FvDesigner\run\storage\internal\recipe |
|
【Recipe Name】 |
【Recipe Name】 Check whether to enable the recipe name function. 【Type】 Set the type of recipe name to Ascii, Unicode, Big5 or GB18030. 【Length】 Set the length of recipe. 【Use Current Recipe Name Address】 When this option is selected, you can specify the memory address used for the recipe name. It can be set to an internal register or a PLC address. The amount of memory used will vary depending on the length of the name. |
|
【Internal Recipe Memory】 |
【Recipe Data】 Display the address range used by the recipe group data in the internal memory area of the HMI 【Memory Required】 Display the number of words occupied by the recipe group data 【Recipe Set Name】 Display the address range used by the recipe name in the internal memory area of the HMI 【Current Recipe Data】 Display the address range of the current recipe data in the internal memory area of the HMI 【User-defined Current Recipe Address】 If you select the option to define the current recipe data address, the user can decide which address the buffer memory should start from Note: This address can only use the internal register 【Auto Access Target Address】 If you check this option, when the current recipe data is changed, the data will be automatically written into the 【target address】 【Current Recipe Index】 The register data of this address is a 16-bit UINT. This integer is used to represent the number of the current recipe. The recipe used by the recipe group when the HMI is executing is the current recipe. 【User-defined Current Recipe Address of Recipe No.】 User can decide the current recipe number control address by himself, instead of using the recipe register configured by the system default Note: The recipe number control address cannot be the same as the current recipe start address 【Power-On Reset Recipe No.】 This option becomes available after enabling Custom Recipe Number. If the system default address is used, the value will not be retained regardless of whether Backup Memory is checked. To retain the recipe number address, you must change it to a non-volatile memory address (such as $U:XNV or $U:XNVA) or an external device address. |

9.2.2 【Parameter】
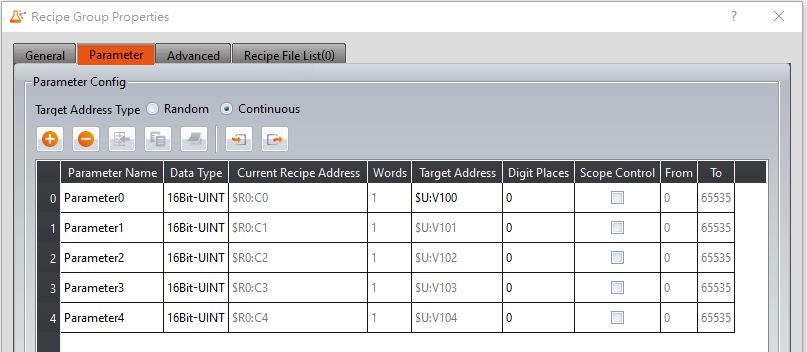
Figure 145【Parameter】【Recipe】settings
Table 64【Parameter】【Recipe】properties settings
|
Field |
Description |
|
【Parameter Config】 |
【Target Address Type】 【Continuous】 The target(usually PLC) address can only be set for the first parameter of in the table below. The addresses of the other parameters will be filled in consecutively in memory and the user cannot modify them. 【Random】 The user can set the target address for every parameter, but the addresses must be unique.
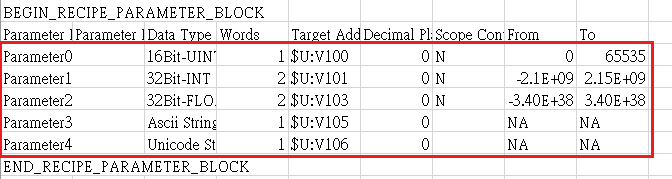
【Add】 Add a new item at the bottom of the parameter table 【Delete】 Delete the selected parameter, if not selected, delete the last one 【Insert】 Add one under the selected parameter 【Copy】 Copy the selected parameter 【Paste】 Paste the copied parameter If is select a row, the parameter name and other parameters except the current recipe address will be overwritten. If is not select a row, the copied parameters will be pasted in the last row. 【Import】 Import the recipe parameter file. The content has a fixed format. Be sure to export the file first and then modify the file then import. When importing, it will check for validity, and if there is an error, a warning will pop up. 【Export】 To export the recipe parameter file, it should be noted that only the content in the red box can be changed.
The following are the explanations for parameter settings. 【Parameter Name】 The parameter name cannot be blank and each parameter should have a unique name. It can be entered directly or selected by【Font】. 【Data Type】 Available selections include 16Bit-BCD, 16Bit-INT, 16Bit-UINT, 16Bit-HEX, 32Bit-BCD, 32Bit-INT, 32Bit-UINT, 32Bit-FLOAT, 32Bit-HEX, 64Bit-BCD, 64Bit-INT, 64Bit-UINT, 64Bit-FLOAT, 64Bit-HEX, Ascii-String, Uniucode (Simplified Chinese), Uniucode (Traditional Chinese), Unucode (Others). 【Current Recipe Address】 The current recipe address of the parameter is determined by the start address set by the user. The user cannot change it. 【Words】 If the data type is 16 bits, it will occupy 1 word, and if the data is 32 bits, it will occupy 2 words. If the data type is Ascii-String or Uniucode, the user can decide how many characters this parameter occupies, and each word occupy 2 bytes. Each Ascii-String occupy 2 words. Each Unicode occupy 1 word. 【Target Address】 Set the address of the target register (usually PLC). 【Digit Places】 Set the position of the decimal. 【Scope Control】 Allows the user to set a value range for this parameter. If not selected, the default value range of the parameter will be the range set by the【From】and【To】columns. 【From】 Set the minimum value of this parameter; this value cannot be less than the absolute minimum value for the data type. The default value for this field is the absolute minimum value. 【To】 Set the maximum value of this parameter; this value cannot be greater than the absolute maximum value for the data type. The default value for this field is the absolute maximum value. |

9.2.3 【Advanced】
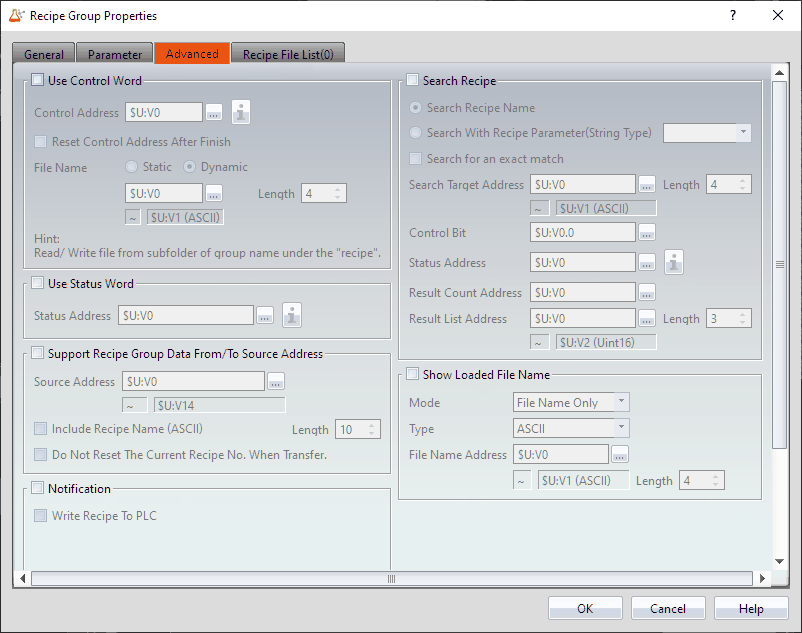
Figure 146【Advanced】【Recipe】Settings
Table 65【Advanced】General Settings
|
Field |
Description |
||||||||||||||||||||||||||||||||||||||||||||||||
|
【Use Control Words】 |
Use the control word to control the recipes actions. Including; reading, or writing data from/to the PLC, editing, and other functions. 【Control Address】 Set the control address to a specific address that will trigger the function 【Reset Control Address After Finish】 After the control address is triggered, it must be reset to zero to do the next function control. You can manually set the value or check this option to automate the reset.
【File Name】 Two types of file names,【Static】and【Dynamic】.【Static】allows you to set the recipe below the checkbox.【Dynamic】allows you to set the string length. The maximum amount of characters is 16, the contents of the string affect the file name. Note: No need to enter ".csv" by yourself. |
||||||||||||||||||||||||||||||||||||||||||||||||
|
【Use Status Word】 |
Use the status word group to monitor the current state of the recipe processing. 【Status Address】 Set the status address to the following to achieve the desired status message, as show in the table below.
|
||||||||||||||||||||||||||||||||||||||||||||||||
|
【Support Recipe Group Data From/To Source Address】 |
Set whether to use the entire recipe group and source address to transfer data. 【Source Address】 Set the source address of the starting address. The software will automatically calculate the total number of addresses used and will prompt the user for the ending address. 【Include Recipe Name】 Set whether to include the recipe name when using the entire recipe group and the source address. 【Length】 Set the recipe name length. 【Do Not Reset The Current Recipe No. When Transfer】 When unchecked, this function will reset the【Control Address of Recipe No.】to zero after transmission. After checking, the current selection will be kept. |
||||||||||||||||||||||||||||||||||||||||||||||||
|
【Notification】 |
Set whether to allow the recipe group to enable the notification function. After enabled, the notification address can be set at the follow, and it will be notified when the function【Write Recipe To PLC】or【Read Recipe From PLC】is executed. |
||||||||||||||||||||||||||||||||||||||||||||||||
|
【Recipe Search】 |
Set whether to use the search recipe function. Use this function to search for the current recipe name or the recipe parameter column for a particular ASCII type. 【Search Recipe Name】 Use the search recipe name to search for the recipe. When the【Recipe Name】is not checked in the【General】, it will become【Search With Recipe Parameter】. 【Search with Recipe Parameter(String Type)】 Search for recipe parameters in Ascii or Unicode format 【Search with Recipe(String Type)】 Search for recipe parameters in Ascii or Unicode format 【Search for an exact match】 Search for recipes with the exact same parameters as entered. 【Search Target Address】 Search using text address’ and character length, up to 20 bytes. 【Control Bit】 Search is initialized when the control bit changes from 0 to 1 【Status Address】 Shows the status of the current search. The following is a list of status addresses and results
【Result Count Address】 Set the search result count address. After the searching is complete, the number of search results will be stored. If there is no seach, the number stored will be 0 【Result List Address】 Set the search result list address. After the searching is complete, a number that represents the temporary register is stored. The magnitude of the number is the maximum number of searches and the maximum number of recipes that can be set. 【Length】 It is the number of searchable items, and the maximum length can be set as【No. of Recipe】 |
9.2.4 【Recipe File List】
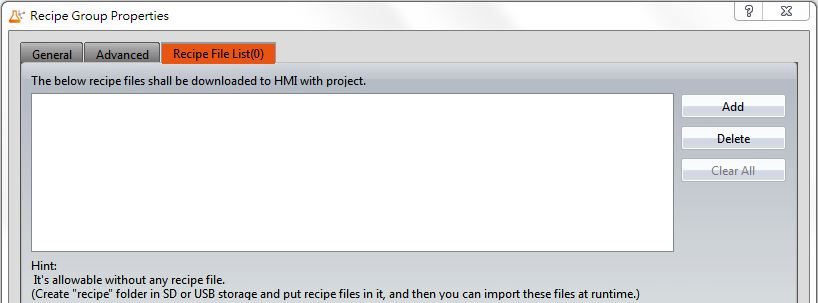
Figure 147【Recipe File List】Screen of【Recipe】
Table 66【General】Properties of【Recipe】
|
Property |
Description |
|
【Add】 |
Add an already existing recipe group file to the recipe file list. |
|
【Delete】 |
Delete an item in the recipe file list. |
|
【Clear All】 |
Delete all the items in the recipe file list. |
9.3 【Recipe Memory】
The HMI system will allocate a dedicated memory area for each recipe group according to the【Memory Area No.】, so that users can directly access the data in the recipe group through the exclusive [recipe register], including: (n is【Memory Block No.】)
Recipe Data Memory—————- $Rn:D
Recipe Name Memory————— $Rn:N
Current Recipe Data Memory——- $Rn:C
Current Recipe Name Memory—– $Rn:I
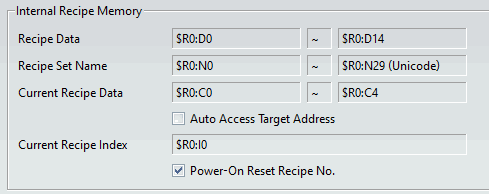
Figure 148 Recipe Memory
After the formula is created, the【Recipe Memory】can be read and written in various functions, such as using【Numeric Input/Display】to read.
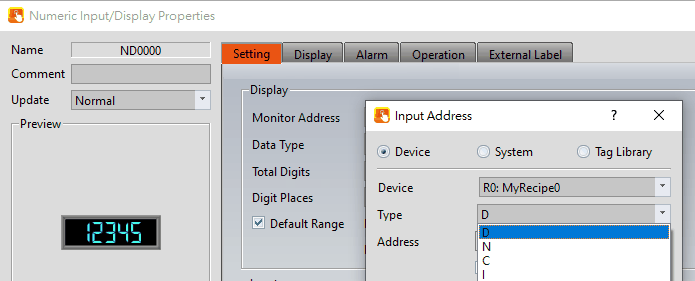
Figure 149 Recipe Memory Usage
Table 67 Recipe Memory
|
Property |
Description |
|
Recipe Data Memory 【$Rn:D】 |
$Rn:D0~$Rn:Dm-1, n is【Memory Block No.】, m is the No. of words occupied by the recipe group data. |
|
Recipe Name Memory 【$Rn:N】 |
$Rn:N0~$Rn:Nm-1, n is【Memory Block No.】, m is the No. of words occupied by the recipe name. |
|
Current Recipe Data Memory【$Rn:N】 |
The address range of the current recipe data in the internal memory area in the HMI. $Rn:C0~$Rn:Cm-1, n is【Memory Block No.】, m is the No. of words occupied by the current recipe. |
|
Current Recipe Name Memory 【$Rn: I】 |
The current recipe number address that in the address range of the internal memory area of the HMI. $Rn:I0, n is【Memory Block No.】. |
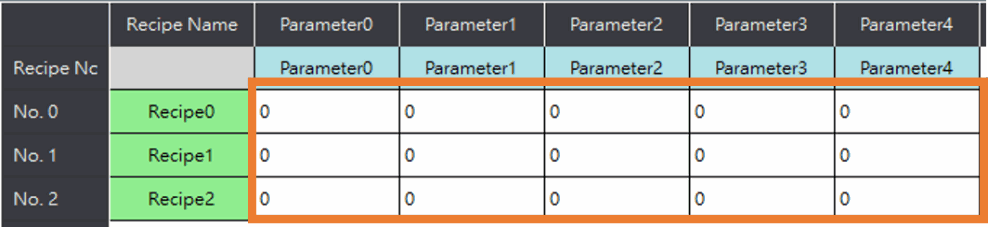
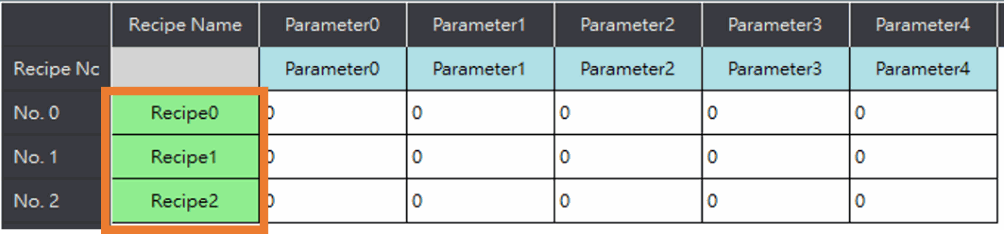
9.4 【Recipe Editor】
This function allows users to add recipe group files or edit existing recipe group files.
You can open this interface in【Open Recipe Editor】in the【Recipe Group Properties】【General】setting function, or click RecipeEditor.exe from the FvDesigner folder to open it.
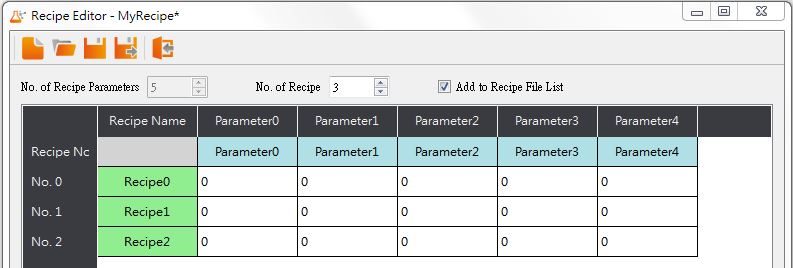
Figure 150 Open【Recipe Editor】from software
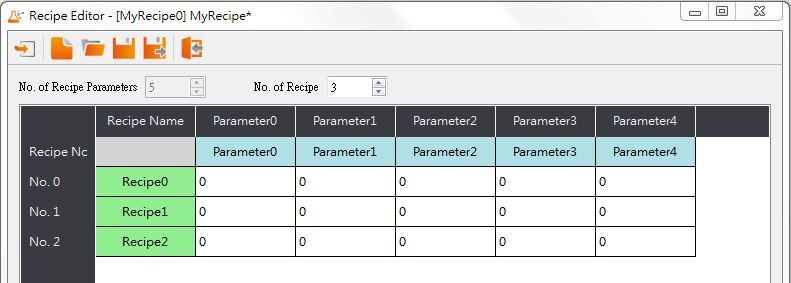
Figure 151 Open【Recipe Editor】from folder
Table 68【Recipe Editor】Functions
|
Property |
Description |
|
【Import Recipe Config】 |
It is visible when the editor is opened from the folder, and the recipe file (.rpcfg) exported by the software can be imported for editing. |
|
【New Recipe】 |
Add a new recipe. |
|
【Open Recipe】 |
Open an existing recipe file (.csv). |
|
【Save Recipe】 |
Save the currently edited recipe group contents into a recipe group file. The user can select to save it as a csv file. |
|
【Save Recipe As】 |
Save the currently edited recipe group contents into a new file; the user can select to save it as a csv file. |
|
【Exit】 |
Exit the recipe editor. |
|
【No. of Recipe Parameters】 |
The “No. of Recipe Parameters” cannot be set if the user is adding a recipe group file. The No. of Recipe Parameters can be set if the user is modifying an existing file. |
|
【No. of Recipe】 |
Determine how many recipes this recipe group file has. A number will be automatically generated on the left side of the recipe. |
|
【Add to Recipe File List】 |
Open the editor from software and the option can be seen. If checked, this file will be automatically added to the recipe file list after finishing editing. |
Note:
Please note that when the user is editing the value of the parameters, this value cannot exceed the limit between the minimum and maximum value of this parameter, in which the data type of the parameter usually defines the maximum/minimum value. However, the value set for the【Scope Control】will be referred to if the user selects【Scope Control】in parameter settings.
If this parameter is an Ascii String, the length of characters entered by the user cannot exceed the length configured for the parameter x2. If the parameter in the file opened by the user exceeded the restricted range, the background will be displayed in red.
9.5 【Recipe Table】
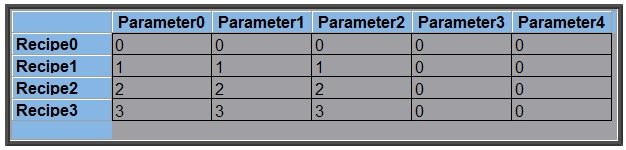
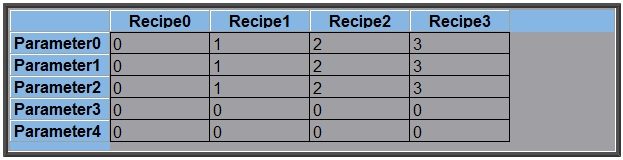
The【Recipe Table】is used to view or edit the contents of the recipe group. In addition, the user can decide to use a【Sub Switch】in the recipe table. 【Sub Switch】allows users to load the data in the recipe group file into the【Recipe Table】or save the parameter contents in the【Recipe Table】into a recipe group file.
The【Recipe Table】object can be found in the【Recipe】category of the【Toolbox】to the right; it can also be found by clicking the icon in the【Object】group of the【Design】page on the Ribbon workspace. Please refer to the Chapter 0–
【Recipe Table】for a detailed introduction to the properties of this object; the following is only an introduction to special properties and functions related to recipes.
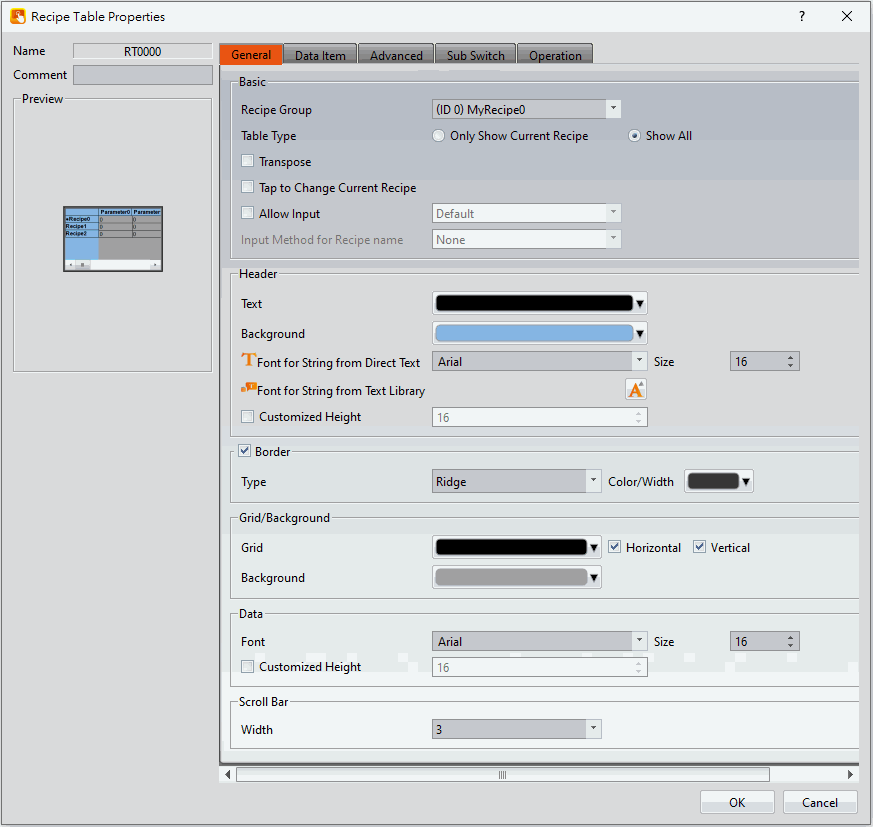
Figure 152【Recipe Table】Property Setting Screen
Table 69【Recipe Table】Functions
|
Property |
Description |
|
【Recipe Group】 |
The recipe group ID and recipe group name can be seen here if the user added a new recipe group in the recipe settings function. The【OK】button can only be pressed after the user has selected a recipe group.
|
|
【Table Type】 |
【Only Show Current Recipe】 Display the current recipe according to the Control Address of the Recipe No. in recipe settings. The default value for index is 0. 【Show All】 Show all contents of the recipe group. |
|
【Transpose】 |
Reverse the rows and columns. For example, row 1 in the original table becomes column 1 in the transposed table.
|
|
【Tap to Change Current Recipe】 |
When checked, you can click the recipe header or item to automatically switch the current recipe to the clicked recipe. |
|
【Allow Input】 |
The user will be able to change the parameter contents in the recipe table during execution if this option is selected. If【Function Switch】or【Sub Switch】in the Toolbox is also used, the user can save the value contents of the recipe table into a recipe group file, or change the parameter of the controller. 【Input Method for Recipe name】 Input methods includes【None】,【Pinyin(Simplified Chinese)】, and【Chewing(Traditional Chinese)】. |
|
【Advanced】 |
【Use Filter】
|
|
【Sub Switch】 |
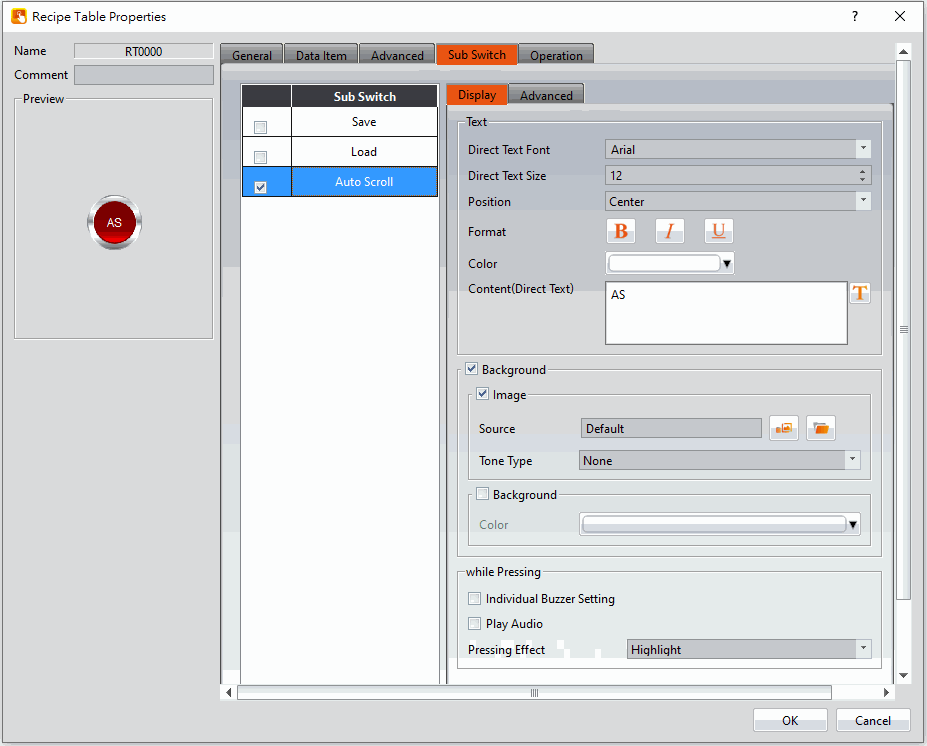
If the【Save】or【Load】button in the【Sub Switch】page is selected, corresponding buttons will also appear on the top-right of the recipe table editing section screen when the【OK】button is pressed. 【Save】 Once the user clicks this button during execution, the parameter contents of the current【Recipe Table】will be saved onto the recipe group file in recipe settings. 【Load】 Once the user clicks this button during execution, the contents of this file will be loaded into the【Recipe Table】according to the recipe group file in recipe settings. 【Auto Scroll】 When the【Control Address of Recipe No.】has changed, the recipe table will jump to the corresponding recipe.
|

9.6 【Recipe Selector】
The【Recipe Selector】is used to select a current recipe. The operator can only see the name of the recipe on the HMI and cannot know the contents of the recipe parameters. Therefore, the parameter data is confidential.
The【Recipe Selector】object can be found in the【Recipe】category of【Toolbox】, it can also be found by clicking the icon in the【Object】group of the【Design】page on the Ribbon workspace. Please refer to the Chapter19.4.31–【Recipe Selector】for detailed introduction to the properties of this object; the following is only introduction to special properties and functions related to recipes.
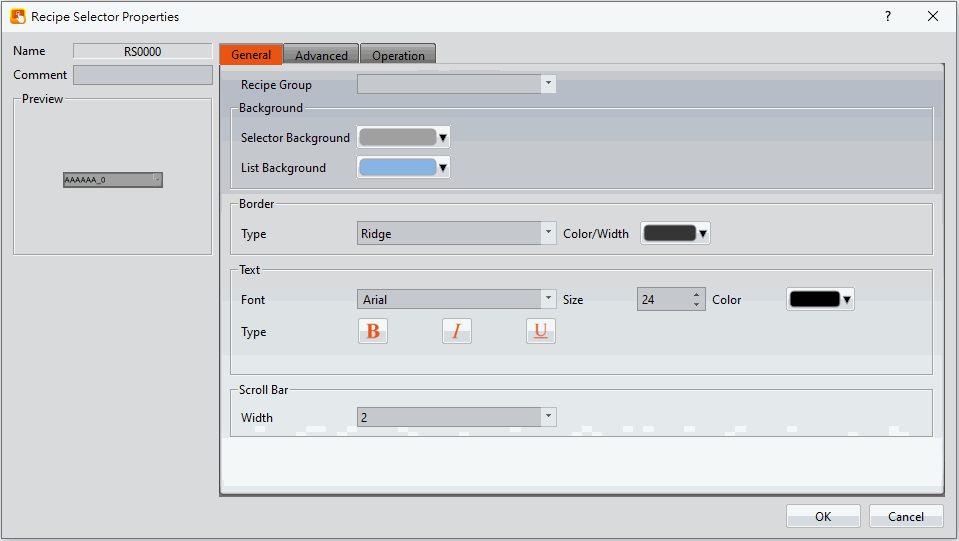
Figure 153【Recipe Selector】Property Setting Screen
Table 70【Recipe Selector】Functions
|
Property |
Description |
|
【Recipe Group】 |
【Recipe Group】 The recipe group ID and recipe group name can be seen here if the user added a new recipe group in the recipe settings function. The【OK】button can only be pressed after the user has selected a recipe group. 【Background】【Background Selector】 Set the background color. 【Background】【List Background】 Set the background color of the list. |
|
【Advanced】 |
【Source】 Set the recipe selector’s souce 【Recipe Name】 Default value. Use recipe name as recipe selector’s data. 【Recipe Recipe(String Type)】 When the recipe parameter has ASCII String type, you can use the ASCII String type parameter as the data displayed of the recipe selector. 【Sort】 Set whether the recipe selector data is displayed in text order. 【Use Filter】 Use filter in dynamic mode, filter the needed options in the recipe selector by specifying the value or text of the【Filter String Address】, for example, the【Filter String Address】is R50, and R50=A, the recipe selector only the recipe group name with "A" text will be displayed |
9.7 【Function Switch】
There are a few functions in the【Function Switch】component related to recipes; users can select these functions according to their needs. Please refer to the following table for detailed introductions to these functions.
The【Function Switch】object can be found in the【Lamp/Switch】category of the【Toolbox】to the right. Please refer to the Chapter19.4.2.4-【Function Switch】for detailed introduction to the properties of this object. The following is only introduction to special properties and functions related to recipes.
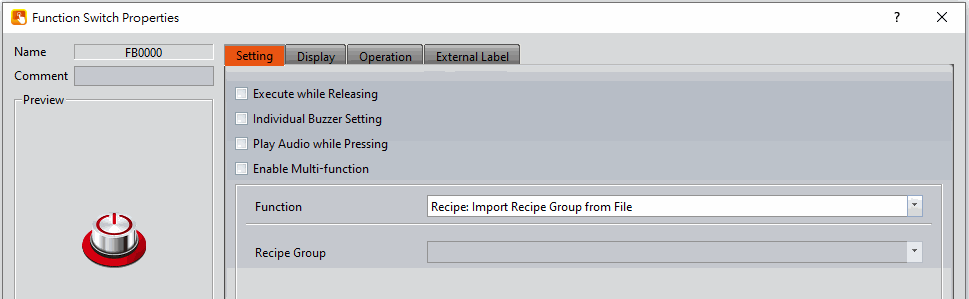
Figure 154【Function Switch】Property Setting Screen
Table 71【Function Switch】Recipe Functions
|
Property |
Description |
|
【Function】 |
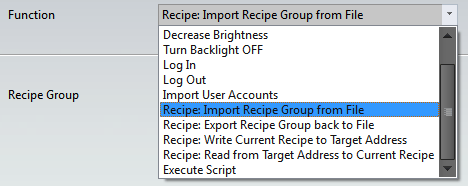
【Recipe: Import Recipe Group from File】 Import the contents of the recipe group file. If a recipe table exists, the user will be able to see complete recipe group contents. If the register addresses of some displayed objects are the same as the current recipe address in the recipe settings, users will also be able to see the value changes of the displayed objects. A drop-down list will appear once this function is used; the user must decide which recipe group to use for this function switch. Note: The current recipe of this recipe group will be set to Recipe No. 0 when this function is used. 【Recipe: Export Recipe Group back to File】 Export the contents of the recipe group into a recipe group file. The user can choose to export a new file or overwrite the original recipe group file. A drop-down list will appear once this function is used; the user must decide which recipe group to use for this function switch. 【Recipe: Write Current Recipe to Target Address】 A drop-down list will appear once this function is used; the user must decide which recipe group to use for this function switch. The parameter value of the current recipe of the HMI will be written to the register of the target address according to the setting of this recipe group. 【Recipe: Read from Target Address to Current Recipe】 A drop-down list will appear once this function is used; the user must decide which recipe group to use for this function switch. The register contents of the target address will be read and the value will be written to the current recipe of the HMI according to the setting of this recipe group. 【Recipe: Add Default Recipe】 Add a set of recipes to or above the current recipe and switch the current recipe to the most recent recipe 【Recipe: Copy Current Recipe】 Copy the the current recipe and put it above or below the recipe you copied. 【Recipe: Delete Current Recipe】 Delete the current recipe and switch the deleted recipe group with the next recipe group. 【Recipe: Transfer Source Address to Recipe Group】 The source address parameter data is written to the recipe group. The source address can be set in the advanced tab of the recipe. The function the entire recipe group data. 【Recipe: Transfer Recipe Group to Source Address】 The parameters of the recipe group are read and written to the source address. The source address can be set in the advanced tab of the recipe. The entire recipe group data is transferred. 【Recipe: Import Recipe group from File, then Transfer to Source Address】 After importing the contents of the recipe group file into the group storage space, the parameter data of the recipe group is read and written to the source address. The source address can be set in the advanced tab of the recipe. This function transfers the entire recipe group data. 【Recipe: Transfer Source Address to Recipe Group, then Export to File】 After the source address data is read, it is written to the recipe group. The contents of the recipe group are exported to the file. The source address can be set in the advanced tab of the recipe. This function sends the entire recipe group data.
|
|
【Recipe Group】 |
Set the corresponding recipe group for this function switch. |
9.8 Example
The following example can allow the users to better understand how to use the recipe functions and components related to recipes.
- Adding a new recipe group in the recipe settings function. This recipe group uses 4 parameters and 3 recipes; please refer to the following figure for details on the settings:
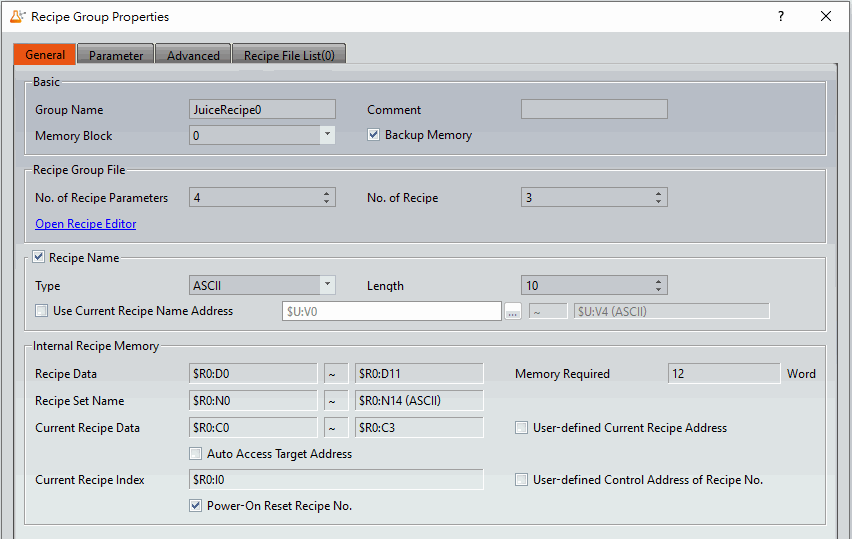
Figure 155 Recipe Settings Example 1
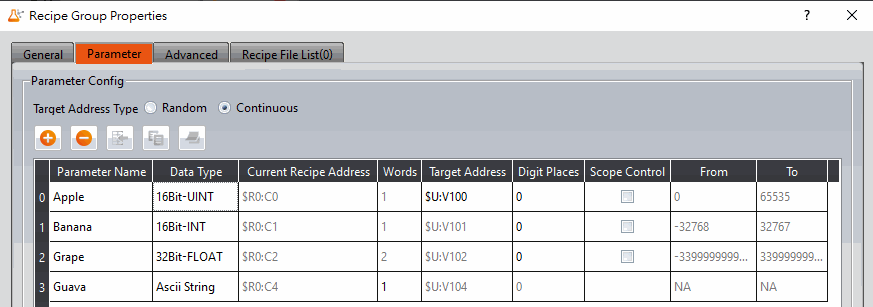
Figure 156 Recipe Settings Example 2
- Press the【Open Recipe Editor】function and the【Recipe Editor】will appear on the screen; the parameter contents inside will be the same as the recipe settings, including the maximum and minimum value that the user will be able to input. Refer to the following figure for editing contents, and remember to save the file when editing is completed; please remember to check【Add to Recipe File List】.
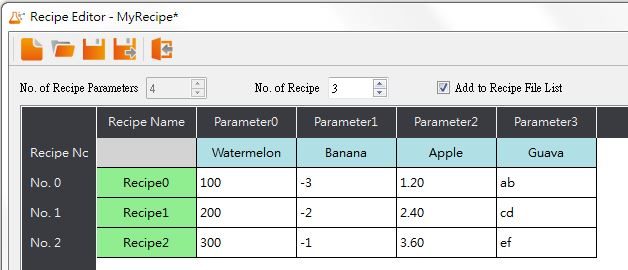
Figure 157【Recipe Editor】Example
- Pull two【Recipe Table】from【Toolbox】to the editing section of the screen, and select (ID 0) MyRecipe0 for【Recipe Group】. Please select【Only Show Current Recipe】for one of the recipe tables and【Show All】and【Allow Input】for the other recipe table.
- Pull a【Recipe Selector】from【Toolbox】to the editing section of the screen, and select (ID 0) MyRecipe0 for recipe group.
- Pull four【Function Switch】from【Toolbox】to the editing section of the screen, and select (ID 0) MyRecipe0 for recipe group. The functions of these four switches are【Recipe: Import Recipe Group from File】, 【Recipe: Export Recipe Group back to File】,【Recipe: Write Current Recipe to Target Address】and【Recipe: Read from Target Address to Current Recipe】respectively. In order to avoid confusion, the text: Import, Export, 2PLC and 2HMI can be added to respective function switches.
- Pull 6【Numeric Input/Display】and 2【Text Input/Display】from【Toolbox】to the editing section of the screen. The【Monitor Address】of these 8 objects corresponds to the【Current Recipe Address】and【Target Address】in recipe settings. The【Data Type】of the【Numeric Input/Display】object is also the same as the【Data Type】of the parameter. Set the maximum value and minimum value of these objects to provide a reasonable range.
- Pull a【Numeric Input/Display】from【Toolbox】to the editing section of the screen. The【Monitor Address】of this object is the same as the【Control Address of Recipe No.】in recipe settings. Please also select【Allow Input】.【Max.】is 2.【Min.】is 0 (because there are only 3 recipes, therefore the values used is 0~2).
- Drag 9【Numeric Input/Display】and 6【Text Input/Display】from the 【Toolbox】to the workspace. The【Monitor Address】of these 15 objects correspond to the【Recipe Data Address】and【Recipe Name Address】of the【Recipe Memory Area】. The【Data Type】of the 【Numeric Input/Display】object should also be consistent with the 【Data Type】of the parameter. Please also set the maximum and minimum values of these objects within a reasonable range.
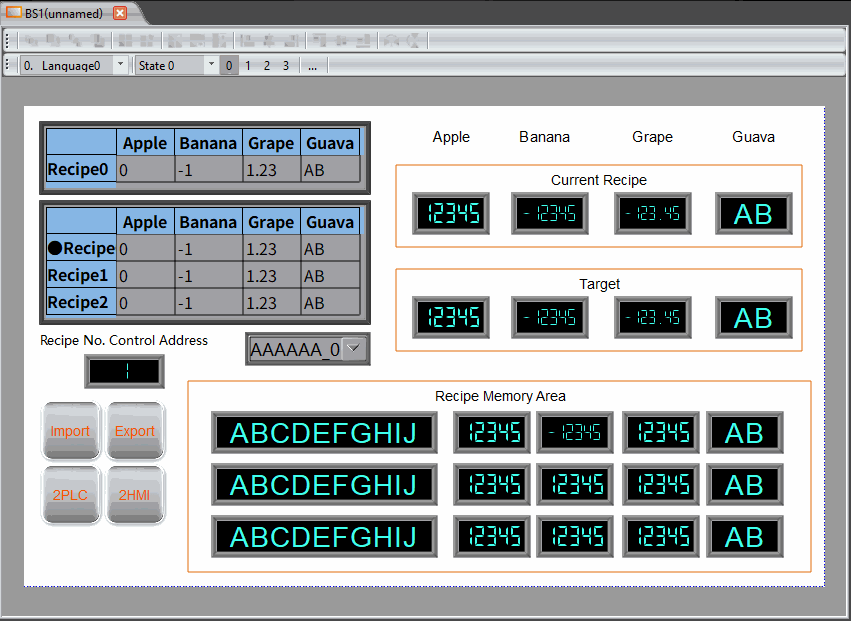
Figure 158 Example Screen
- We can use the【Simulation】function once the project is created to simulate the behavior of this project in the HMI on the computer. Click【Simulation】in the【Project】function tab of the Ribbon. It will ask the user to build the project first before executing the function. The starting simulation screen is as shown below:
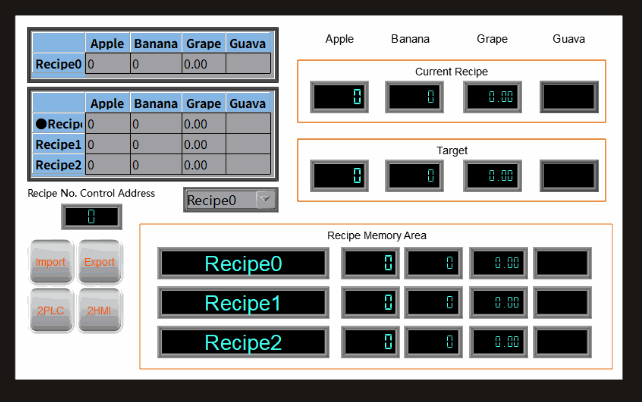
Figure 159 Simulation Screen 1
- Click the import function switch; this operation will read the contents of the recipe group file into the HMI, including the current recipe and recipe table. If the monitored addresses of the displayed objects are the same as the current recipe address of the recipe settings, the displayed numeric value or text will changes accordingly. The contents of the recipe selector will also change accordingly. The current recipe will be reset to Recipe No. 0 every time a file is imported, so the contents of the recipe selector will be the Juice1 with a number of 0. During this time the screen will be displayed as follows:
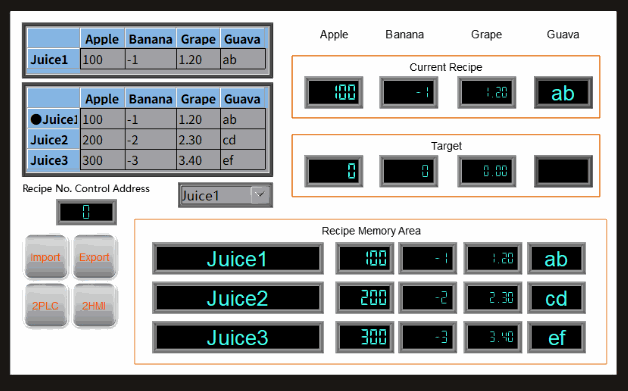
Figure 160 Simulation Screen 2
- Change the numeric input of the Control Address of Recipe No. 2 and the current recipe will change to Juice 3.
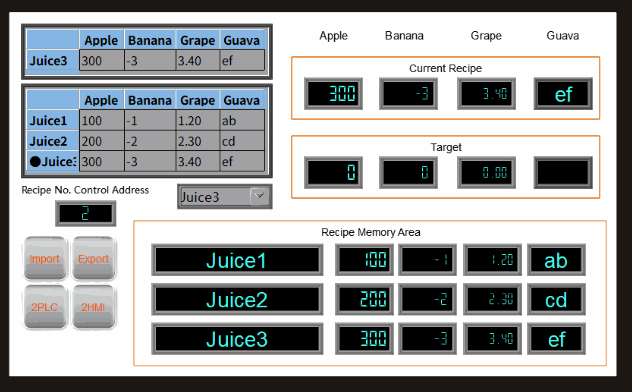
Figure 161 Simulation Screen 3
- Click on the 2PLC function switch; this operation will write the data contents of the current recipe into the register of the target address (usually the controller). It can be observed that the displayed objects in the target area are also the parameter data of Juice 3 after clicking the switch.
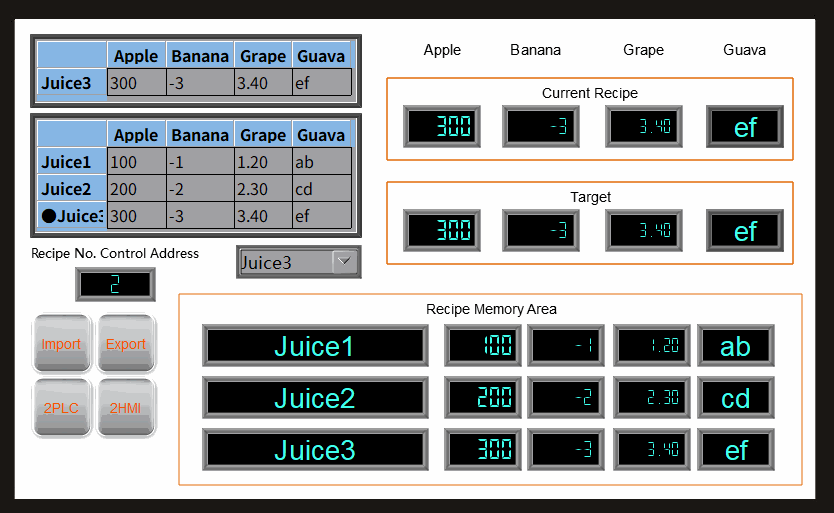
Figure 162 Simulation Screen 4
- A keypad will appear allowing the user to input a numeric value once the apple field in the recipe table below is clicked. Enter 400 and press OK. It can be observed that the displayed objects for the recipe table and current recipe also changes to 400.
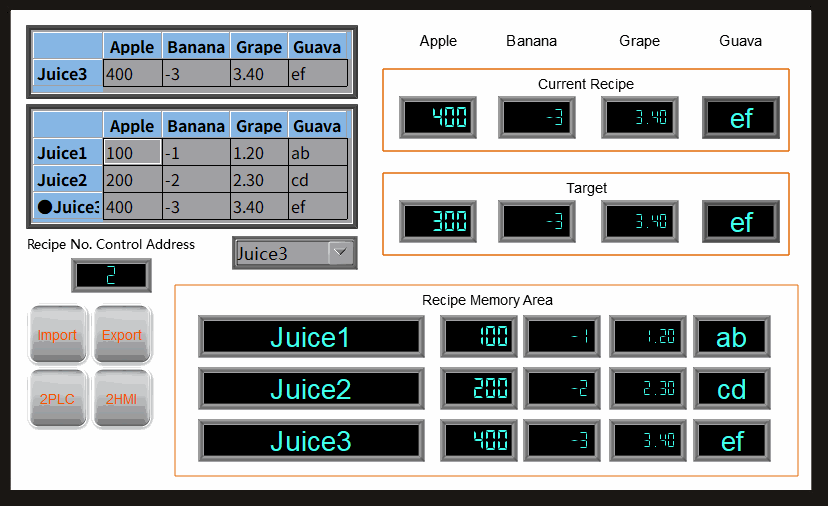
Figure 163 Simulation Screen 5
- Click the Export function switch; this operation will export the parameter contents of this recipe group in the HMI onto the original file. Because we changed the apple parameter data of Juice 3, the recipe group file will also save the changed data.
- Click the 2HMI function switch; this operation will write the contents of the target register back into the current recipe of the HMI. At this time, it can be observed that the value of the apple parameters of Juice 3 for the current recipe and recipe table changes back to 300.
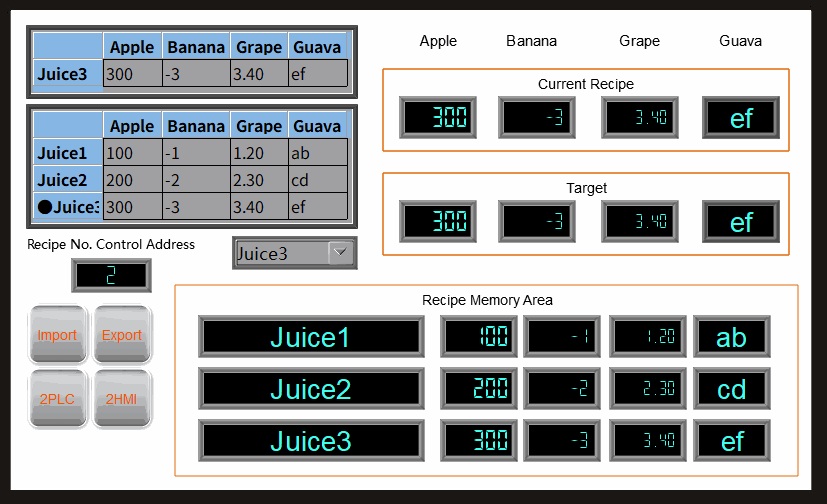
Figure 164 Simulation Screen 6
- Click the Import function switch and it can be observed that the apple parameter of Juice 3 changes to 400 again. This is because we used the export function before, so the contents of the file have also been changed. However, because the file was imported again, the number of the current recipe was reset to Recipe No. 0, so the current recipe will show the data of Juice1.
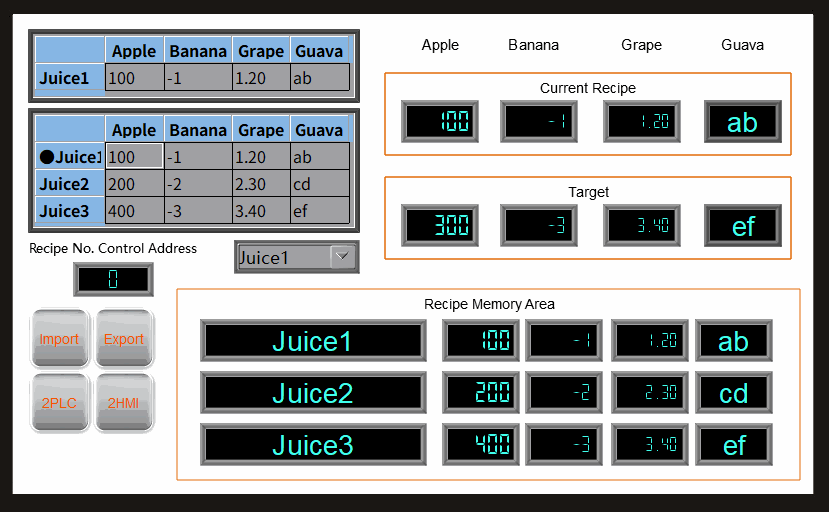
Figure 165 Simulation Screen 7
Tip: press ← → to switch chapters, Ctrl+K to search